
Add a kiosk clock
Instructions for creating a new kiosk clock.
In this guide, you'll find step-by-step instructions on creating a kiosk clock.
Step 1: Configure clock's general settings
To start with creating a kiosk clock, from the left-hand navbar in your Web App, navigate to the Clocks section and select the Add New Clock button.
PERMISSIONSYou may add a new clock if you have the Add new clock permission enabled for your role in Administration () > Role Permissions > Clocks.
In the General settings page that opens next, fill in the following details:
- Add a Clock name.
- Add one or more Assigned job sites. The first job site you add will be marked as
Main, but you can then mark another job site as main from the three-dot menu. - Select Create clock to save the changes and add the clock to the list of kiosk clocks.
When you complete these steps, the clock is created and you are taken back to the Clock details page where you can activate the clock as well as configure additional settings.
NOTEIf your MobiClocks environment is converted to an enterprise structure, the clock is also assigned an org unit, which is the org unit of the main job site. The org unit unit is updated automatically according to the main job site. See Edit a Kiosk clock for more details.
Step 2: Activate the clock
Clock activation is the process of linking your Kiosk App to the newly created kiosk clock to connect the app to your MobiClocks environment. See Kiosk clock for more details.
PERMISSIONSYou may activate a clock if you have the Activate clock permission enabled for your role in Administration () > Role Permissions > Clocks.
Follow these steps to activate the clock:
- In the Clock details page, select the Activation code button.
- Apply the activation code from the dialog box in your Kiosk App. Note, that if you close the dialog, the code becomes invalid and you need to generate it again. When you open your Kiosk App the first time after installing it, you see an authentication screen where you need to add a Company and an Activation code. Add the name of your MobiClocks environment (if the URL of your MobiClocks environment is https://mycompany.mobiclocks.com, "mycompany" is the name of your environment) to the Company field and the clock activation code to the Activation code field.
- After authenticating through Kiosk App and thus activating the kiosk clock, refresh the Clock details page in your Web App. The clock's Status toggle should be active now.
The following screenshot shows the authentication screen of Kiosk App.
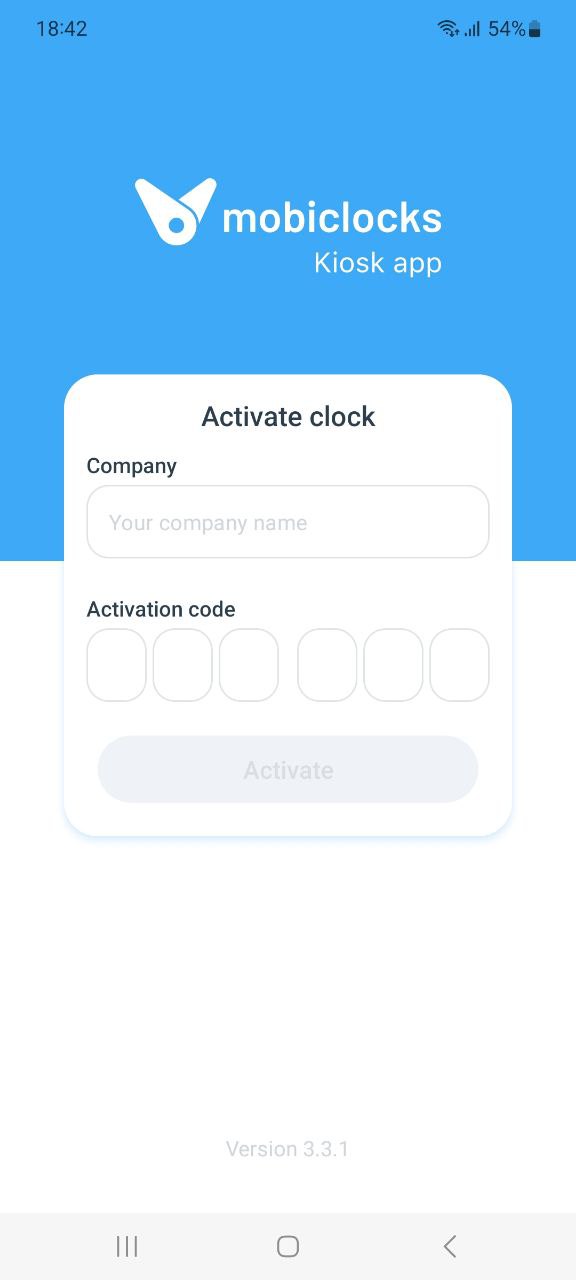
Kiosk App authentication screen
Step 3 (Optional): Configure additional settings for the clock
The Clock details screen contains a few additional settings that you can review and modify if needed before finalizing the clock setup. The following options are available:
- Notes. A text area for attaching notes to the clock.
- Geofence lock. If this setting is enabled, employees are not able to punch if the clock, that is the device with the connected Kiosk App, is beyond the job site's geofence zone. See Geofence zones for more information on geofence zones and how they are set up.
- Liveness Detection. The setting is visible if Face Liveness Check is activated from Administration () > Settings > Punch and Timelogs. If the toggle is enabled, face liveness detection is applied on punches made from Kiosk App connected to the given clock.
- Roaming. If the setting is enabled, the clock can be used at any of your job sites.
- Sunglasses/Face mask. Using this setting, you can have the system detect if an employee wears sunglasses, a face mask, or anything else that covers the employee's face during the punch. If anything is detected, the employee is asked to remove it and try punching again.
Updated about 1 year ago