
Manually create an employee
Creating an individual employee profile manually.
This guide provides step-by-step instructions for manually creating an employee profile.
Create a new employee profile
In your MobiClocks Web App, navigate to the Employees tab of the left-hand navbar and select the Add new employee button.
PERMISSIONSYour role needs to have a Create new employee permission under Administration > Role Permissions > Employees to be able to create an employee.
NOTEIf Employee Manual Creation is not activated for your MobiClocks environment in Administration > Settings > General, the Add new employee button will not be available.
Apply an employee template (optional)
Instead of filling in fields manually, you can apply an employee template to prefill them.
NOTEIf Employee creation templates is not activated for your MobiClocks environment in Administration > Settings > General, the template panel won't be available.
In the Configurable templates panel, search for a template or browse the Shared templates and Personal templates lists. Select the eye icon on a template to preview its fields, or select Apply to populate the employee profile with the template's values.
If you apply a different template afterward, only the fields the new template carries are overwritten. Manually entered First name, Last name, and Employee number values, along with any field the new template doesn't carry, are preserved.
Select a role
Select the employee's role from the list of available roles. What roles are available depends on your setup in Administration > Settings > Role Permissions.
Select an organization unit (visible based on configuration)
Next comes the Organization Unit field where you select the organization unit that the employee is assigned to.
VISIBILITYYou’ll see the Organization Unit field only if your MobiClocks environment is converted to an enterprise structure.
PERMISSIONSYour role needs to have an Assign to organization unit permission under Administration > Role Permissions > Employees to be able to assign employees to organization units.
Add an employee name
Next, fill in the First name and Last name fields.
Select a company
Assign the employee to a company using the list of available companies.
NOTEIf your environment is converted to an enterprise structure, the list of companies is filtered based on the selection of an organization unit done in Step 3 of this guide.
Add an employee number
Further on, you have the employee number, which is a unique identification number assigned to each employee. There are two methods for specifying employee numbers:
- Generated automatically
- Entered manually
Which method is applicable for a given employee, depends on the Employee Number Policy setting of the employee's company configured in company details.
Fill in the rest of the profile information
- Pay group. The following options are available:
- Hourly. For employees compensated based on the actual number of hours worked, with pay calculated at an hourly rate.
- Salary. For employees receiving a fixed annual compensation divided into regular pay periods, regardless of exact hours worked.
- Salary Actual. For salaried employees whose compensation is precisely calculated based on the specific hours they have completed in each pay period.
- Pay class. Employee pay classes are individual wage classifications imported from third-party integrations. Unlike job site pay classes, these classifications are assigned directly to employees and follow them across all projects. Pay class history is also available to show all the past pay class assignments and their effective dates. Note that pay classes imported from third-party platforms may not be edited. Employee pay classes are set up in Employee Setup.
- Default cost code. Assign a default cost code to the employee. See Cost coding to learn more.
- Comp code. This is a compensation code that insurance companies use to estimate rates based on the risk level of work that employees are performing.
- SS number. The last four digits of the employee's social security number, which is required as part of federal or federally-assisted construction projects. This field appears if certified payroll is enabled for your MobiClocks environment.
- Email and Phone Number. Here you can specify employee's email and phone number, which are also used to activate the employee's user account.
- Address. Specify the employee's address.
- Job title and Department. The options for these fields are defined in Administration > Settings > Employee Setup. If no values are specified for these fields, they aren't shown in Profile info.
- Work classification. Work classification refers to the categorization of employees based on their job duties, skills, and responsibilities on federal or federally-assisted construction projects. This field appears if certified payroll is enabled for your MobiClocks environment. Available classifications are set up in Administration > Settings > Employee Setup.
- Skill tags. You can assign skills to the employee. The list of available skills is specified under Administration > Tag Management > Employee Skills.
- Crews. View the employee's crew tags crew tags if any. Crew tags are assigned to employees from the job site's employees section.
- Preferred language. The language used for messages sent to the employee, such as consent requests, account activation, one-time passwords, password resets, and workforce notifications. Select English or Spanish, or leave the default No preference, which sends both languages when a Spanish version of the message exists. If the employee selects a language in Personal App, this field updates to match. The field applies to messages only and doesn't change the Personal App interface language. It's available for employees, while back-office users always receive English.
- User defined fields. Here, all the custom fields added for your environment under Administration > Settings > User Defined Fields > Employee. are shown.
Configure general settings
Non eligible for rehire
If this setting is activated, you are not able to re-activate the employee profile if it has been disabled. See Manually create an employee for more information on employee profile status.
Ignore job site hours policy
This setting allows an employee to punch at any job site regardless of the job site's working hours policy. The same setting is available in the job site employees section to configure this rule per specific job site.
NOTEIf the Ignore job site hours policy is activated
- It prevents the Auto-adjust punches to work hours setting from being applied if it's enabled in the job site's working hours policy settings.
- The Lock hours option in the job site's working hours policy settings must be turned off so that employees are able to punch outside of working hours.
Other important behavior to note:
- When an employee is first assigned to a job site, the system automatically applies the employee profile's Ignore job site hours policy setting to that assignment. This setting can be modified later in the job site employees section.
- For existing job site assignments, changes to the Ignore job site hours policy setting in the employee profile will not affect the existing assignments. By default, the setting in the job site employees section takes precedence. However, if you select the Update all job site level settings option when applying the setting, the setting in the employee profile will override all the job site-level settings for the employee's current and future job site assignments.
Configure User account settings
- GPS tracking. Enable or disable GPS tracking for the individual employee. See GPS to learn how GPS tracking works and is configured. The GPS tracking settings in the employee profile becomes available if GPS tracking is enabled in Administration ().
- Allow personal app punches. Let employees punch into and out of the job site using their personal app.
- Cost code on punch out. The employee will be asked to cost code all the timelogs on punch out.
- Geofence lock. If the option is enabled, the employees will only be able to punch into a job site if they are within the job site's geofence lock. See Geofence zones for more information.
- Roaming employee. Employees are able to punch into any job site regardless of the job sites assigned to them. In addition, roaming employees can punch regardless of the job site's working hours policy.
NOTEIn this section, you configure user account settings that will be applied later on when creating a user account. See Account and access for more details on creating a user account.
Assign job sites
In this section, you can assign a job site to the employee as well as view the complete history of past job sites.
To assign a new job site, select the Assign job site button in the upper right corner of the screen, select a job site from the dropdown list, and select Save.
PERMISSIONSThese settings will be visible to you if your role has the Assign/unassign to job site(s) permission activated under Administration > Role Permissions > Employees.
If your organization is converted to an enterprise structure, users can only view and access job sites within their organization unit.
The following screenshot shows the dialog box where you can search for job sites and assign them to employees. There is a RECENTLY WORKED section that displays the job sites that the employee has worked at recently.
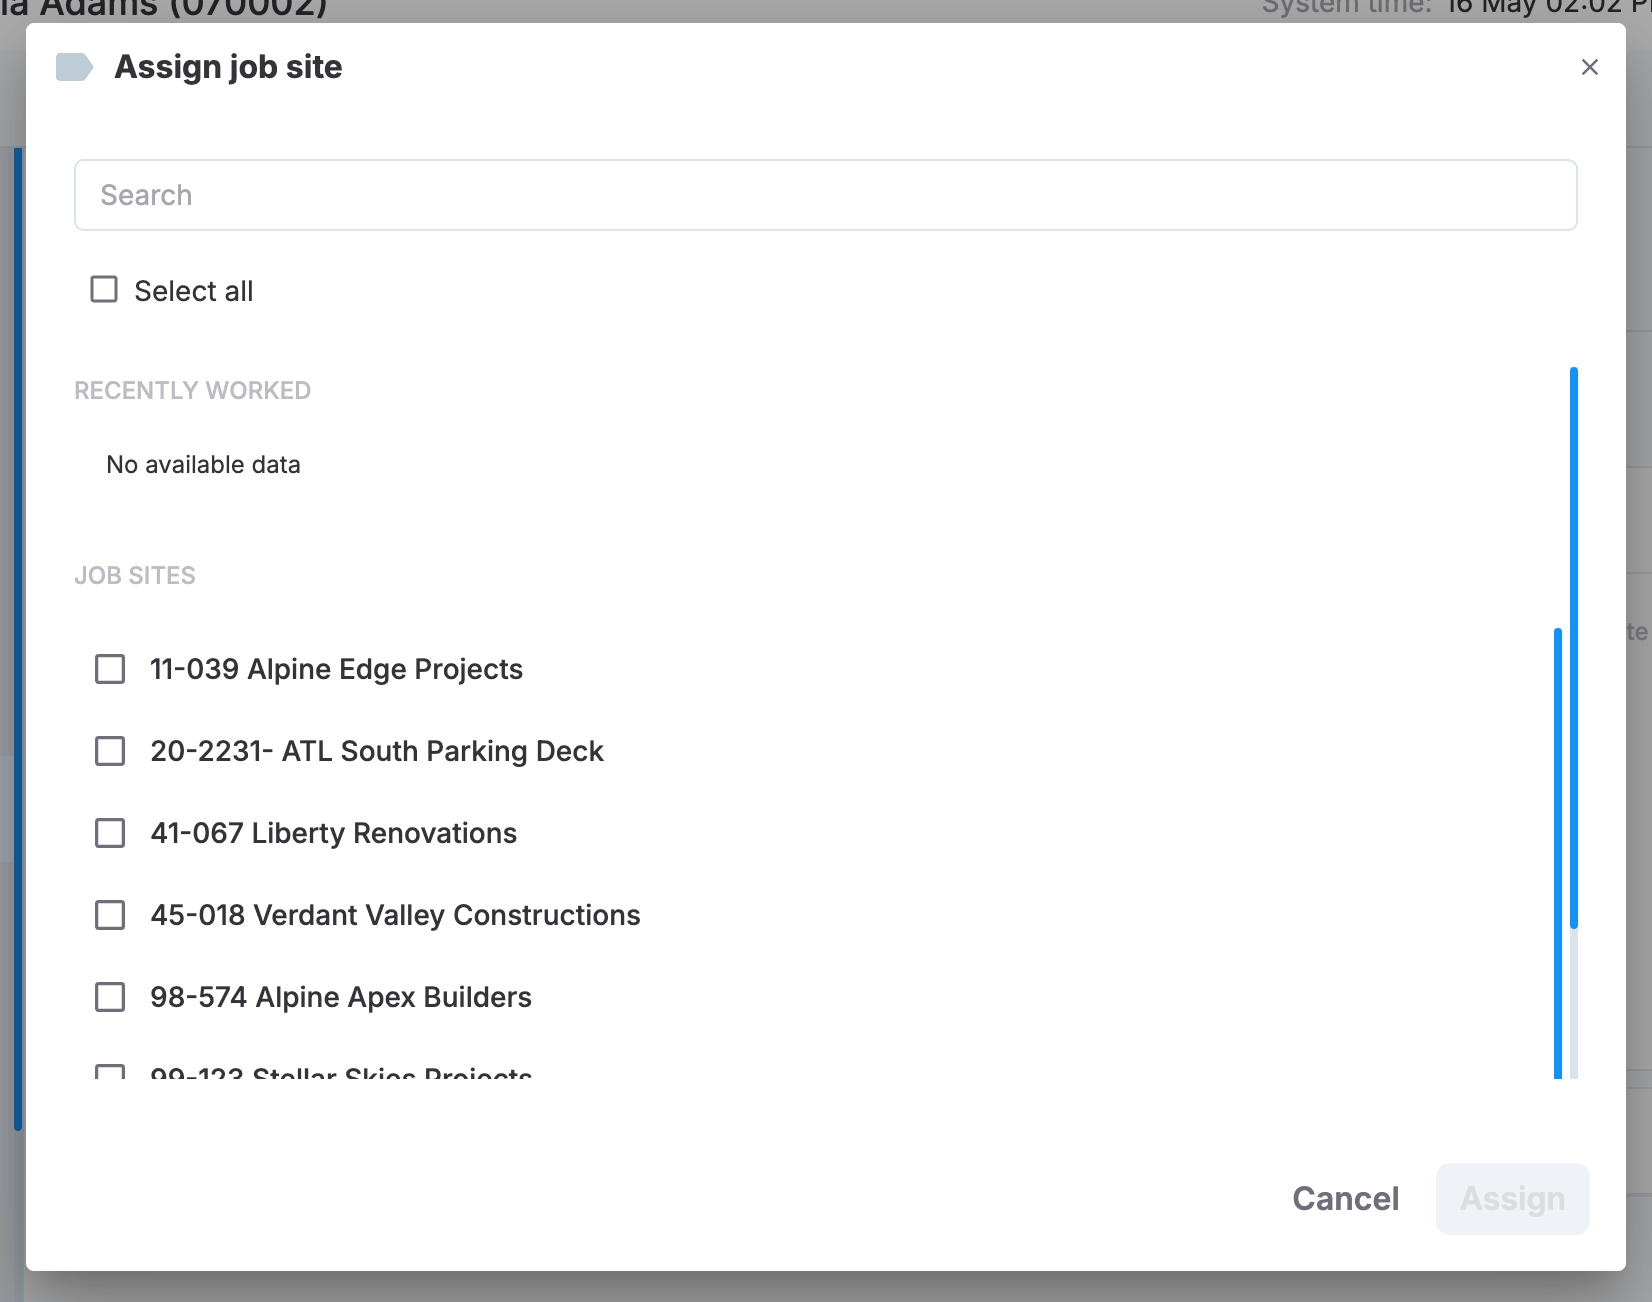
Job site selection
Add a profile picture (optional)
There’s also the profile picture field, which is optional. So, you can create an employee without adding a profile pic, but you won’t be able to activate the employee profile without a profile pic.
NOTEThe profile picture also serves as a base for face recognition. Therefore, if you're using face recognition as part of your employee identification process, make sure employee profile picture are clean photos with clear backgrounds and don't contain sunglasses.
If the profile picture contains sunglasses, the system will not let you upload the photo.
Finalize the setup
When you’re done, select the Create Employee button at the top to create the employee entry. As soon as the employee is created, you’ll be taken to the employee’s newly created profile, where you’ll see some additional details under Profile Info.
Employee activation
By default, the employee profile has a Draft status. You’ll be able to activate it as soon as you fill in all the required fields and add a profile picture. If the requried fields and profile picture are set prior to selecting the Create Employee button, the status will change to Active automatically upon creating the profile.
Draft employee profiles can be deleted using the Delete employee option.
PERMISSIONSYour may delete a draft employee profile if you have the Send employee activation link permission enabled under Administration > Role Permissions > Employees.
If the employee profile has a Draft status and doesn't have a profile picture, you can send an activation link to the employee and request to upload a profile picture. See Add a profile picture to learn more.
PERMISSIONSYour may send activation links if your role has the Send employee activation link permission enabled under Administration > Role Permissions > Employees.
The option is available under the profile picture area, as shown in the following screenshot.
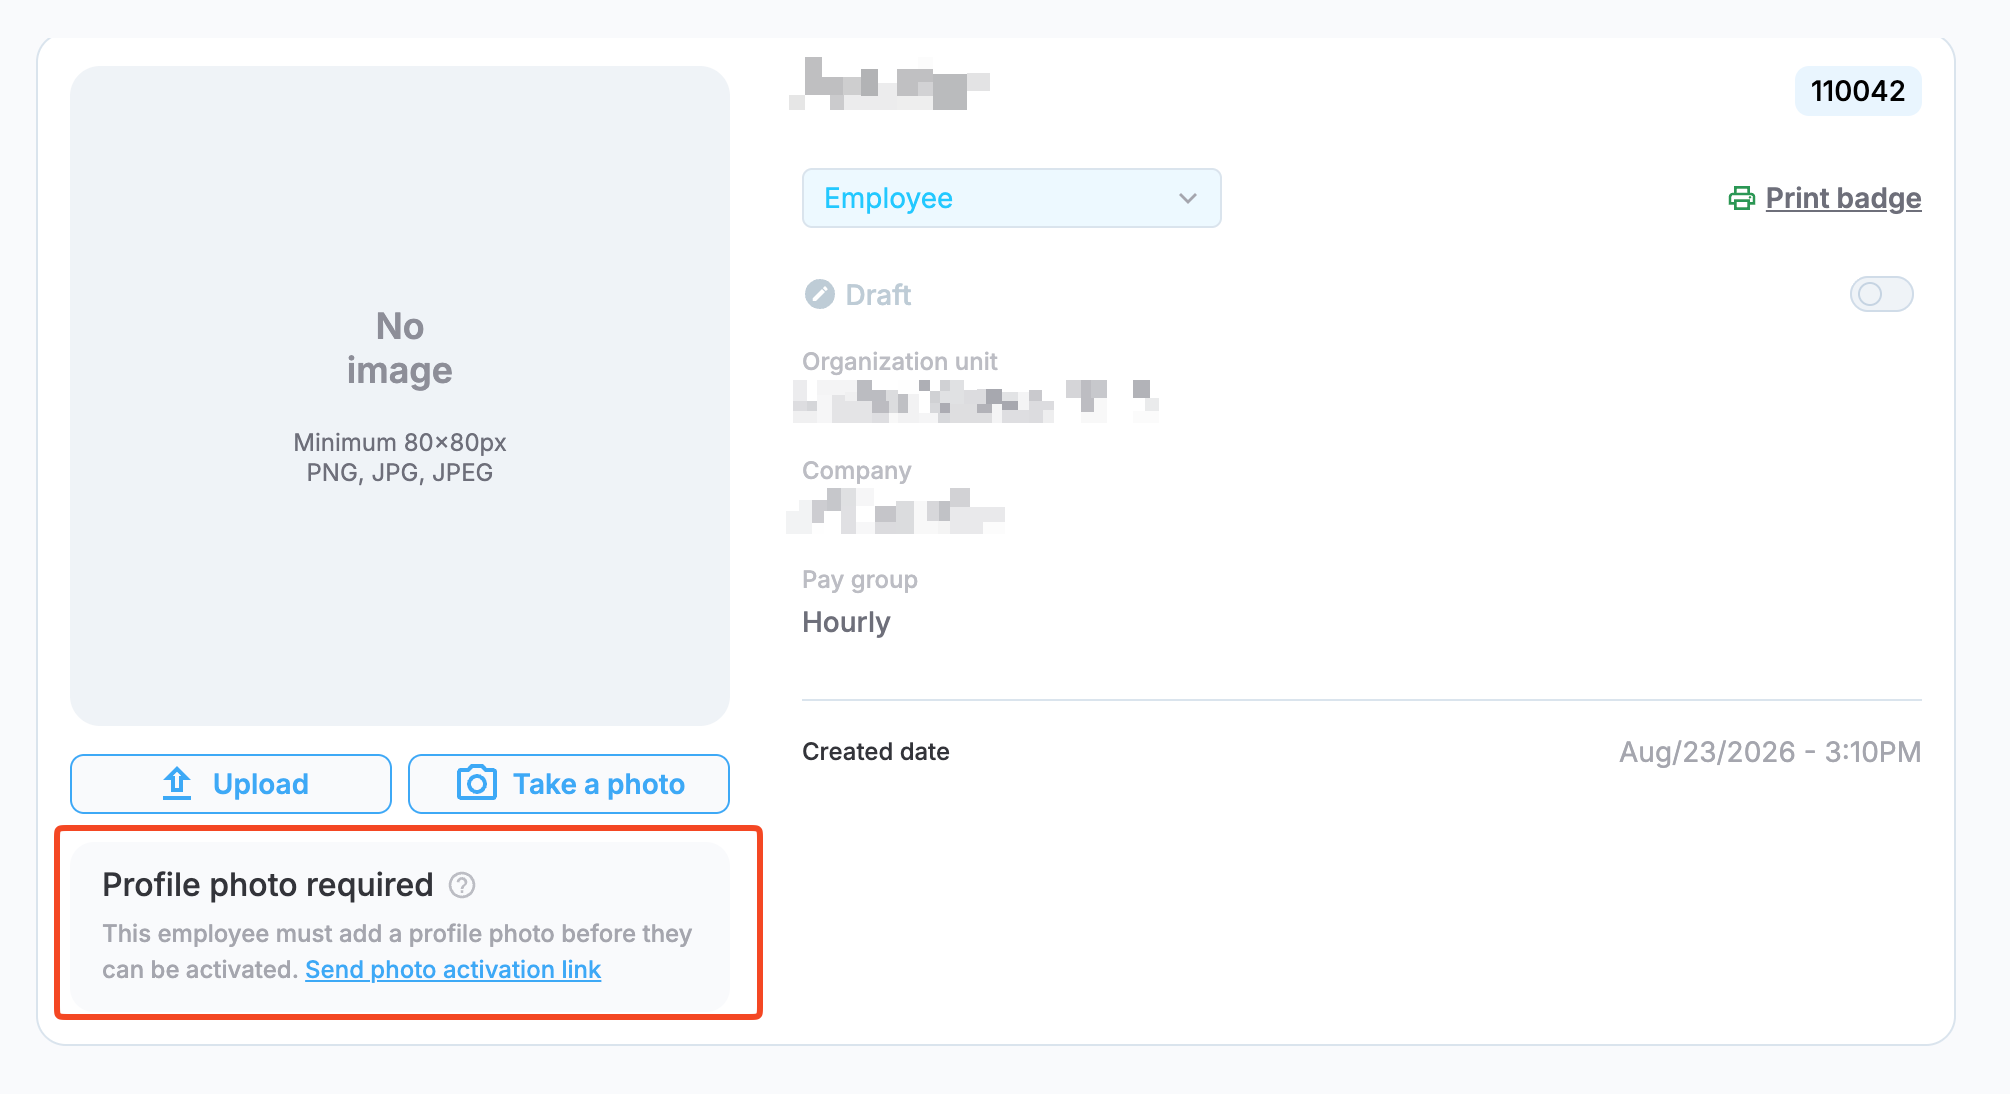
Activation link
The activation link (expires in 72 hours) can be sent either via email or sms if the employee has a phone number indicated. The following screenshot shows the dialog with the two possible methods.
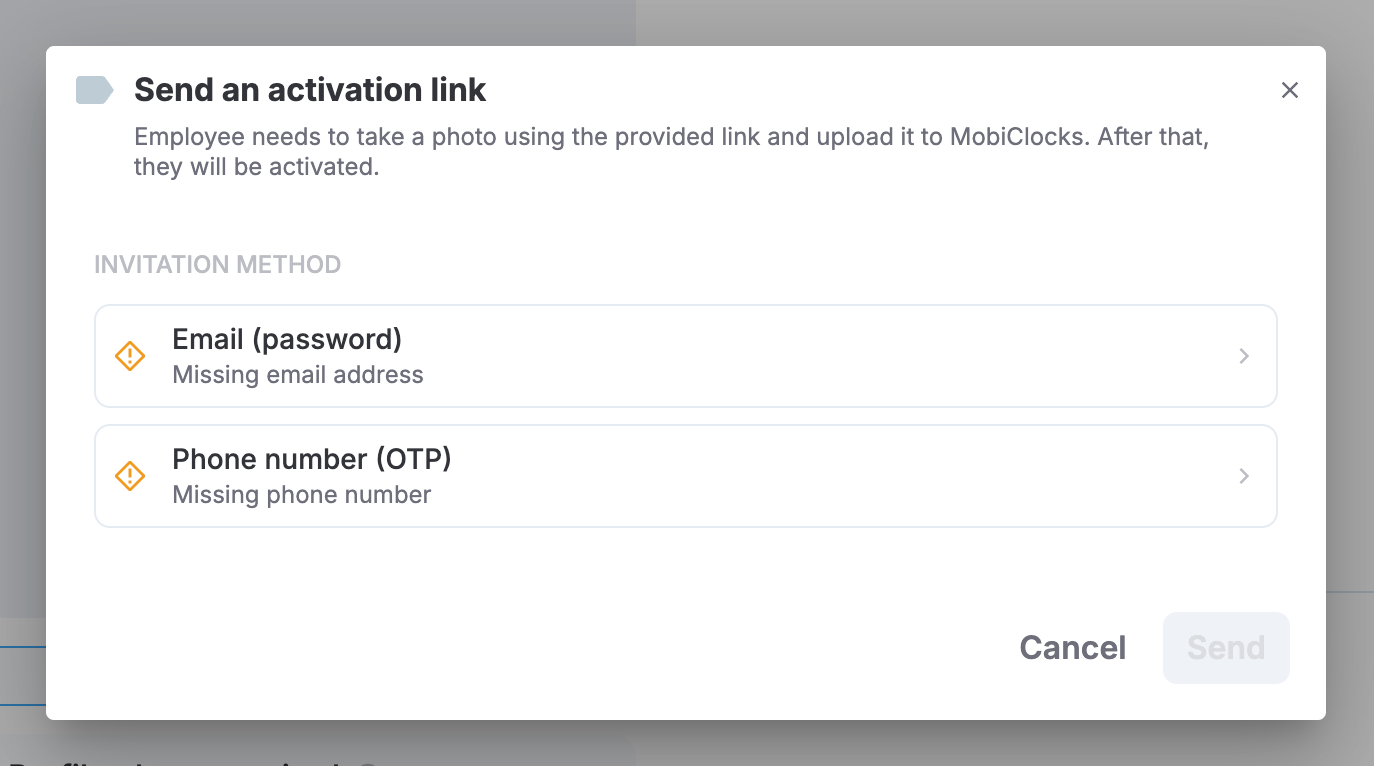
Activation dialog
Choose the preferred option and select Send. After you send the activation link, you can track when at was last send as well as resend it, as highlighted in the following screenshot.
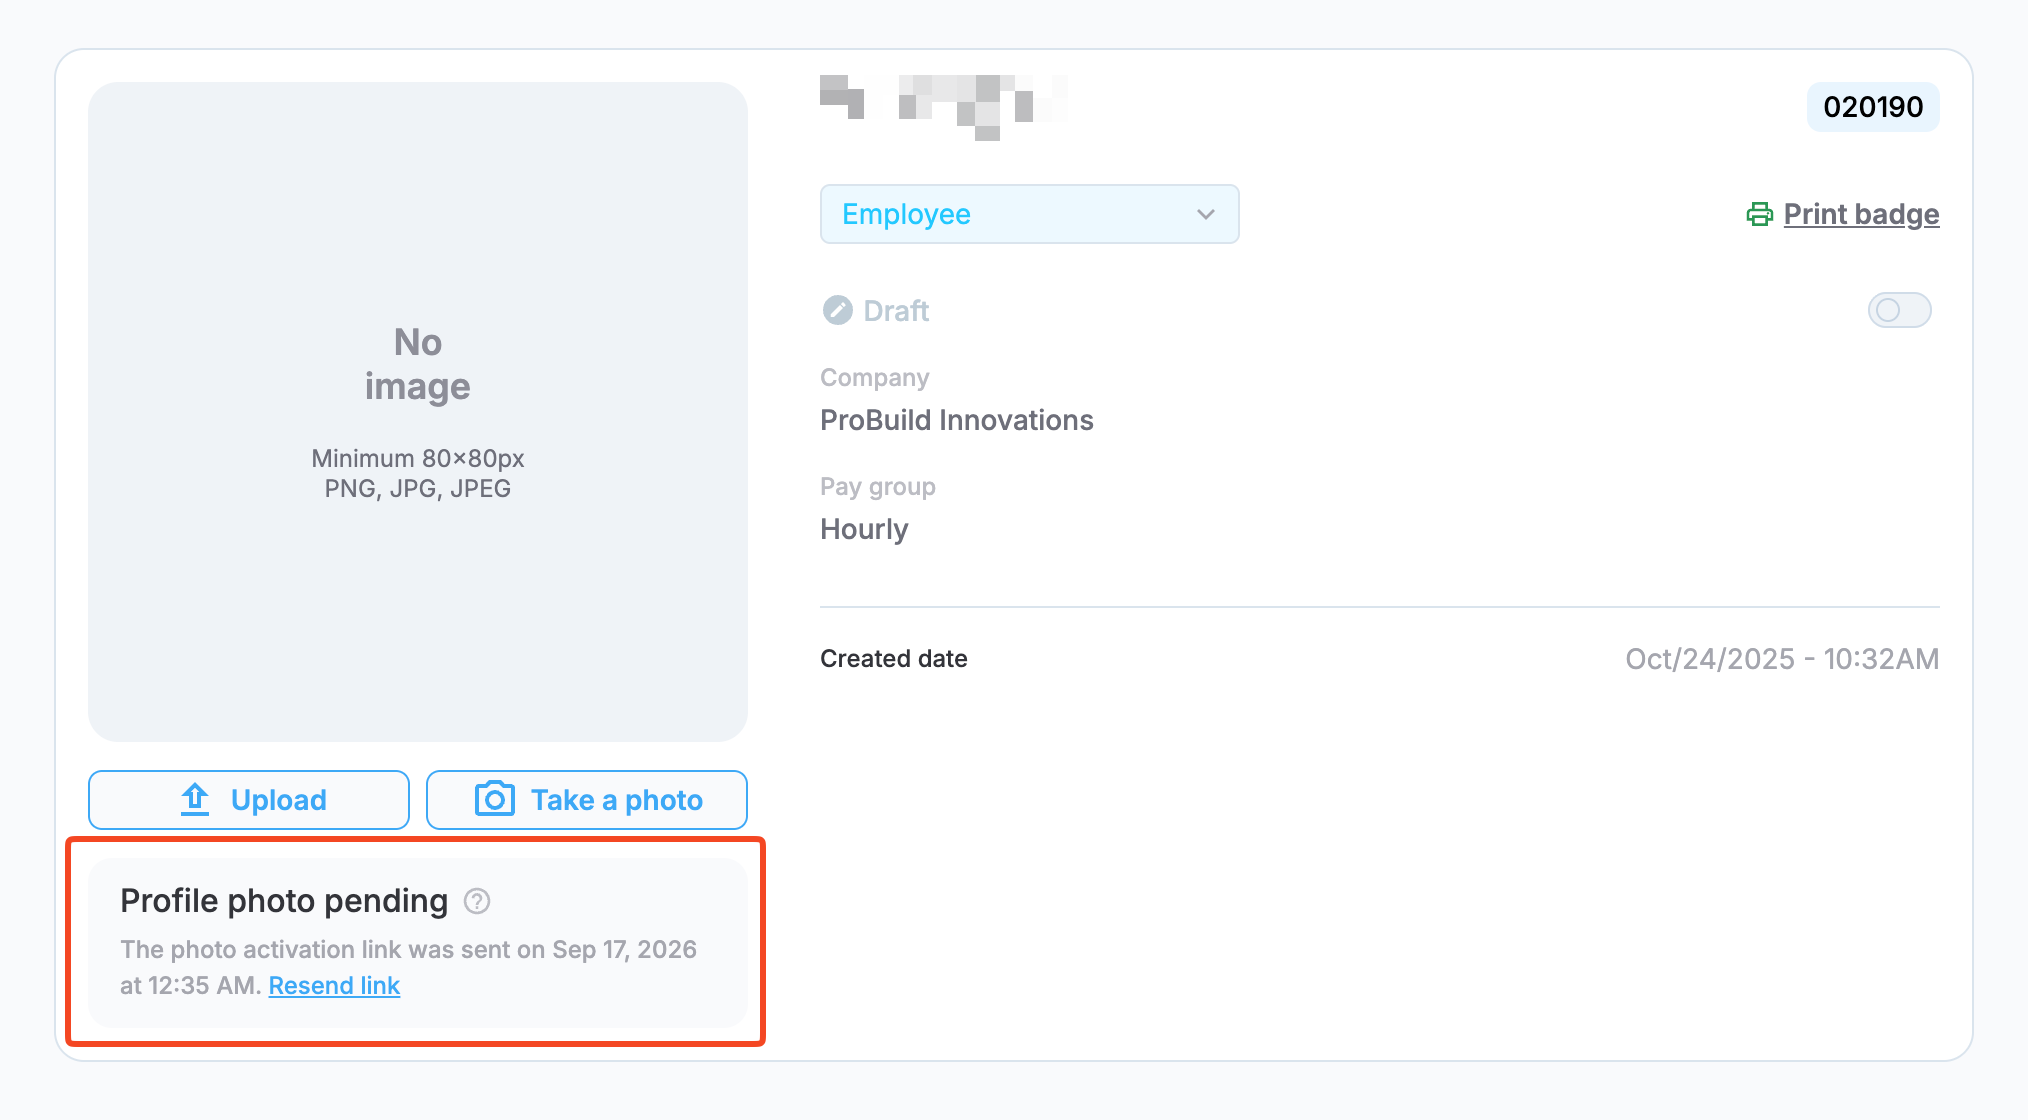
Activation link sending status
After the employee selects the link in the message, they are taken to a new screen where they are asked to take a photo of themselves and submit it.
NOTEFace detection is applied when taking a photo, and the system doesn't allow to upload the image if no face is detected.
As soon as the image is submitted, it is uploaded to their profile, which in turn becomes Active.
NOTEThe profile is not activated if a similar employee is identified in your environment. You have the option to disable the similar employee profile to active the current profile.
Updated 21 days ago