How integrations work
How integrations are hosted, how data sync and import works, and more.
MobiClocks integrations are connected and configured from the Web App under Administration > Integrations.
PERMISSIONSYou may enter the Integrations page if you have the View "Integrations" tab permission enabled for your role in Administration () > Role Permissions > Administration.
In the Overview section of Integrations, you have the whole list of available integrations and can see which one is activated and which MobiClocks modules are available for syncing or publishing.
Each integration entry has a Sync and Publish columns:
- The Sync column shows which MobiClock modules can be synced with the integration and import data from it.
- The Publish column shows what data can be published from MobiClocks to the integrations.
The following screenshot shows the Overview page with different integration entries.
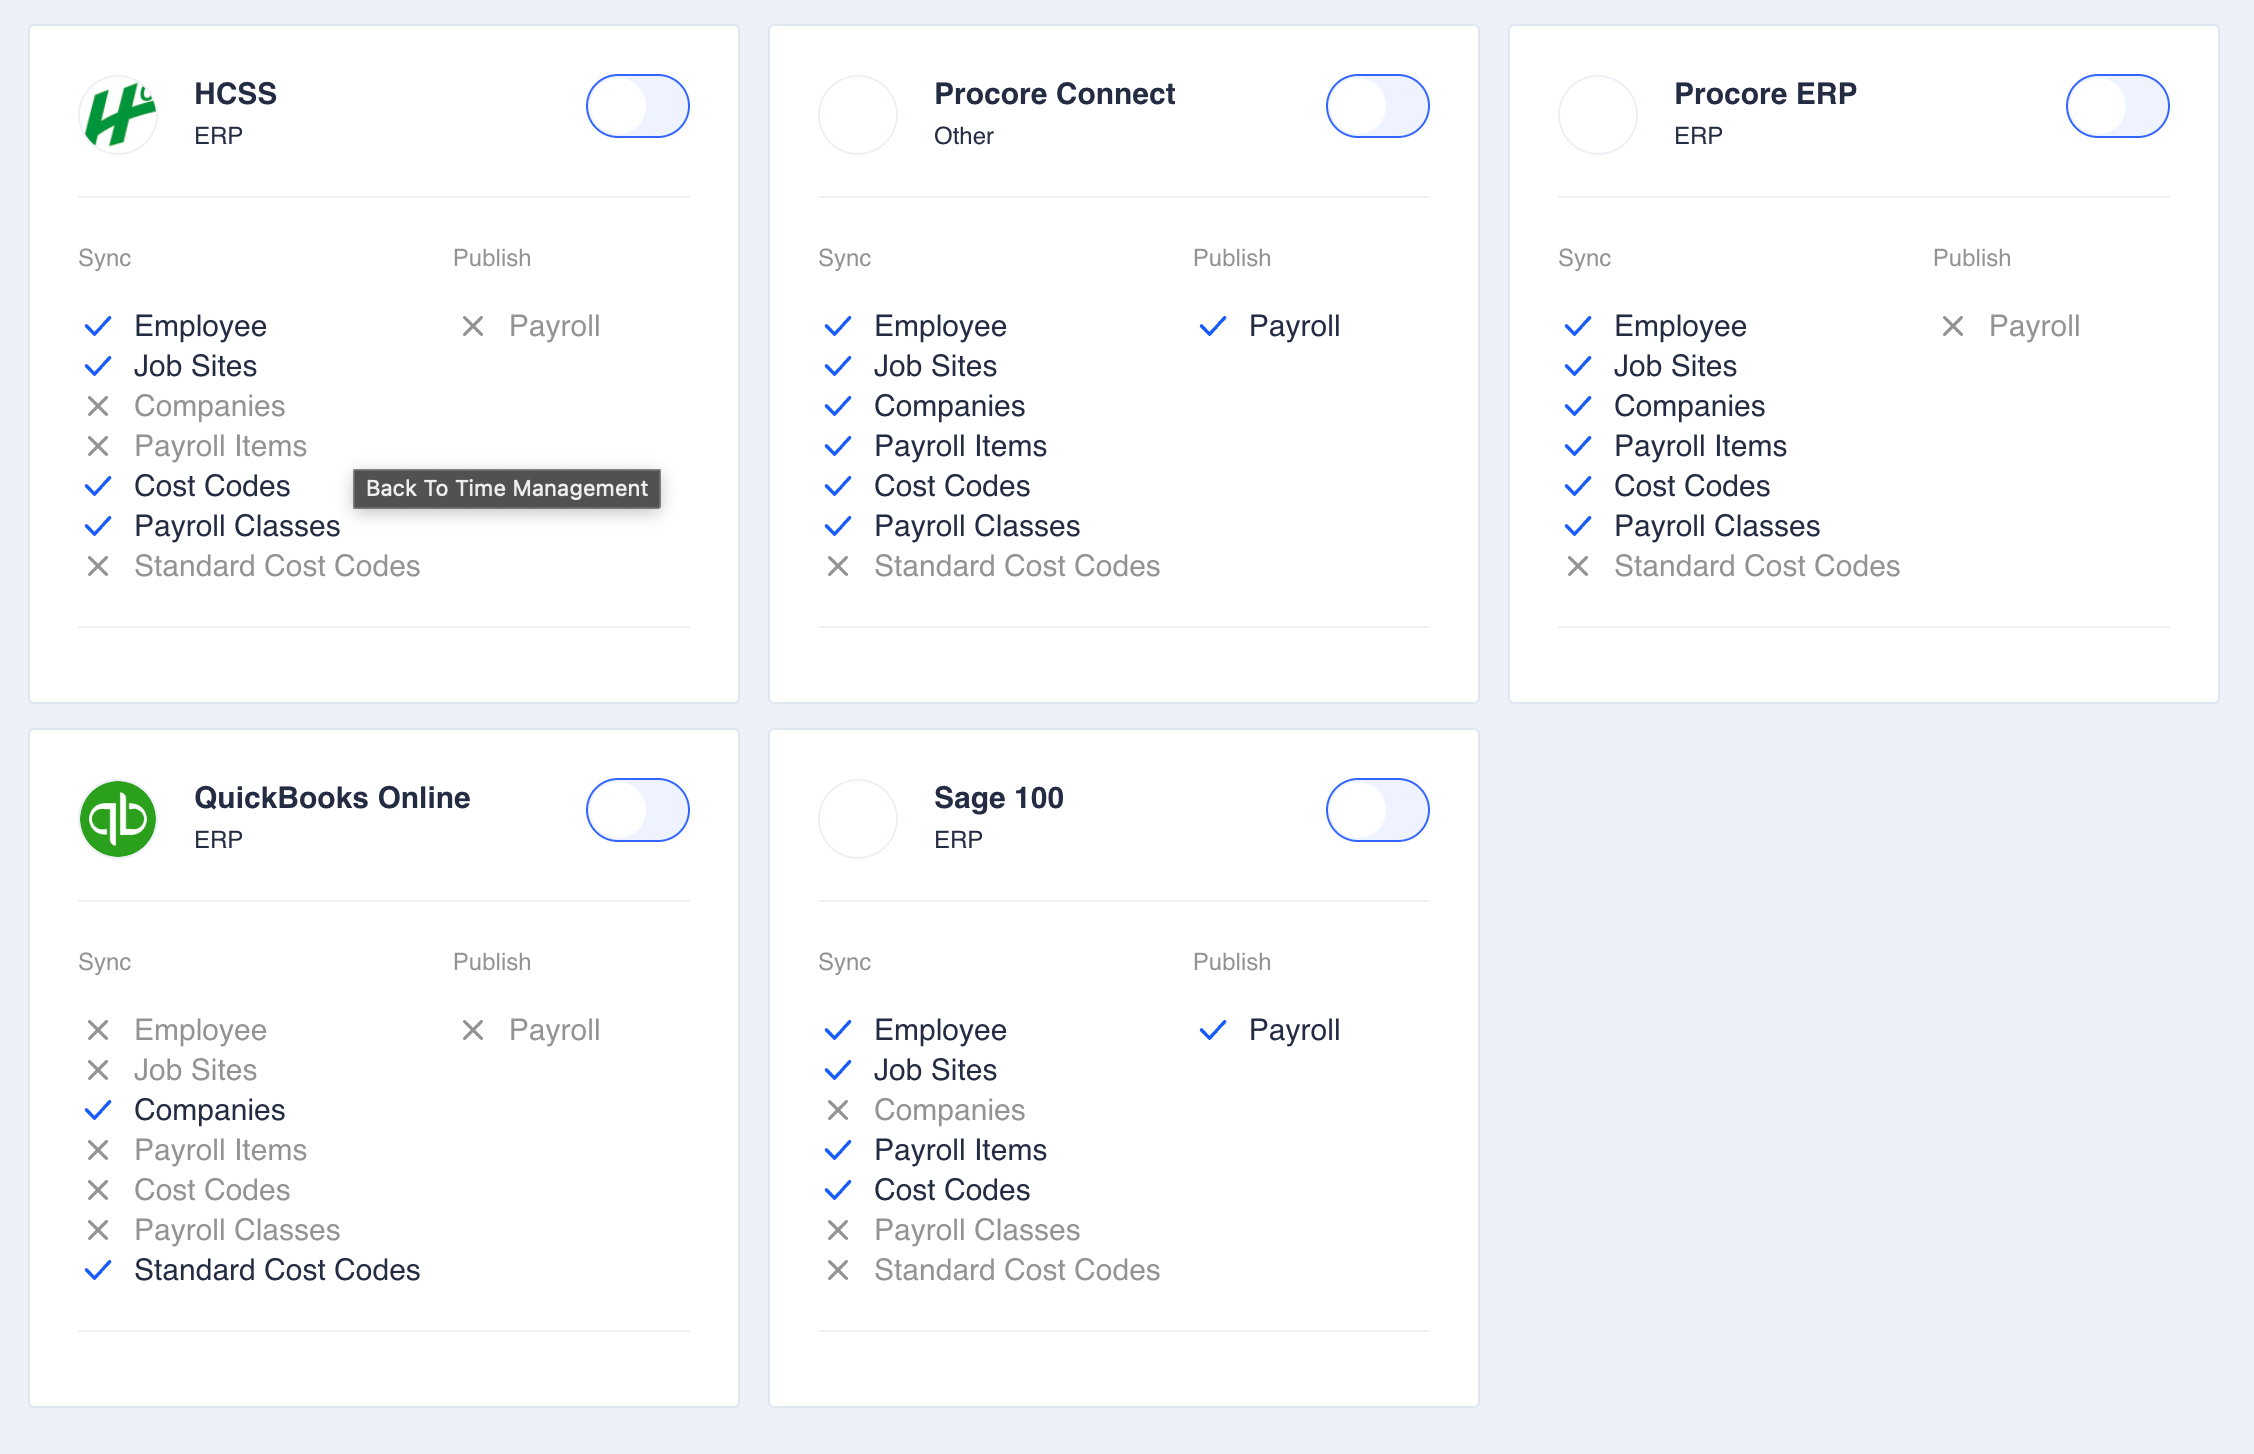
Integrations overview
Thus, Sync is the process of transferring data from an integration to MobiClocks, while Publish is the process of sending data from MobiClocks to an integration.
NOTEWhen you sync with a third-party platform, it becomes a source of truth for your data. Therefore, you can sync with only one platform at a time. In contrast, you can publish data to multiple integrated platforms.
Data syncing and publishing are discussed in greater detail in the following sections of this article under Data sync and import and Payroll publishing, since only the Payroll module is supported for publishing.
Integration hosting and setup
MobiClocks integrations are either cloud-based or hosted on-premises (the software needs to be installed on your device). The setup and connection process is different for each platform, and, In some cases, you need to involve the MobiClocks team to set up the integrated software and connect it to MobiClocks. You can find more details on hosting and setup for each integration in its respective article. The list of the available integrations with links to their respective articles is available in the integrations overview topic.
PERMISSIONSYou may set up an integration if you have the Setup Integrations permission enabled for your role in Administration () > Role Permissions > Administration.
Data sync and import
Each integration has its list of modules that are available for sync. In Web App > Administration > Integrations > Overview, each integration card includes a list of sync items, where the supported modules have a checkmark next to them. The following screenshot illustrates this on the example of QuickBooks Desktop.
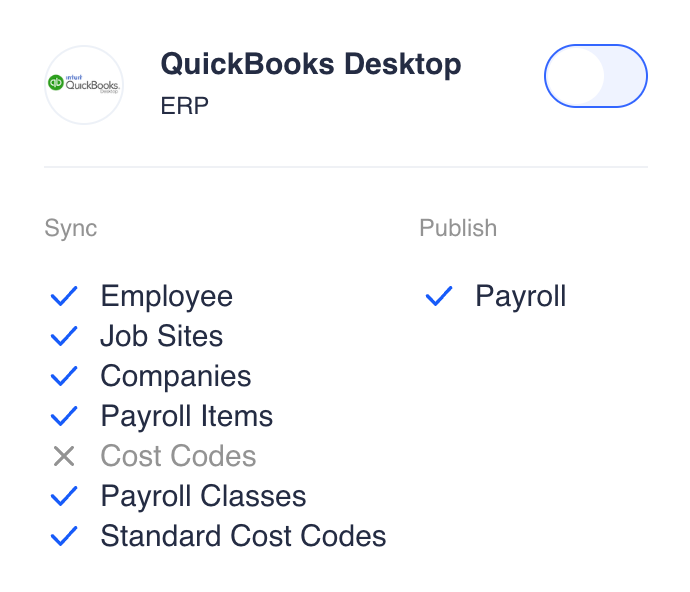
The list of sync items for QuickBooks Desktop
When you connect an integration, a separate tab for each synced module is added to the integration's entry under Administration > Integrations. To get the data for a given module, you need to navigate to the corresponding tab and select the SYNC button.
PERMISSIONSYou may use the SYNC and other integration actions if you have the Integration Actions permission enabled for your role in Administration () > Role Permissions > Administration.
When the sync is complete, the table on the module's page is populated with the data synced from the connected platform. However, this does not mean that the data is already imported to your MobiClocks environment. The complete sync and import process involves the following steps:
- Select SYNC to transfer all the available data for a given module to a middleware component in MobiClocks, which serves as a medium between the integrated platforms. After the sync is complete, the data exists only within the middleware component, and you need to choose what you want to import into MobiClocks.
- Choose all the items you wish to import, and select the IMPORT button.
- Navigate to the corresponding module in your MobiClocks environment, such as the Employees tab, and see the imported data.
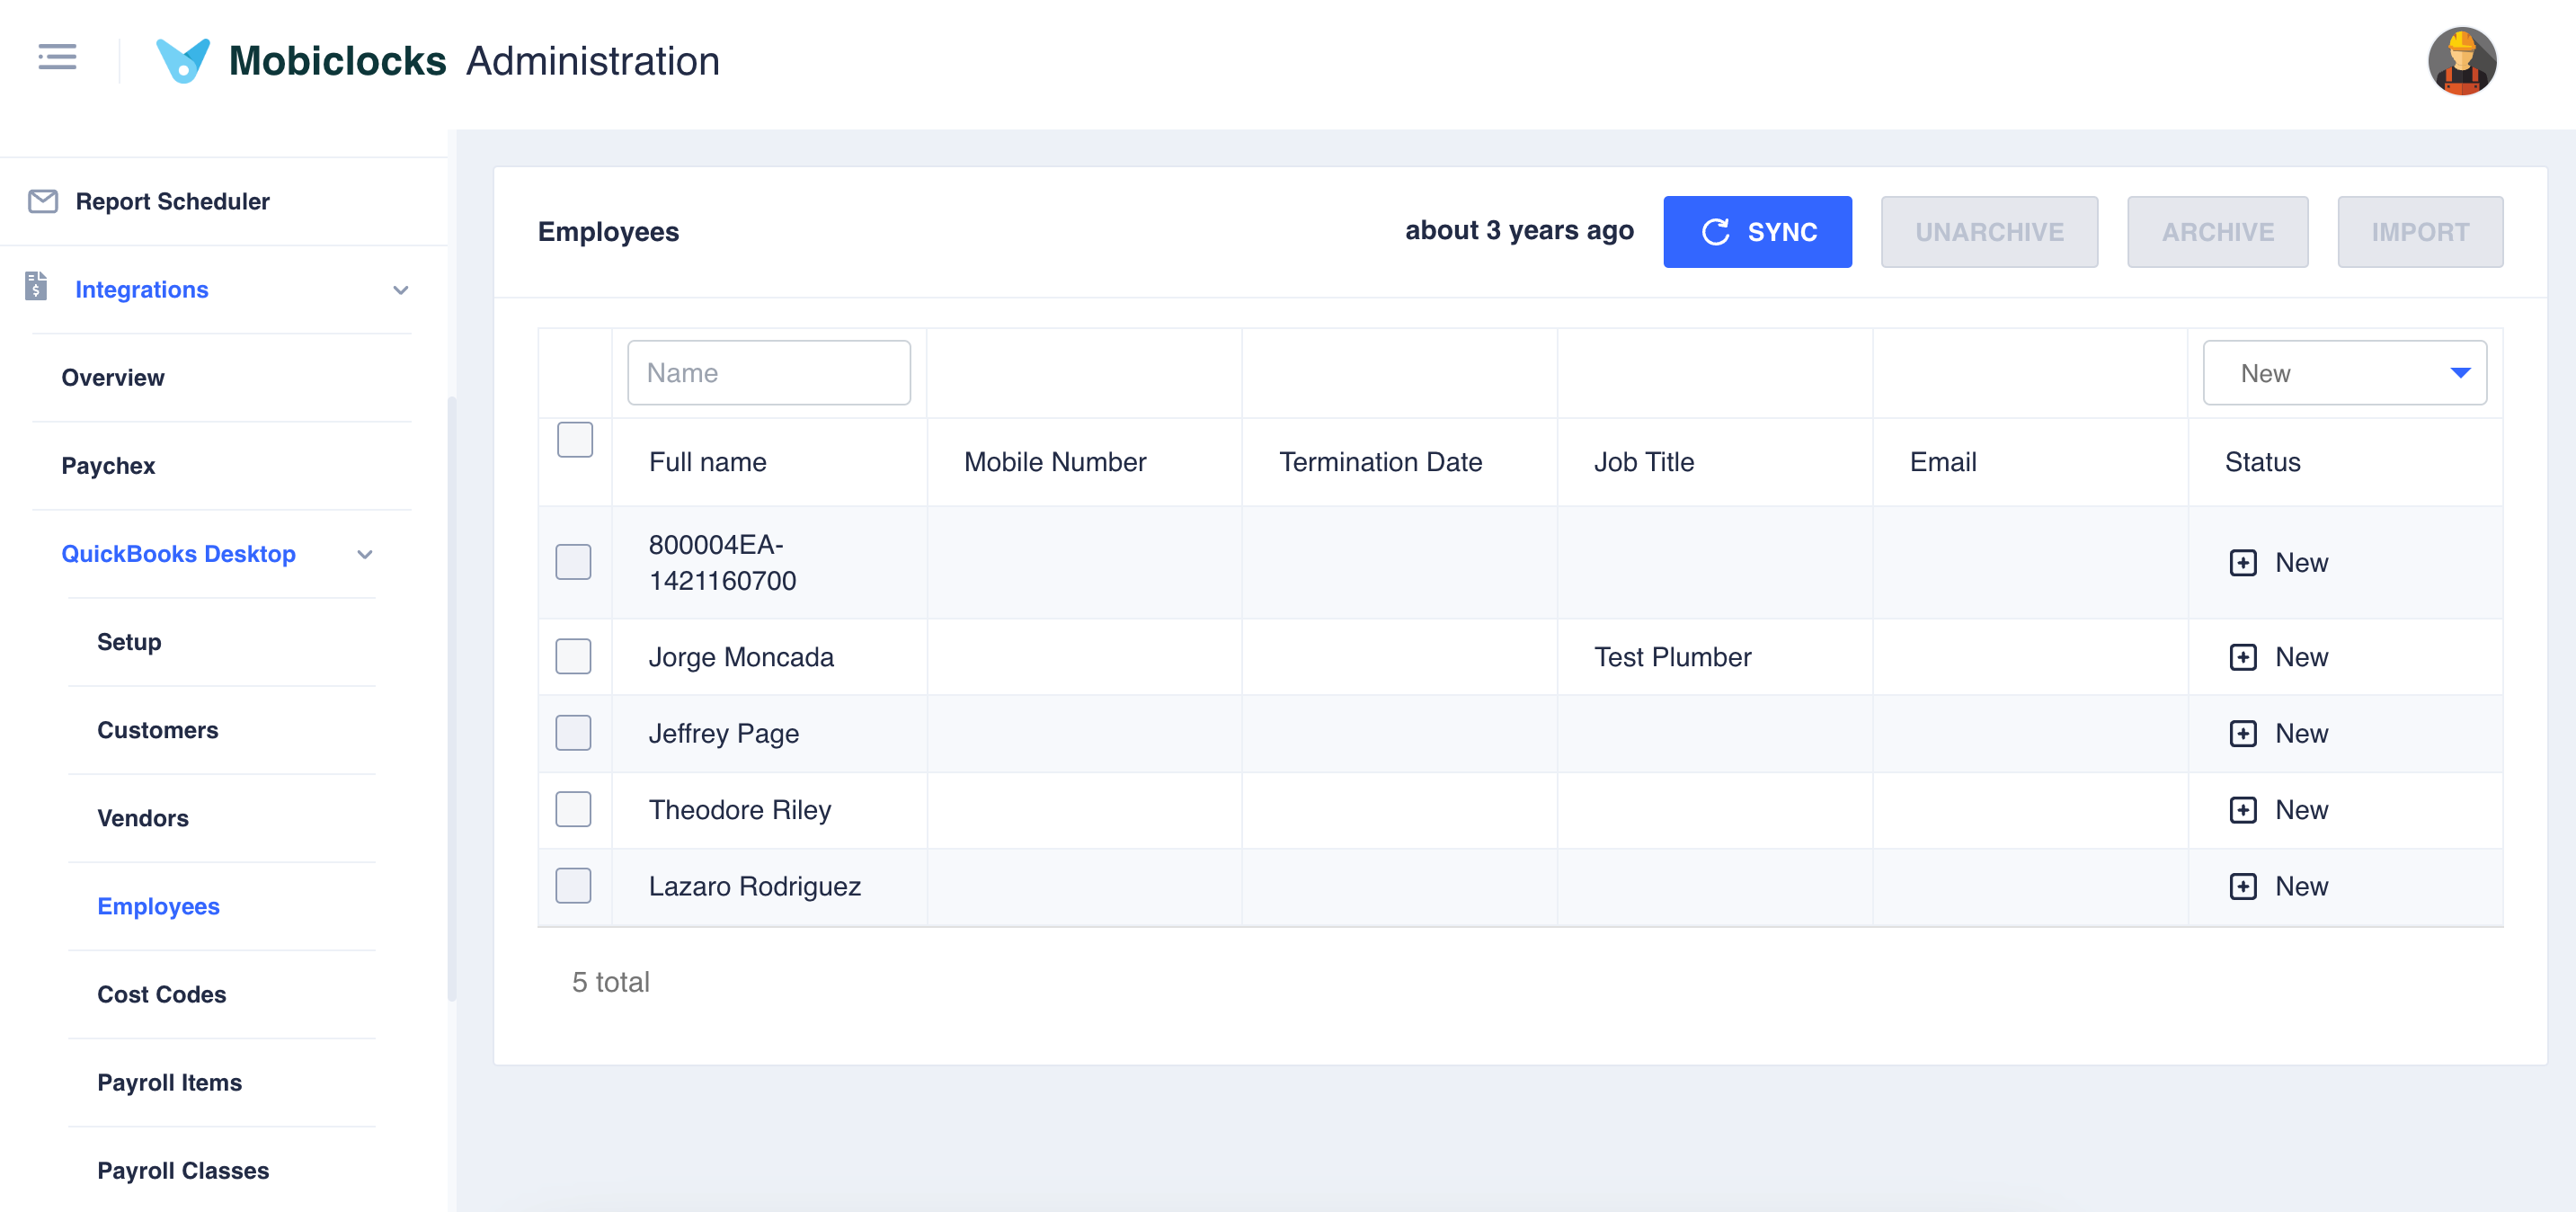
Synced data in the QuickBooks Desktop integration
There are also an Archive and a reverse Unarchive functions. Archiving can be useful if, for example, certain data is no longer needed and you want to prevent it from being imported in the future.
Each entry in the middleware component has a Status field that can have one of the following values:
- New: The entry is new and has not been imported to MobiClocks.
- Archived: The entry has been archived.
- Updated: The entry has been imported to MobiClocks in the past but it has undergone some changes. For updated entries, you can click on the corresponding cell in the Status column of the entry to open a pop-up that shows which properties have been modified. The following screenshot shows an example of an updated entry with existing and updated data.
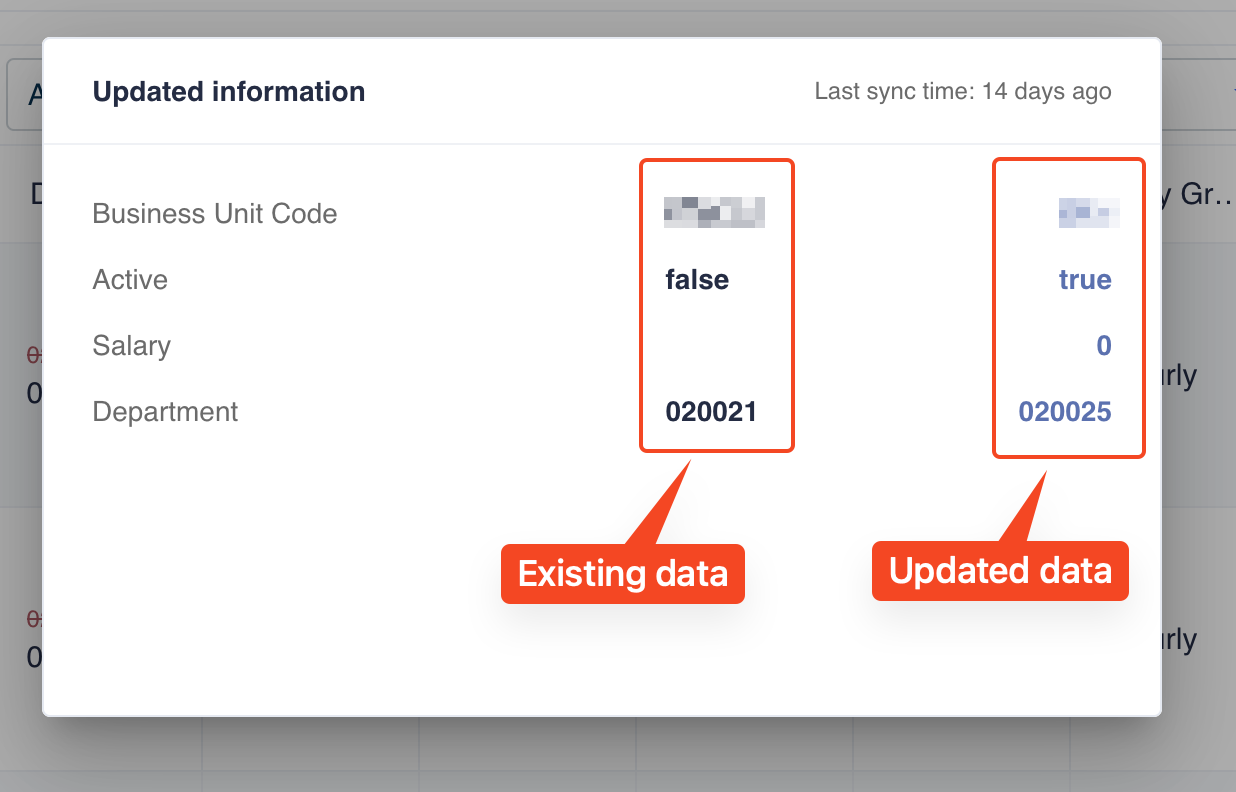
Example of an updated entry
- Imported: The entry has already been imported.
Since you can also add data manually to your environment, each module in MobiClocks has a Synced status field that indicates where each entry is coming from. The following is a screenshot from the Job Sites module that shows the synced status of several job sites. As you can see, most of them have been created manually, while one job site has been imported from Sage 300. This way, you can always differentiate between different data sources and filter accordingly.
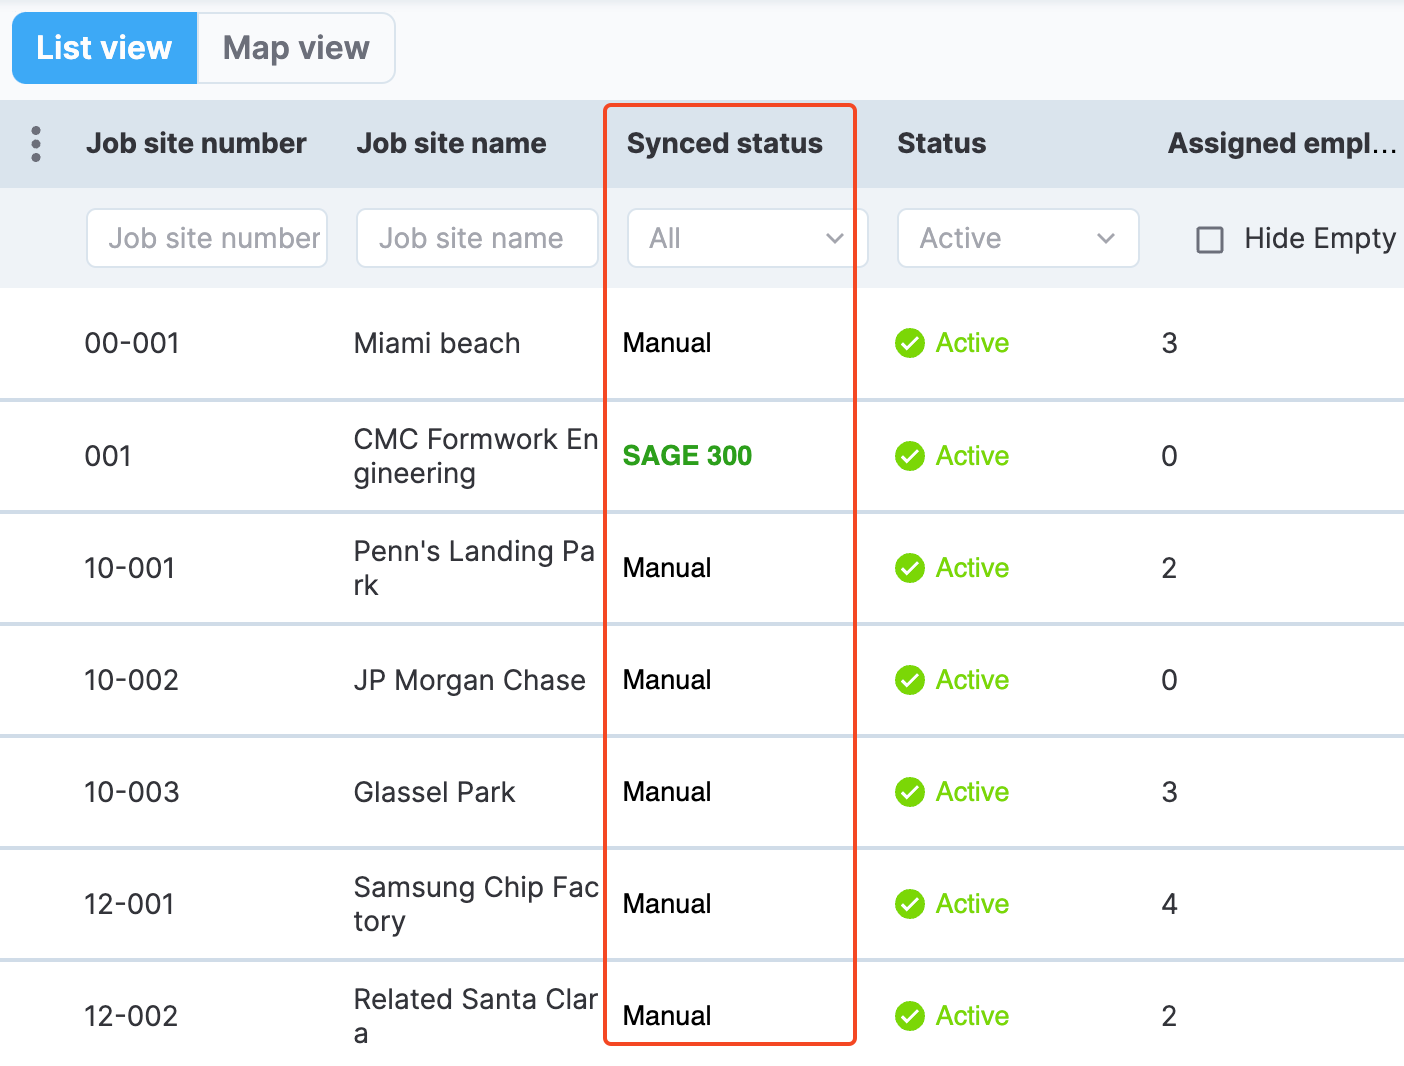
Synced status field
Automatic sync, import, and update
The Data Sync & Automation feature in integrations lets you configure automated data synchronization between MobiClocks and your integrated platform. Select which entities, such as Employees, Job Sites, or others, you want to automatically sync, import, or update by checking the corresponding boxes in the settings table. Note that the list of available entities may differ for each integration, and you must check the specific integration docs for details. The following screenshot shows the Data Sync & Automation setting for the Acumatica integration.

Data Sync & Automation settings
You can schedule up to three custom times for the system to run these automated operations throughout the day, with at least one hour between each scheduled time. Apart from that, the system has a default time for running automated operations, which varies by different timezones. If you need immediate data synchronization, use the RUN MANUALLY option to execute the selected operations instantly.
Auto merge on import
When importing data into MobiClocks, the **Auto merge on import **feature automatically detects duplicate records that have been created manually and merges them. This feature applies only to new records that haven't been previously imported to MobiClocks.
When enabled, the system identifies matching records between manually created data and imported data, then consolidates them into a single record. Following the merge, the system updates the sync source attribution from Manual to the specific integration that provided the imported data.
The system uses the following criteria to identify matching records for merging:
- Employees: Employee numbers must match.
- Job sites: Job site numbers must match.
- Cost codes: Cost code numbers, building numbers, cost types, and job site IDs must all match.
- Payroll items: Names must match.
- Pay classes: Names must match.
- Companies: Names must match.
Not all integrations support this setting, and availability is specifically mentioned in each integration's documentation.
Import and update issues
When importing or updating entities such as employees, cost codes, job sites, or others, issues may occur with individual entries. These issues can include duplicates, missing required information, and other problems.
The system doesn't fail the entire import or update process when issues occur. Instead, it:
- Skips the problematic entries.
- Continues processing all valid entries.
- Displays a
Warningstatus in Synced logs.
The warning identifies which entries were skipped and explains the specific reasons for each skipped entry.
Sync progress monitoring
When syncing data for a specific entity, you can monitor the sync progress and see when each task is completed. A task is all the data for a particular job site, company, or any other entity you have chosen to sync. Select the task number indicator to see the list of tasks that are in progress.
In the following screenshot, the sync is in progress, and the task number indicator shows (1). The indicator has been selected, and the list of ongoing tasks has been expanded.
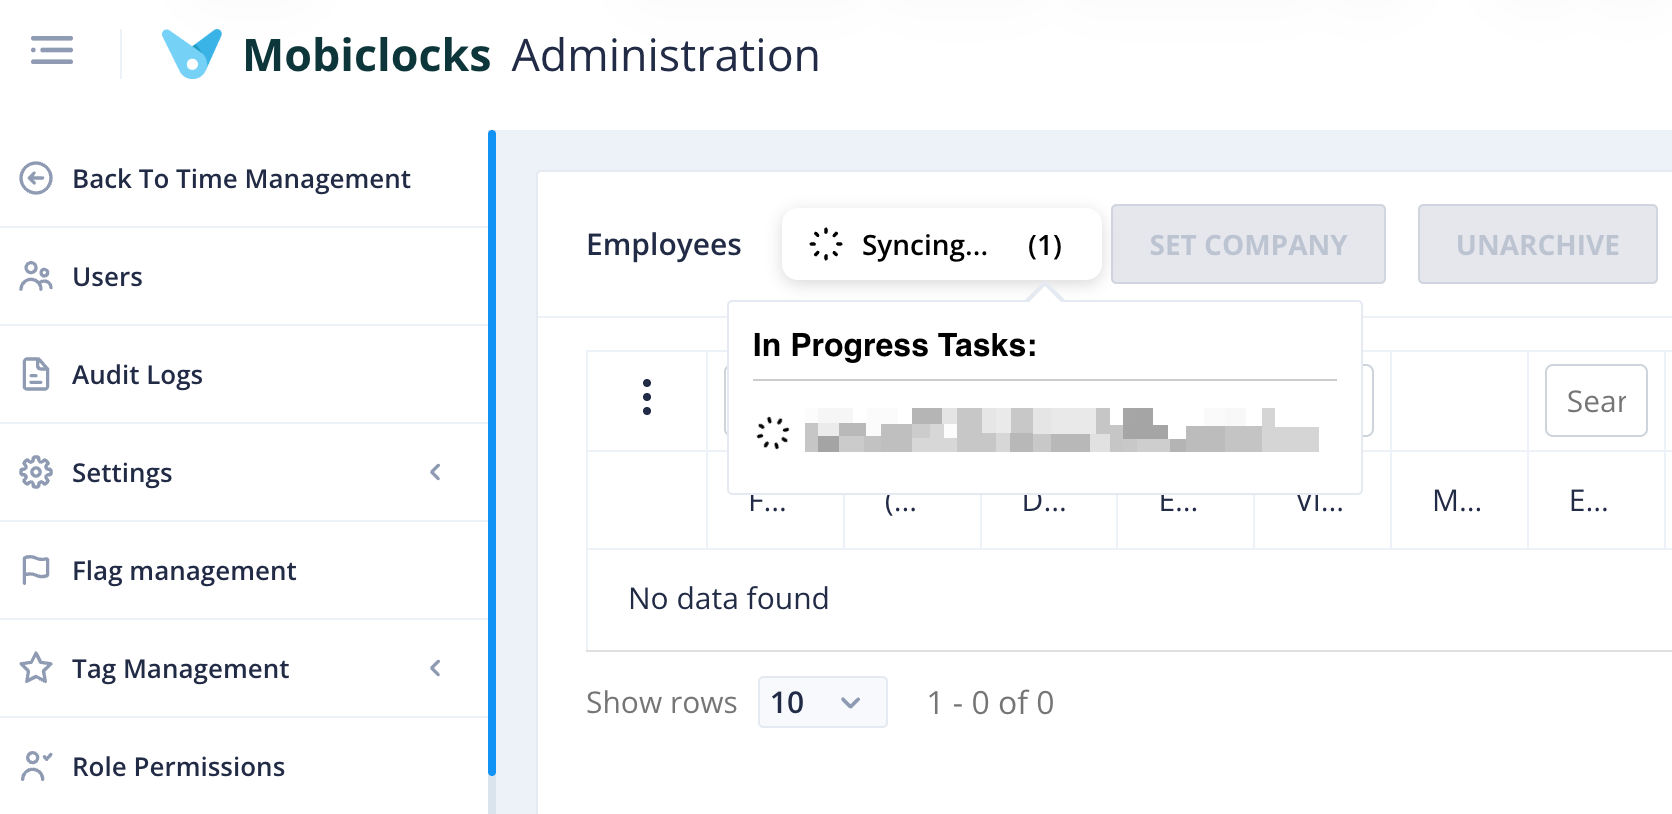
Sync progress
For example, if you have chosen to sync data for a particular job site, the task will be named accordingly. If a task is already in progress, and you add other tasks, the new ones are added to the list, and you can monitor the progress individually.
NOTESync progress monitoring is available for auto-sync as well and is displayed only on the page of the entity being synced.
Payroll publishing
Data publishing is the process of sending data from MobiClocks to an integrated service. Mobiclocks only supportspayroll publishing , and, if it's available for a given integration, you will see a checkmark next to Payroll in the Publish column of the integration's entry in Web App > Administration > Integrations > Overview. This following screenshot shows the entry of the Sage integration, which supports payroll publishing.
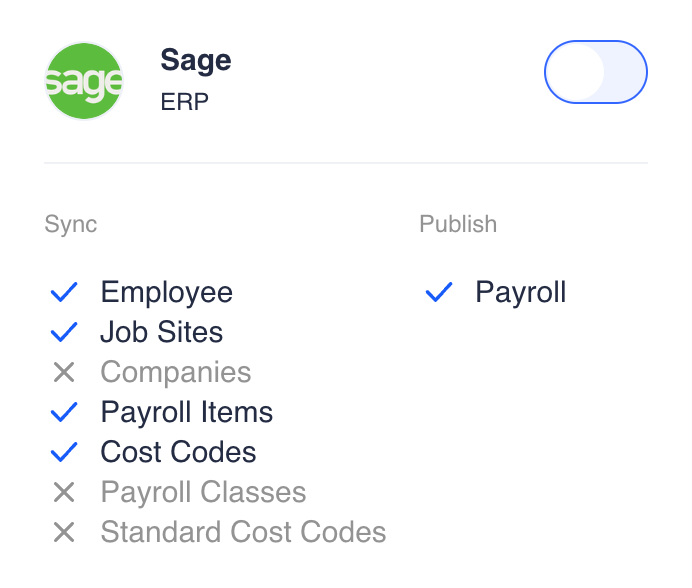
Payroll publishing available for Sage
If an integration doesn't support payroll publishing, you can check if there is a relevant report format available in payroll reports to upload it manually. If you can't find a relevant report format either, please get in touch with the MobiClocks team to request one.
Payroll item mapping
The pay IDs in your MobiClocks environment can be denoted differently from those in the integrated platform. To address this, you can do payroll item mapping to map the pay IDs in Mobiclocks to the pay IDs in the connected software to have the data published correctly.
Updated 14 days ago