
Edit timelogs and apply actions
Actions that can be performed on individual and a group of timelogs
Using timelog actions and other settings, you can modify existing timelogs as well as add or remove information. This topic features a complete list of all the available timelog actions. Next, some additional settings such as meal and rest break policies are discussed. Lastly, you learn about the bulk action types that are available if multiple timelogs are selected.
Timelog actions
You can access timelog actions by selecting the more icon on an individual timelog in the timelogs list.
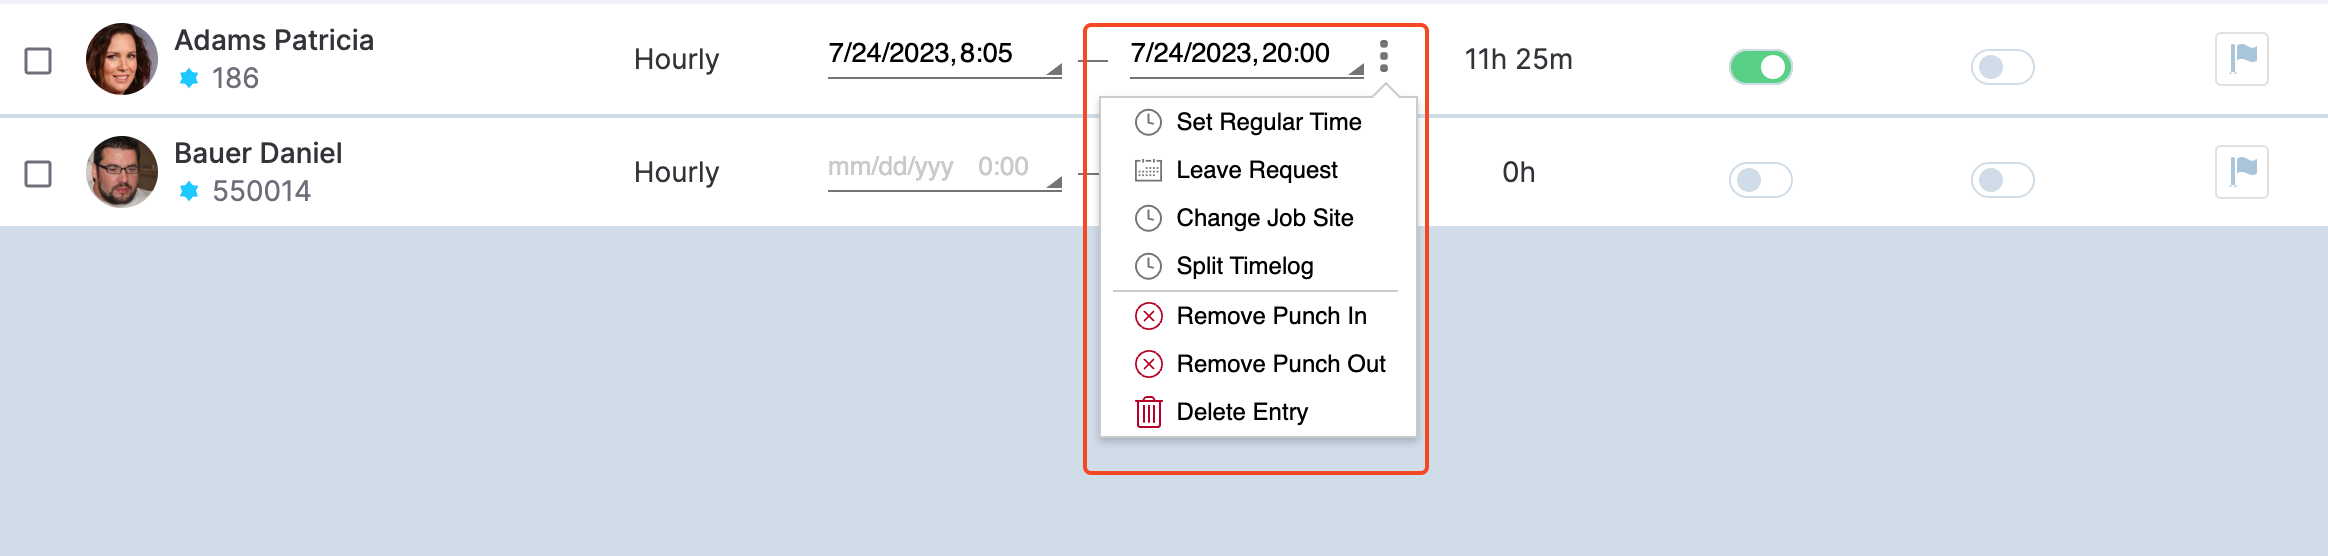
Timelog actions
PERMISSIONSYou may perform actions on a timelog if you have the Update Timelog permission enabled for your role in Administration > Role Permissions > Timelogs.
This permission doesn't apply to actions that have their own distinct permission setting. Such cases are described further in this document.
The following actions are available.
Set Regular Time
Using this action, you can set a manual punch from 12 AM to 23:59 PM. The action is not be available in the following cases:
- The timelog has a missed punch.
- The timelog is pending, which means that the employee has punched in but hasn’t punched out yet.
- The current selected day is a holiday. In this case, the option is replaced with the Set Holiday Work Time option if it's activated from administration settings.
Set Fast 8
This action is a quick way to add an 8-hour-long entry to the timelog. The system creates an entry from 7 AM to 3 PM, which you are able to edit afterwards. The option is not be available in the following cases:
- The timelog already contains a punch out time between 12 AM and 3:59 PM.
- The timelog has both punch in and punch out times already.
- The timelog has a Leave Request.
- Holiday 8hhas been applied already.
Holiday actions
Holidays are specified under Administration > Holidays > Calendar. In Administration > Holidays > Policies, you can apply the following settings:
- Auto-apply Holiday Policy. If activated, the system automatically applies an 8-hour timelog entry for all the empty timelogs on a holiday and generates a [HOL]pay ID. If the setting is not activated, you can perform the same action manually, using the Set Holiday Leave action on a timelog.
- Apply Holiday Work Policy. If activated, the setting accounts for cases when an employee has worked on a holiday. Such cases fall under the [HOL_WORK] pay ID. The entry is marked as holiday work automatically if the employee makes a punch on that day, and it's also possible to add an entry manually using the Set Holiday Work Time timelog action.
NOTEIf you mark a date as a holiday, the existing timelog entries for that date are not converted to [HOL_WORK] automatically . You need to use the Set Holiday Work Time action on those timelogs to appply holiday work manually.
Change Job Site
Use this action to to transfer a specific timelog entry to another job site. Note that you can also transfer leave requests, and meal break entries are automatically transferred along with their associated time entries.
PERMISSIONSYou may change the job site of a timelog if you have the Change job site permission enabled for your role in Administration > Role Permissions > Timelogs.
Split Timelog
PERMISSIONSYou may perform the Split Timelog action if you have the Split Timelog permission enabled for your role in Administration > Role Permissions > Timelogs.
When an employee works at multiple job sites in a day but only punches at one site, you can use the Split Timelog action to distribute their working hours accurately across different locations.
How to split a timelog
- Select the timelogs you want to split, then choose Split.
- In the dialog box, select Add job site to choose additional work locations.
- Select one or more job sites, then select Apply.
- For each timelog, enter the working hours for each new job site. The system automatically subtracts these hours from the original job site, as shown in the following screenshot.
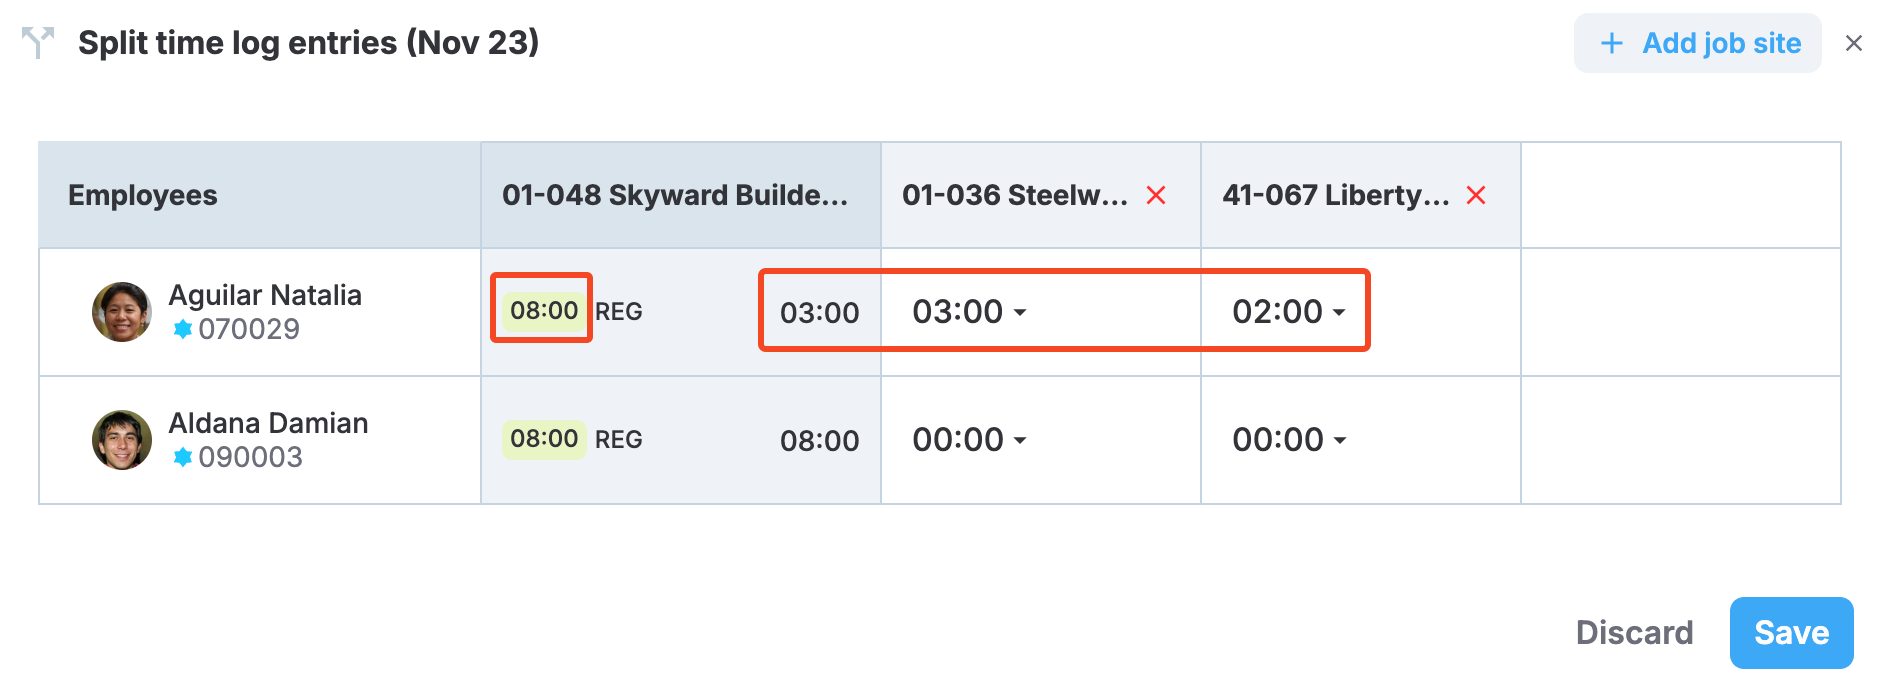
Distributing working hours between job sites
- To apply the same hour value to all timelogs in a job site column, use the duplicate button next to each hour field, as highlighted in the following screenshot.
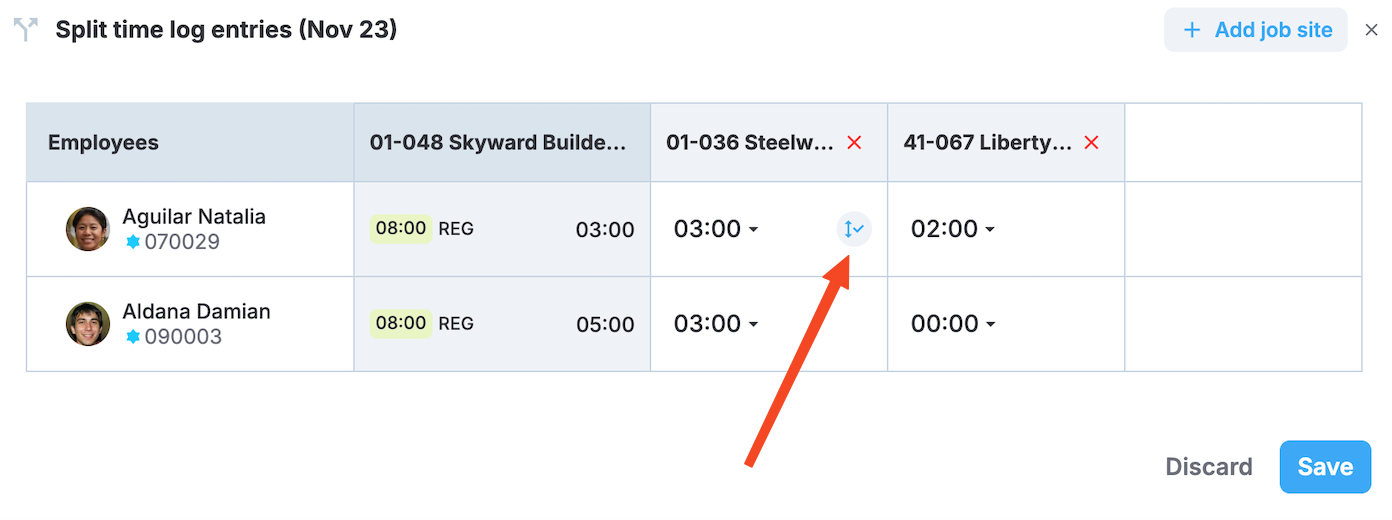
Hours duplicate button
Requirements and restrictions
The following rules apply when splitting timelogs:
- The total hours across all job sites must equal the original timelog entry duration.
- If your distribution exceeds the total duration, the system warns you and reduces hours from the original job site. The following screenshot highlights such a case.
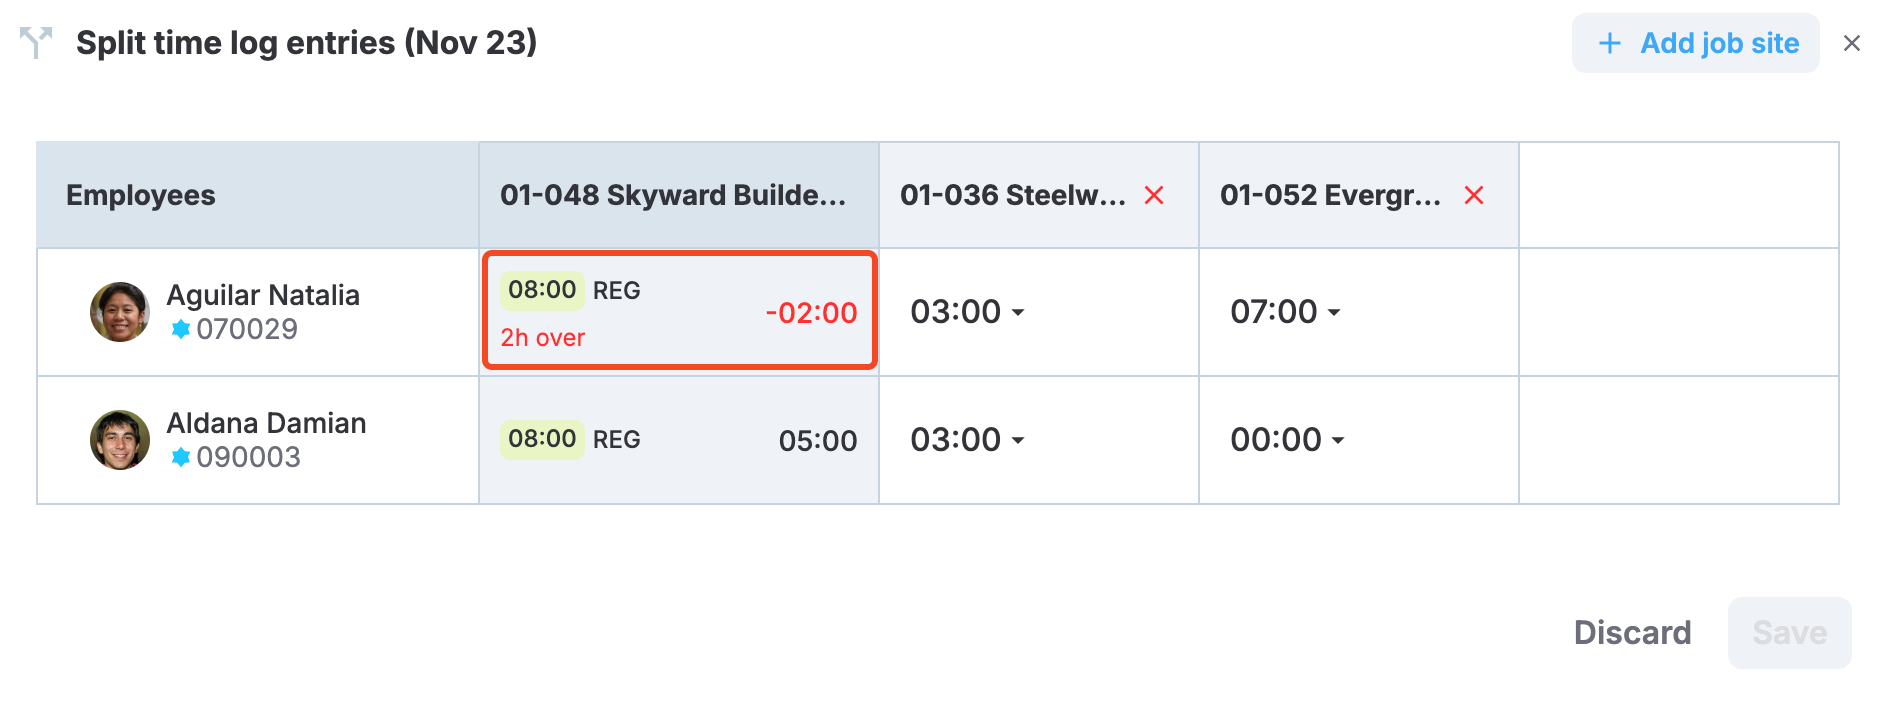
Exceeding total duration warning
- The original job site must retain some hours—you cannot assign zero hours to it.
- You cannot split timelogs if
- Any of the job sites have been reviewed fo for the selected date
- Any job site has approved payroll for the selected date
- The timelog has been cost coded.
Differences between employee pay groups
There are some differences when splitting a timelog for an Hourly and Salary employee. Salary Actual is similar to Hourly. See Pay groups for more details on employee pay groups.
Salary employees
You can split salary timelogs if they have at least one entry without a leave request. Even with a missed punch, the system applies a default 8-hour entry if the employee has at least one punch, making splitting possible.
Hourly employees
For hourly employees, you can split timelogs that have entries without leave requests, unless:
- Any entry has a missed punch.
- An entry has already been split.
- The timelog has cost codes applied
Swap Timelog
Using the swap option, you can swap the timelog's punch in and punch out times. The option becomes available on a timelog entry if the entry contains only a punch in time or only a punch out time. This can occur when, for example, an employee has punched out instead of punching in when entering the job site through the Kiosk App.
PERMISSIONSYou may perform the Swap Timelog action if you have the Swap timelog entries permission enabled for your role in Administration > Role Permissions > Timelogs.
The following GIF illustrates the process of swapping a timelog.
Swapping a timelog
Remove Punch In
Using this action, you can remove a punch in that has already been registered. The action is not available for leave request entries and if the punch time of the entry is missing.
Remove Punch Out
Using this action, you can remove a punch out that has already been registered. The action is not available for leave request entries and if the punch out time of the entry is missing.
Delete Entry
Using this action, you can delete an entry from a timelog.
NOTEIn case of split timelogs, deleting an entry from any of the split timelogs removes the associated entries from the rest of the split timelogs as well.
Delete Timelog
This action deletes a timelog from the job site. It is available if the timelog doesn't contain any entries.
Leave Request
Leave requests indicate reasons for employee absence to allow for accurate reporting and employee tracking. Leave request types are configured under Administration () > Settings > Pay IDs > Leave Pay IDs and can be set to be applicable for any or both of the pay groups. When adding a leave request, you also have the option to specify a duration in hours (an integer from 1 to 8). The following GIF illustrates the process of adding a leave request to a timelog.
Adding a leave request to a timelog
Weekly Edit
Use the Weekly Edit option to review the employee's weekly activities and adjust if needed.
NOTEWeekly Edit is available for salary employees only.
The following screenshot shows how to access the feature from the Timelogs module.
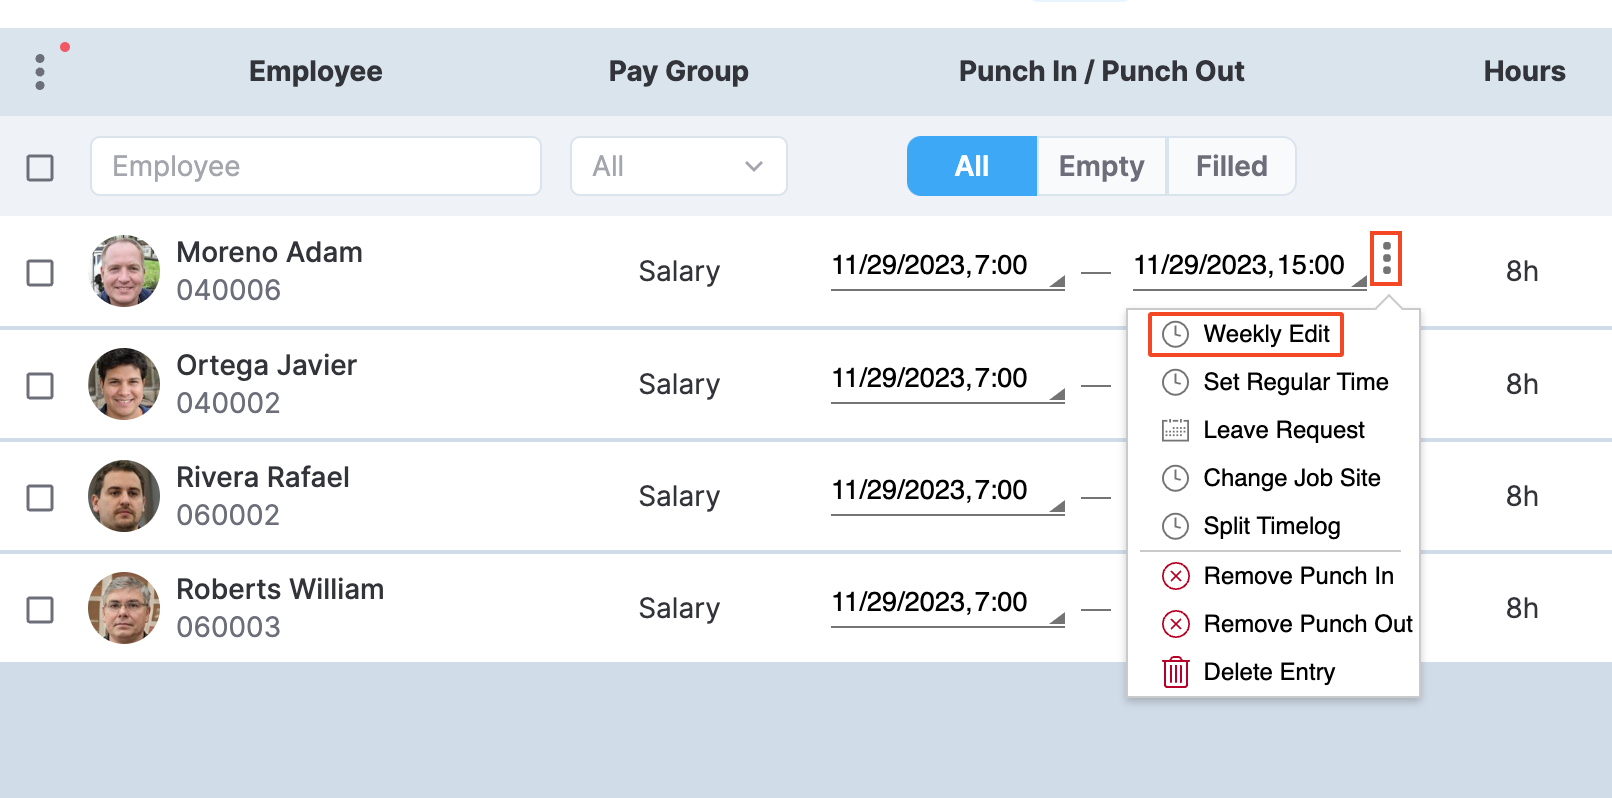
Accessing Weekly Edit
The Weekly Edit action opens a weekly calendar where you have an overview of employee activities and can review and adjust the whole week in one place, as demonstrated in the following GIF.
In particular, the following cases can only be addressed in weekly editing mode:
- Apply both a Holiday Work and a Holiday leave request to the same timelog.
- Apply different leave request types to the same timelog.
Meal and rest break policies
Fixed meal and rest break policies
A timelog in the timelogs list contains a Meal break toggle if Fixed meal policy is enabled for the job site. Similarly, a timelog contains a Rest break toggle if Fixed rest policy is enabled for the job site. The Rest break field is always visible in the list but is activated only if the rest policy is enabled in job site settings.
The following screenshot highlights these two options in the timelogs list.
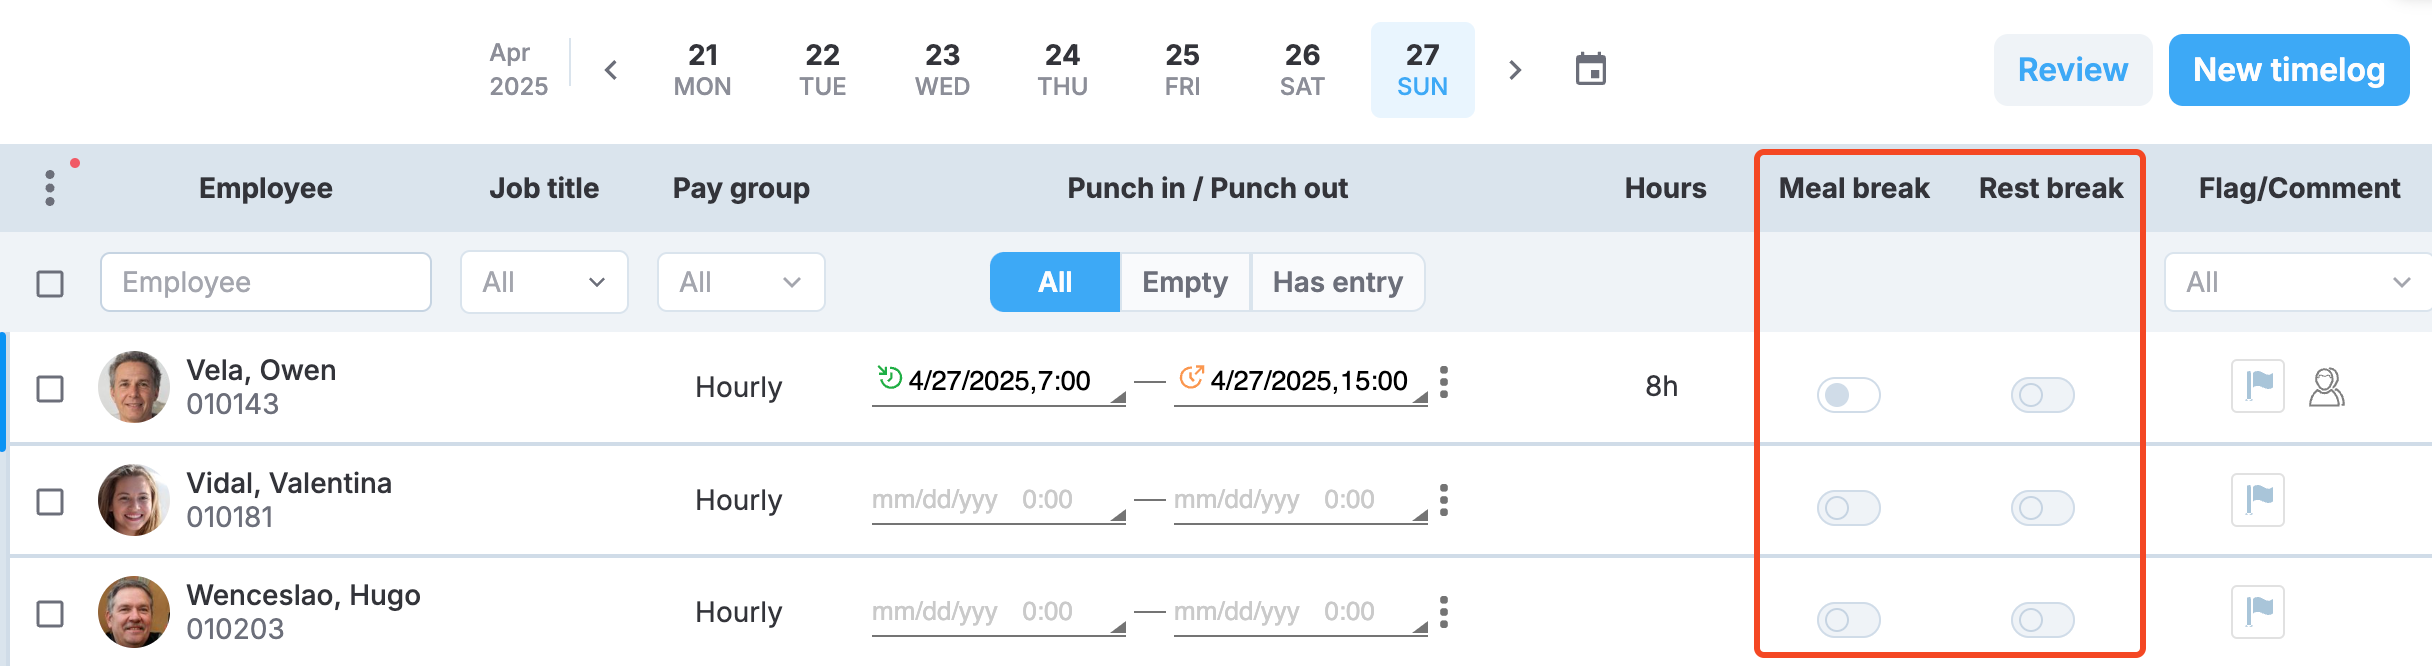
Meal break and Rest break fields
If Meal break or rest break auto-apply is enabled for the employee (it needs to be enabled for both the employee and job site to be applied on the timelog), the corresponding timelog toggle will be switched on automatically as soon as a punch entry is added to the timelog. In addition, the meal or rest break duration will be automatically subtracted from the timelog entry. You can then change these settings manually if needed.
PERMISSIONSYou may switch Meal break and Rest break toggles if you have the Enable/disable fixed meal/rest break permission enabled for your role in Administration > Role Permissions > Timelogs.
Trackable meal policy
If Trackable meal policy is enabled for the job site, you have the Set meal time action to manually set one or multiple meal breaks. The timelog must already contain a punch entry for the option to become available. The following screenshot highlights the Set meal time action in the list of timelog actions.
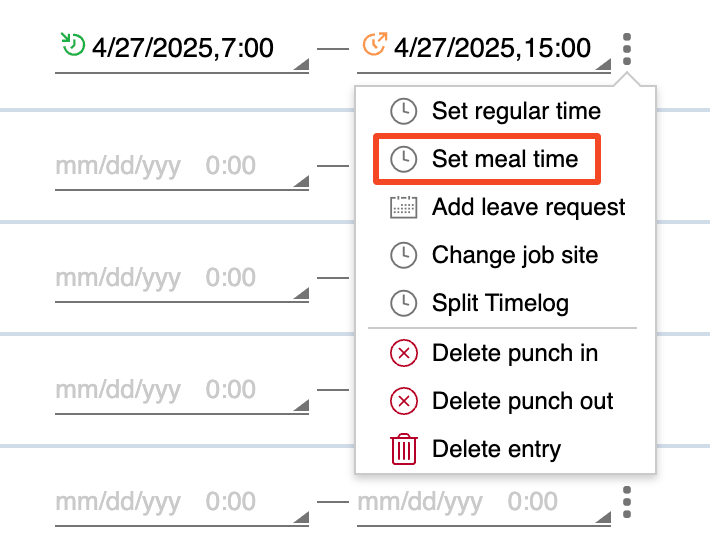
Set meal time action
Crew tags
Crew tag actions are available under the Crew tag column of the timelog, where you can set a new crew tag to the timelog or edit an existing tag.
PERMISSIONSYou may add, edit, or delete crew tags if you have the Add/edit/delete crew tag permission enabled for your role in Administration > Role Permissions > Timelogs.
In the Add tag dialog, you have the following options:
- Crew tag. Select the crew tag you want to apply.
- Apply for this timelog. Applies the crew tag to the selected timelog only.
- Apply for this and following timelogs. The change will be applied to this and all the new timelogs created afterwards.
- Set as a default crew tag for employee. This option is available for employees assigned to the job site and sets or overrides the employee's default crew tag.
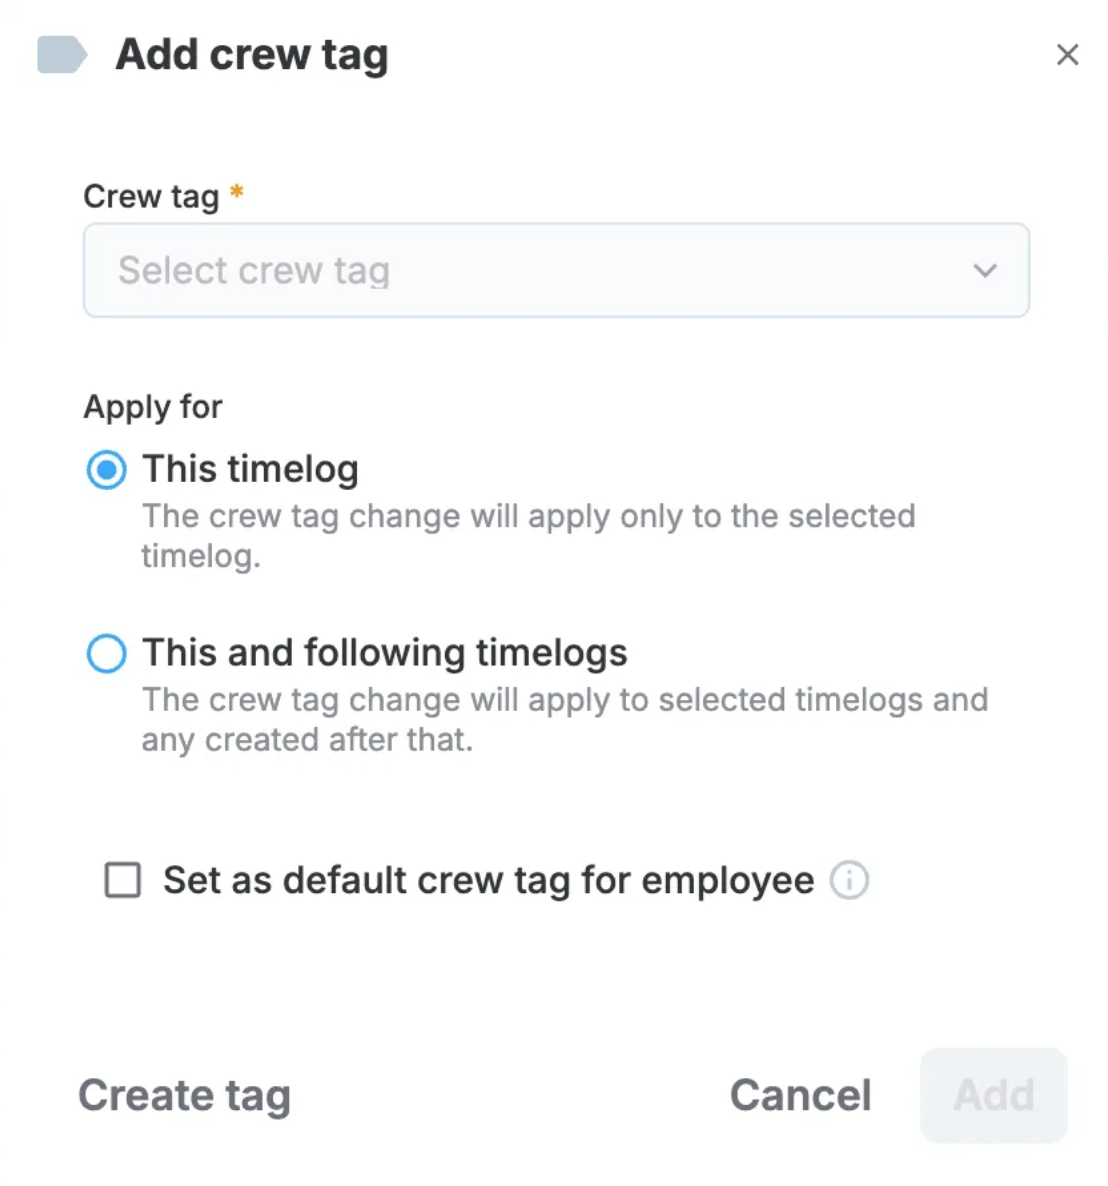
Add crew tag dialog
To add the crew tag, select Add.
Edit crew tags
To edit a timelog's crew tag, select the crew tag on the employee's timelog. This will open a dialog similar to that of the Add tag, where you can update the crew tag and how it's applied.
You also have a Remove option, as highlighted in the following screenshot.
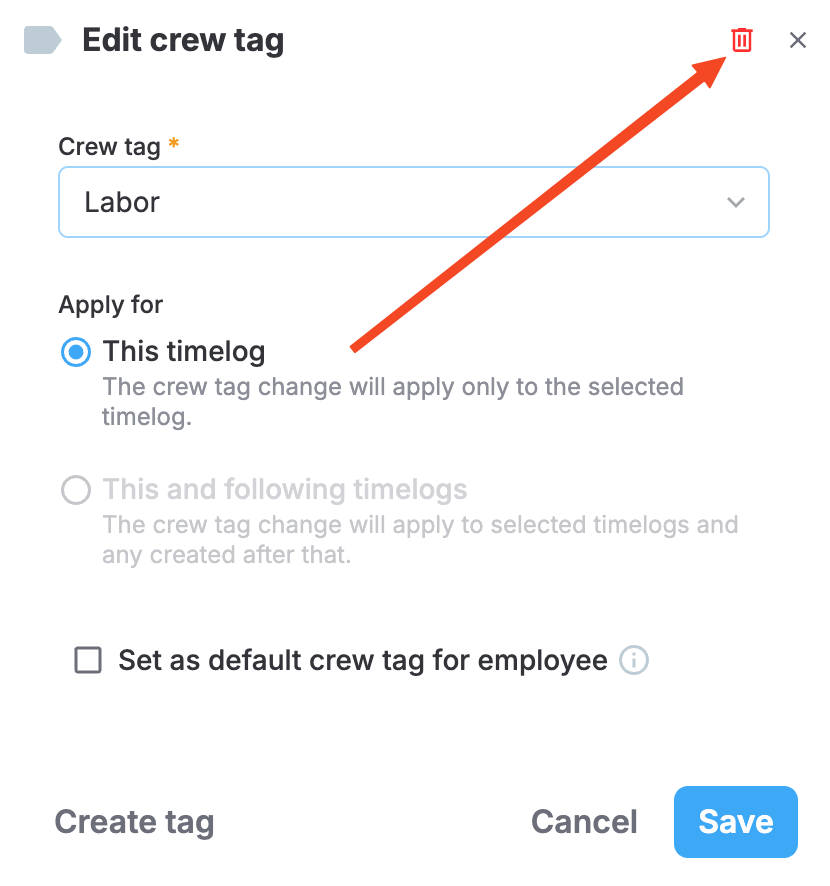
Remove a crew tag
In the remove dialog, you must choose where the crew tag is removed from, as shown in the following screenshot.
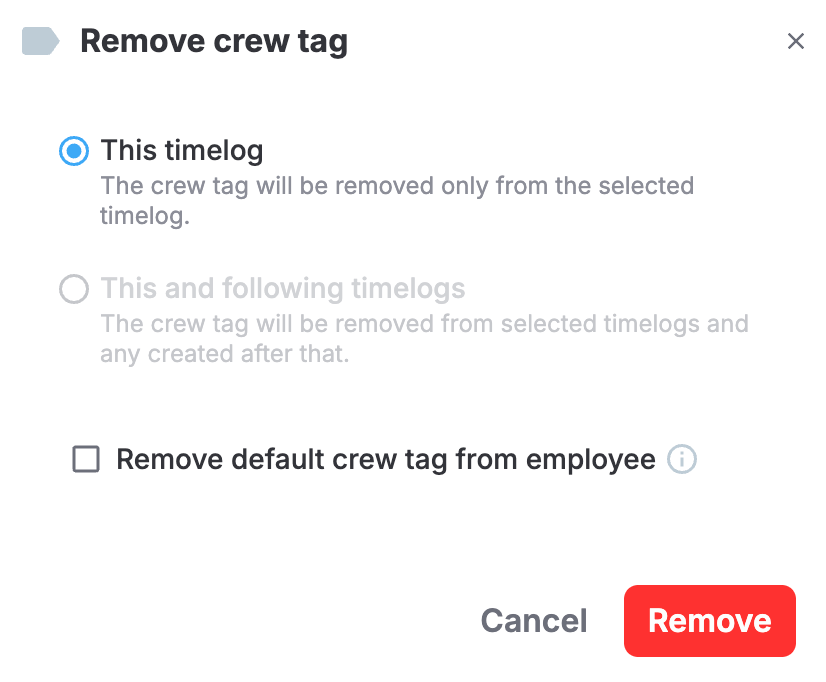
Remove dialog
Bulk actions
When you select more than one timelog, a menu with bulk actions appears above the timelogs list. Here, you can perform actions similar to those that are available for individual timelogs.
A bulk action is active (can be performed) for the selected timelogs if all the timelogs meet the preconditions for that action. The following table lists all the available bulk actions and their corresponding preconditions.
| Action | Timelog preconditions |
|---|---|
| All actions | Selected timelogs need to belong to the same job site and be added on the same day. |
| Meal break | All the timelogs are by hourly employees and contain at least one entry. |
| Rest break | All the timelogs are by hourly employees and contain at least one entry. |
| Set Fast 8h | None of the timelogs has an entry, and none of the timelogs is split. |
| Leave Request | None of the timelogs is split, and all the selected timelog employees are either all hourly employees or all salary employees. |
| Change job site | None of the timelogs is split, and all the selected timelogs contain one entry. |
| Split | The bulk split action can't be performed if at least one timelog in the selection
|
| Punch in | None of the timelogs has more than one entry. |
| Punch out | None of the timelogs has more than one entry. |
| Meal start | Trackable meal policy is set for the job site, and the timelog contains at least one entry. |
| Meal end | Trackable meal policy is set for the job site, and the timelog contains at least one entry. |
| Set crew tag | No preconditions. |
| Remove crew tag | No preconditions. |
| Resolve flags | At least one timelog is flagged. |
Even if a bulk action meets the precondition listed above and is active, there can be additional limitations, which you'll learn about through error messages that are displayed when applying an action.
The following sections discuss some of the bulk actions in greater detail.
Updated about 2 months ago