
Schedule employee work
Schedule individual employees and crews.
In this topic, you'll get familiar with the process of scheduling employee work within the Workforce module. You'll learn how to schedule an individual employee, multiple employees at once, and a crew.
Scheduling is activated in Administration () > Settings > Workforce.
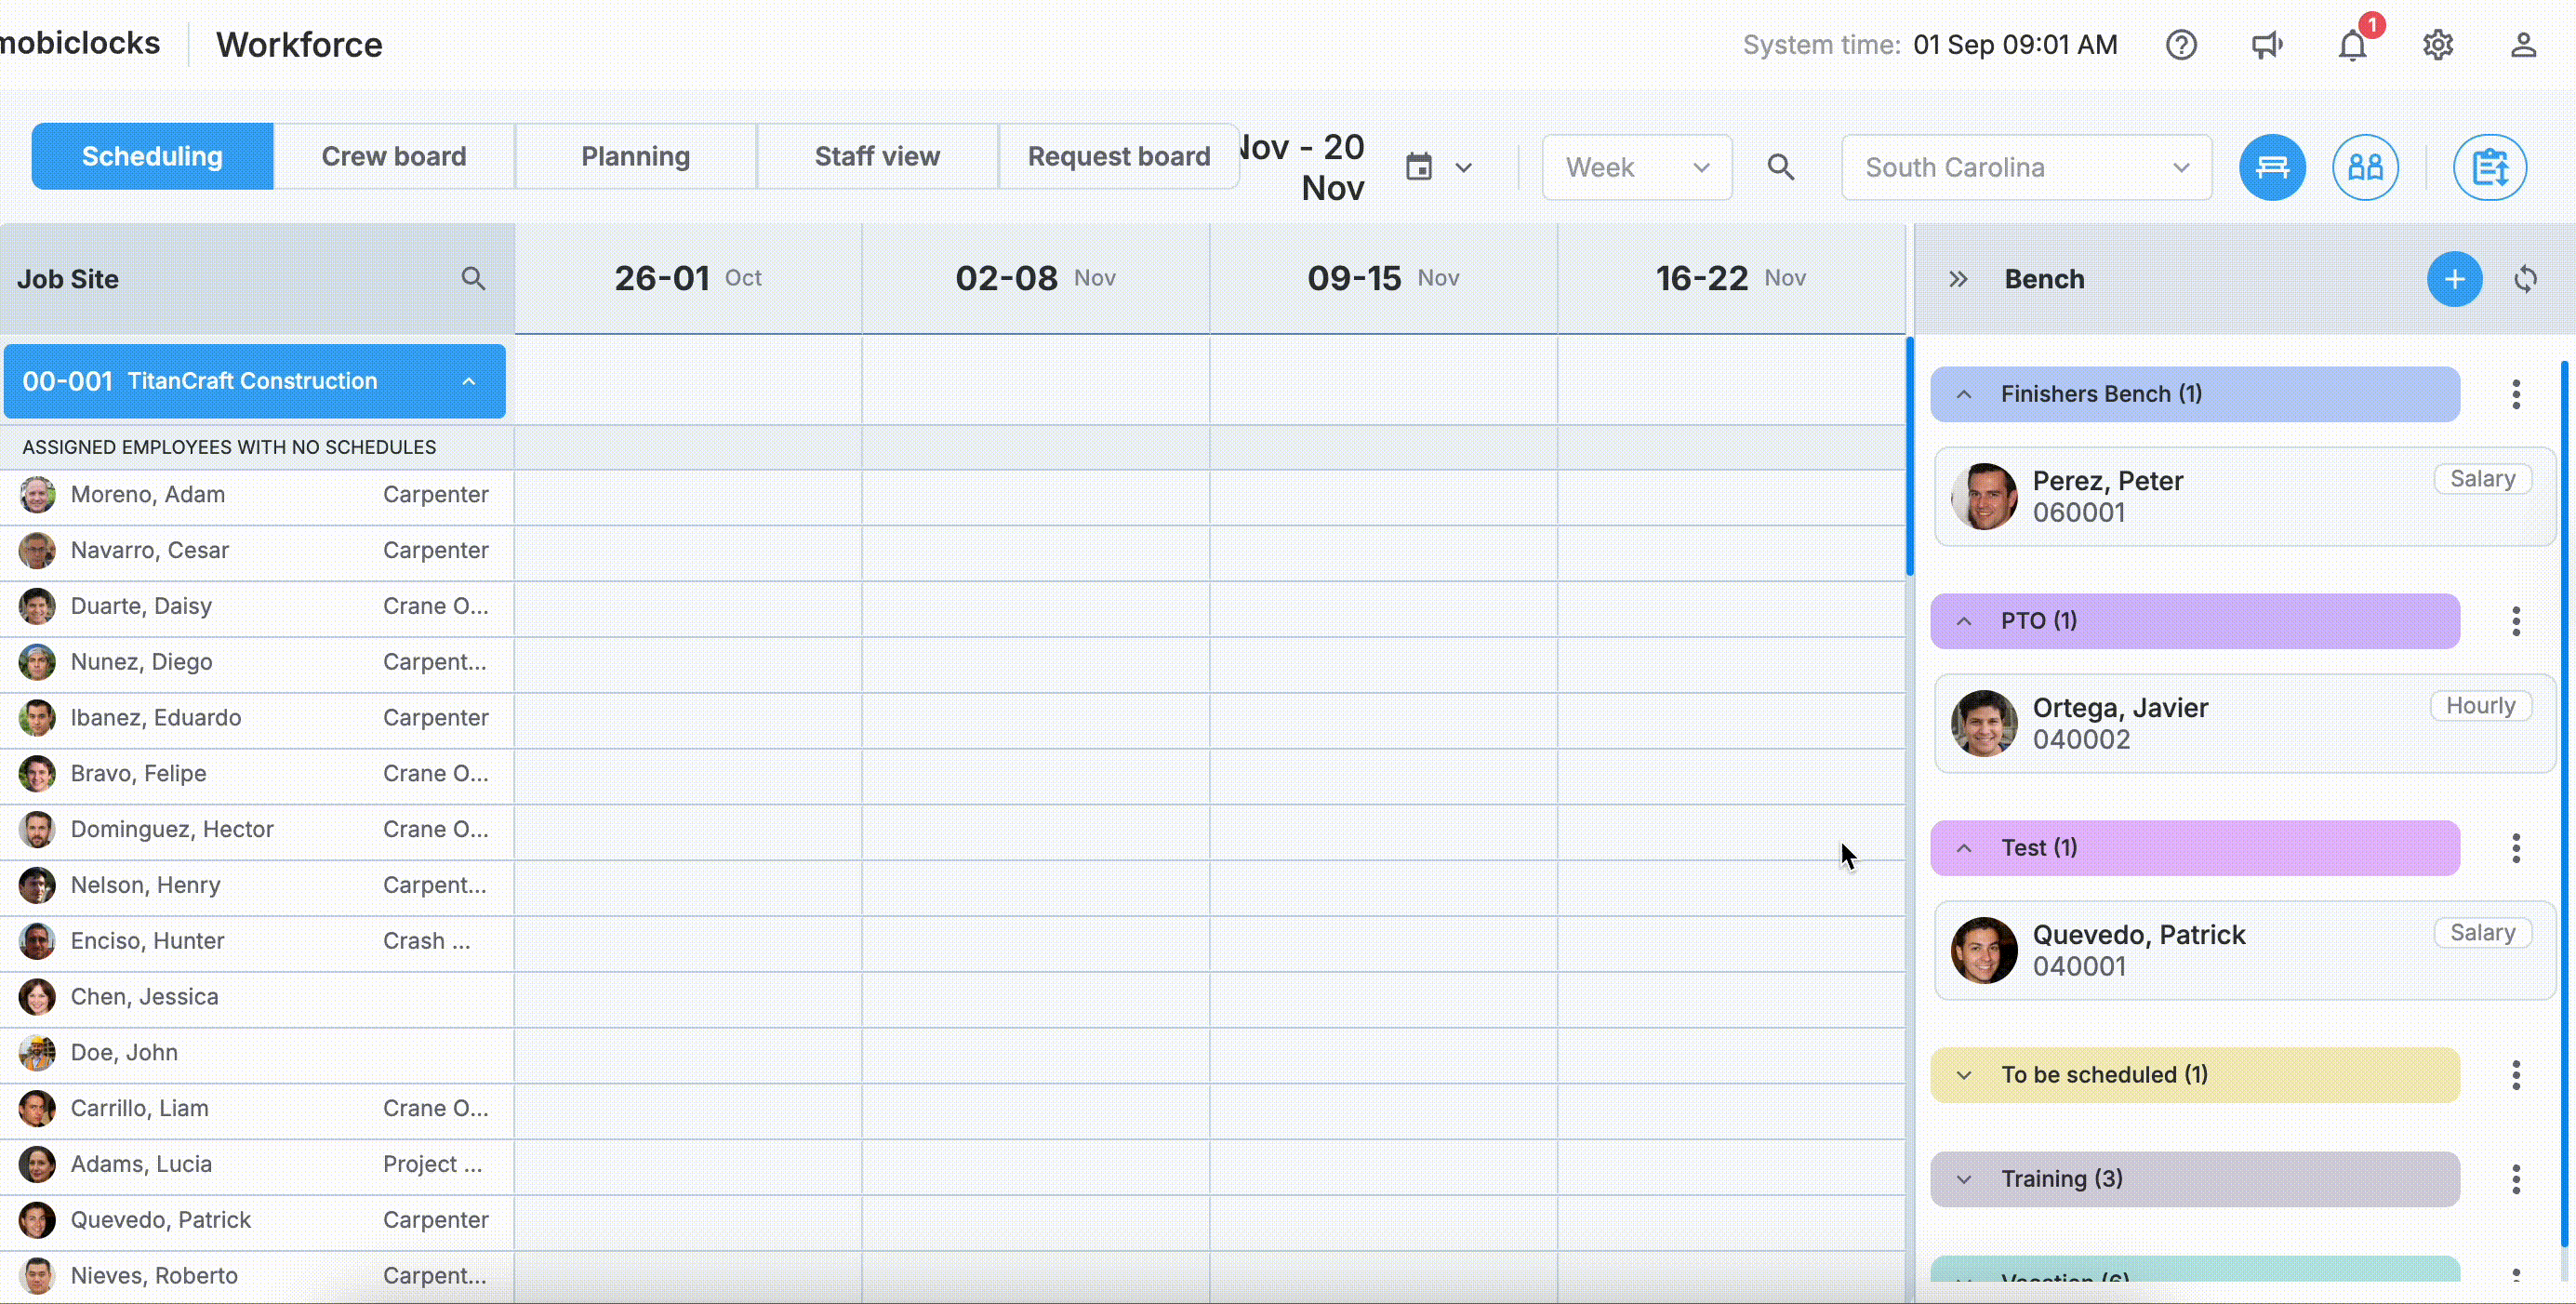
To get started, from the left-hand sidebar of your MobiClocks Web App, select the Workforce icon and navigate to the Scheduling tab, as shown in the following screenshot.

Navigating to the Scheduling tab
PERMISSIONSYou may access the Scheduling tab if you have the View "Scheduling" tab permission enabled for your role in Administration () > Role Permissions > Scheduling.
Here, you have a calendar view with the list of job sites on the left-hand side and a date picker at the top.
Step 1: Select a date
From the date picker at the top of the calendar, select the preferred scheduling dates. The following options are available:
- Custom date range
- This week
- This month
Additionally, next to the date picker, you can select from one of the three calendar views:
- Day. This is a regular calendar view where each cell represents a particular day of the week.
- Week. This is a more high-level view where each cell represents a single week.
- Month. In this view, you have the broadest perspective, as each cell represents a single month.
NOTEIf the selected date range doesn't fit in your screen, use the horizontal scroll at the bottom of the page to navigate left or right.
Step 2: Schedule employees
You can schedule an individual employee, multiple employees at once, or a crew. Each option is discussed in detail in the following sections.
PERMISSIONSYou may add or edit schedules if you have the Create/edit assignment permission enabled for your role in Administration () > Role Permissions > Workforce.
Schedule an individual employee
Choose a job site from the list of job sites in the scheduling calendar. Expand the job site entry to see the employees that are assigned to the job site. The employees who are not assigned to the job site but have been scheduled at the job site also appear in the list. To schedule employees who are not on the job site list, see Step 2.2: Schedule multiple employees.
NOTEBy default, all the employees that are assigned to a job site are automatically scheduled at that job site until the job site end date. However, these schedules can be removed or edited.
Follow these steps to add a schedule for an employee:
- Select an empty calendar cell on the employee's row.
- Select dates. By default, the schedule has the same dates as those represented by the cell you selected. However, you can edit the dates if needed.
- Add a note (optional). Select the message icon to add a note to the schedule.
- Notify employees. If the Notify employees checkbox is selected, the scheduled employee will be notified about their new schedule via the Personal App if they use it.
- Select Save to add the schedule.
Schedule multiple employees
To schedule one or more employees at a particular job site, click on a calendar cell on that job site's row. In the Add schedule dialog that opens next, you need to perform the following steps:
-
Select dates. Under Date, you specify the schedule's dates. By default, the schedule has the same dates as those represented by the cell you selected on the job site's row. However, you can edit the dates if needed.
-
Add a note (optional). Select the message icon to add notes to the schedule.
-
Notify employees. If the Notify employees checkbox is selected, the scheduled employees will be notified about their new schedule via the Personal App if they use it.
-
Search and filter employees. Next, locate the employees you want to schedule in the Available now list. You can either search for the employee by their name or company or filter the list of employees by pay group, classification (same as job title), available dates. Additionally, you have an Include employees with assignments option to include the employees who already have schedules for the selected period or a part of it. The following cases are possible:
-
If the employee is already scheduled at the same job site, the profile is disabled and not available for selection.
-
If the employee is already scheduled at one or more other job sites, a warning sign appears on the employee entry. You can hover over the warning sign to see what other job sites the employee is scheduled at. The following screenshot highlights the warning sign on the employee profile.
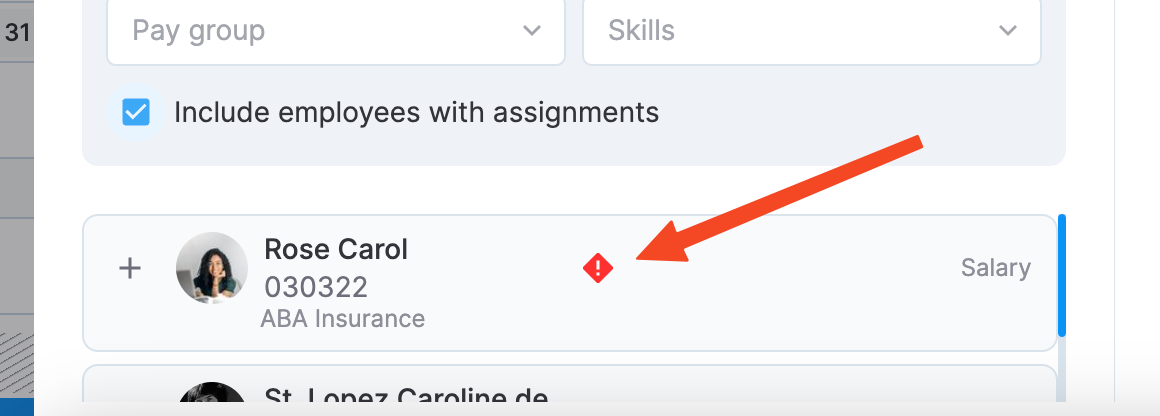
A warning sign indicating that the employee is scheduled at one or more other job sites on the selected period
-
-
Select employees. Now, select the employees that are going to be scheduled. To learn more about each employee, you can either select the name to navigate to the employee profile or select the employee's profile picture to open the employee card on the same page. To add the selected employees, drag and drop the selection on the Other members area of the dialog.
-
To create the schedules, select Schedule in the upper right corner of the dialog.
Schedule a crew
To schedule a crew, repeat the first five steps in Step 2.2: Schedule multiple employees. Next, assign a crew leader by adding an employee to the Crew leader area of the dialog.
NOTEIn the context of scheduling, crews are distinct entities and are not related to job site crews. Therefore, the crews you create as part of scheduling are only available in the Scheduling section and don't affect other parts of your MobiClocks environment.
Next, perform the following steps:
- Specify crew name. By default, the crew is named after the crew leader, but you can edit it.
- Select a color. Assign a color to the crew using the color picker on the right-hand side of the dialog. Crew schedules will appear in the selected color in the calendar.
- To schedule the crew, select Schedule in the upper right corner of the dialog.
Schedule from Staff
The Staff section provides a list of available employees for scheduling or assigning based on your selected date ranges. Access the section through a button on the scheduling board, as highlighted in the following screenshot.
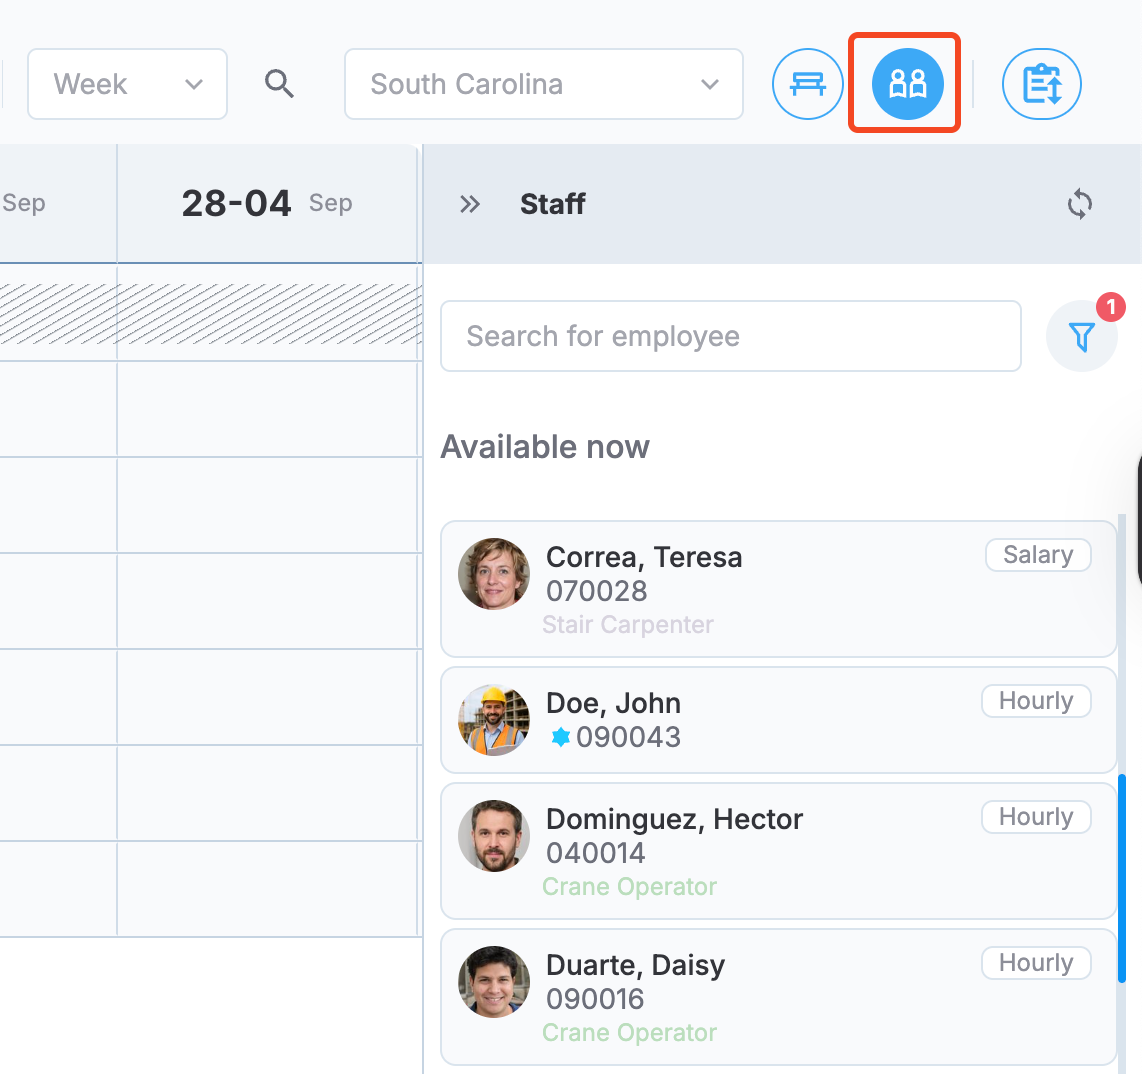
Accessing Staff
Use Staff to filter employees based on specific criteria and schedule them using drag-and-drop functionality. The following sections provide step-by-step guidance on using the Staff section.
Locate employees
Staff automatically filters employees based on the date range you select in scheduling calendar:
- Past date ranges. If you select dates in the past that don't include the current day, the system automatically filters employees based on the current day.
- Current day included. If the current day falls within your selected date range, employees are filtered by the current day.
- Future date ranges. If you select dates in the future (not including the current day), employees are filtered by their availability starting from the first day of your selected date range.
To further narrow down your list of employees, use the search option or filters. The following filtering options are available:
- Pay group. Filter employees by their pay group.
- Classification. Filter employees by their job title.
- Org unit. Filter employee by their organization units. This option is only available if your organization is converted to an enterprise structure.
- Available from. Filter employees by their availability dates.
- Include scheduled employees. Choose whether to include employees who already have schedules within the selected date range.
Select Apply to implement your filters. Use Reset to clear all selections and start fresh.
Schedule or assign
You can use drag-and-drop functionality to schedule or assign employees to job sites. The system responds differently depending on where you drop an employee profile. Consider the following cases:
- Assignment. Drag an employee profile to a job site and drop it on the Assign option to assign the employee to a job site.
- Scheduling. Drag an employee profile to a job site and drop it on the Schedule option to open the individual employee scheduling dialog with the current day prefilled.
- Calendar cell. As you hover or drag over cells, they become highlighted. Dropping an employee on a specific cell opens the scheduling dialog with that cell's date range prefilled.
- The list of scheduled employees. Dropping an employee into the scheduled employee list of the job site opens the scheduling dialog without prefilled dates. The employee appears in the list where you placed them. After page refresh, employees will be automatically sorted alphabetically by name.
- Assigned employees with no schedules. Dropping an employee in this subsection of a job site creates an assignment.
After dropping an employee profile, follow the individual employee scheduling process. See Schedule an individual employee for detailed information about the scheduling dialog and subsequent steps.
Schedule from Bench
The employee Bench is a centralized workforce management tool that organizes available employees into custom categories for efficient scheduling and assignment. Access the section through a button on the scheduling board, as highlighted in the following screenshot.
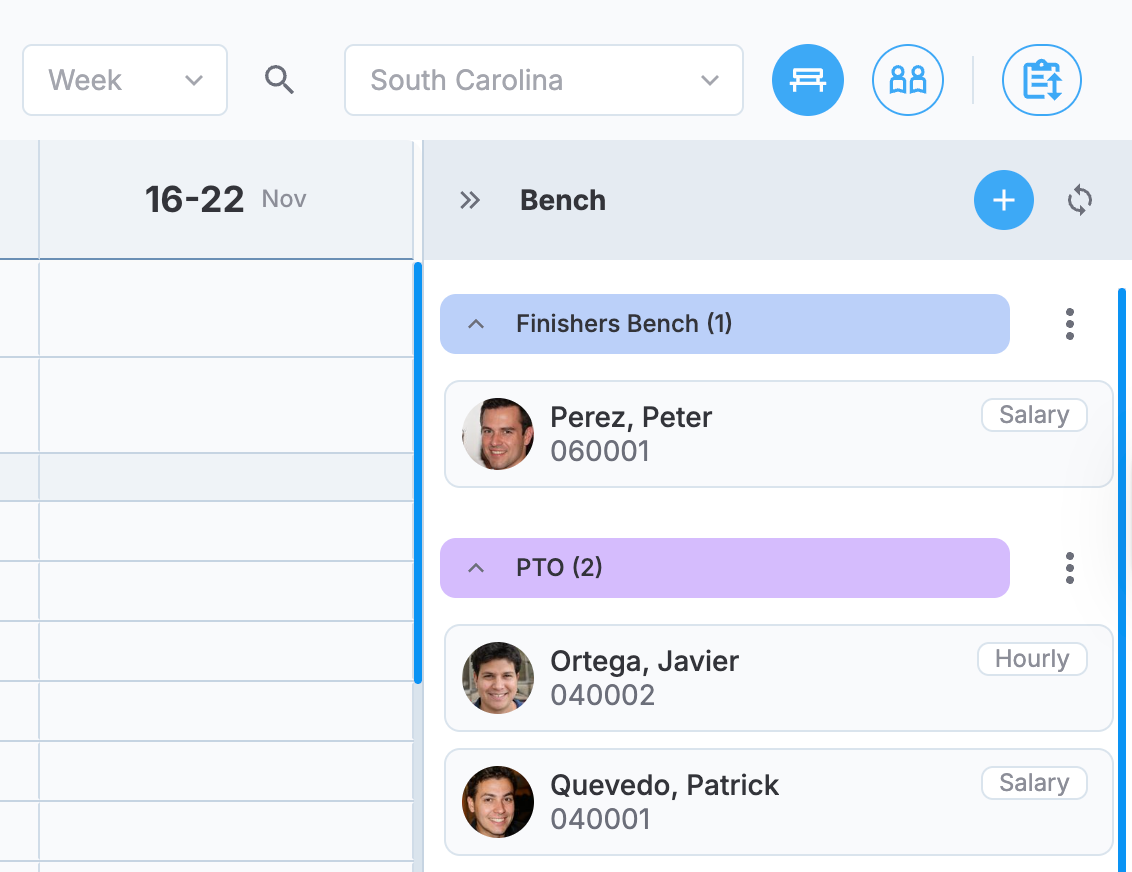
Accessing Bench
Schedule or assign
You can use drag-and-drop functionality to schedule or assign employees to job sites. The system responds differently depending on where you drop an employee profile. Consider the following cases:
- Assignment. Drag an employee profile to a job site and drop it on the Assign option to assign the employee to a job site.
- Scheduling. Drag an employee profile to a job site and drop it on the Schedule option to open the individual employee scheduling dialog with the current day prefilled.
- Calendar cell. As you hover or drag over cells, they become highlighted. Dropping an employee on a specific cell opens the scheduling dialog with that cell's date range prefilled.
- The list of scheduled employees. Dropping an employee into the scheduled employee list of the job site opens the scheduling dialog without prefilled dates. The employee appears in the list where you placed them. After page refresh, employees will be automatically sorted alphabetically by name.
- Assigned employees with no schedules. Dropping an employee in this subsection of a job site creates an assignment.
The following GIF illustrates the 1st and 3rd options.
Assigning and scheduling employees
After dropping an employee profile, follow the individual employee scheduling process. See Schedule an individual employee for detailed information about the scheduling dialog and subsequent steps.
See Employee Bench management to learn about bench categories, how to add employees to the bench, and more.
Scheduling actions
Create views
You can create multiple views that include a custom selection of job sites. Views are located in the upper right corner of the page. Perform the following steps to create a new view:
- Select Create view.
- Specify a View name.
- Select the job sites you want to include in the view.
- Select Create to save the view
- Access the new view from the list of views.
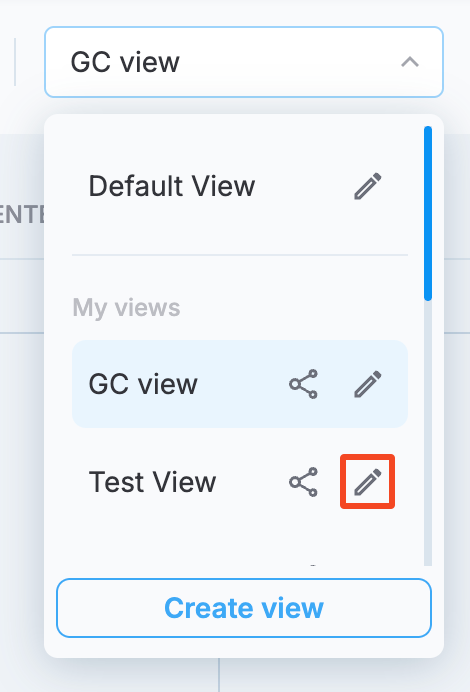
Edit views
To edit an existing view, select the edit icon next to the view name in the list of views, as highlighted in the following screenshot.
Editing views
The view editing dialog is similar to the view creation dialog discussed earlier. After you're done editing the view, select Save to save your changes. You also have the option of deleting the view using the Delete button. The following screenshot shows the view editing dialog.
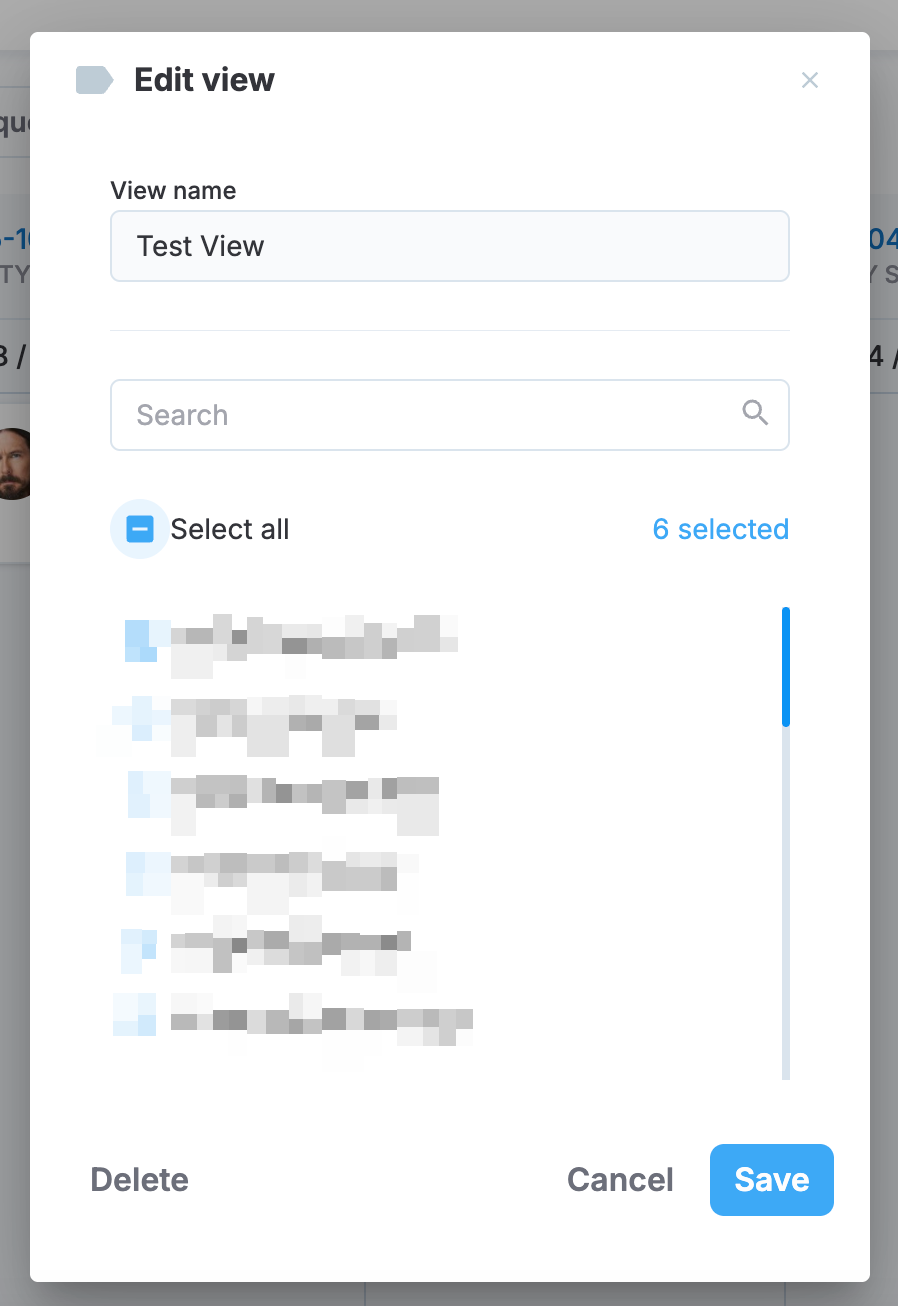
View editing
Share views
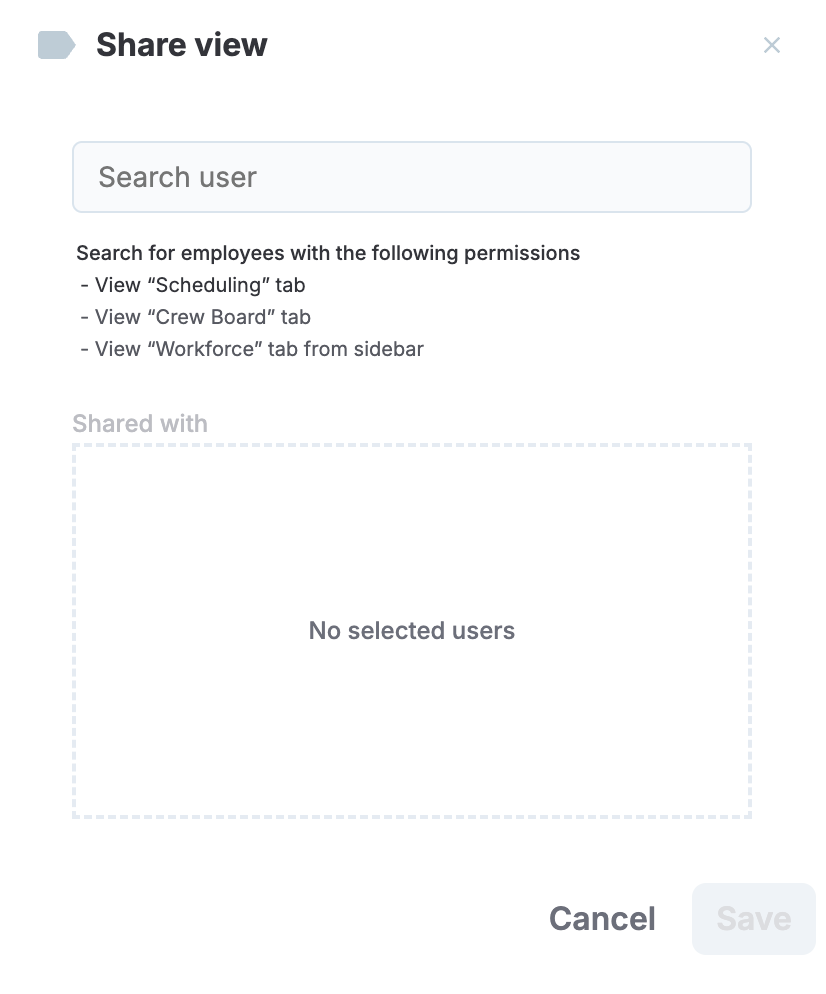
Share views with other users in your MobiClocks environment. Users that access your view, start seeing it in their list of views. To share a view, perform the following steps:
-
Select the share icon next to the view name in the list.
-
Search for users and Add them. Added users appear in the list under Shared with, as shown in the following screenshot.
1.
Share view dialog
-
Select Save to share the view with all the selected users.
NOTEIf the creator of a view is removed from the MobiClocks environment, ownership of the view transfers to the first user with whom the view was shared.
The list of users can be modified later on. You may add more users or remove existing ones. Users can remove the views shared with them.
Global search
Global search allows you to find and filter employees. You can search by employee name, employee number, or filter by classification, that is the job title), within your selected date range and job sites (a view if selected).
Access search
You can access the Global search in the Scheduling tab in two ways:
- Click the Search button in the toolbar.
- Use the keyboard shortcut Command + F (Mac) or Control + F (Windows).
Perform search
- Open the search dialog using one of the methods mentioned earlier.
- Enter at least two characters to activate the search (for example, "Em").
- As you type, the system displays autosuggestions for matching employees or classifications
- You can either:
- Select an item from the autosuggestions.
- Continue typing to refine your search.
- Press Enter or click the Search button to see all matching results.
The following screenshot shows the list of autosuggestions after entering a first name.
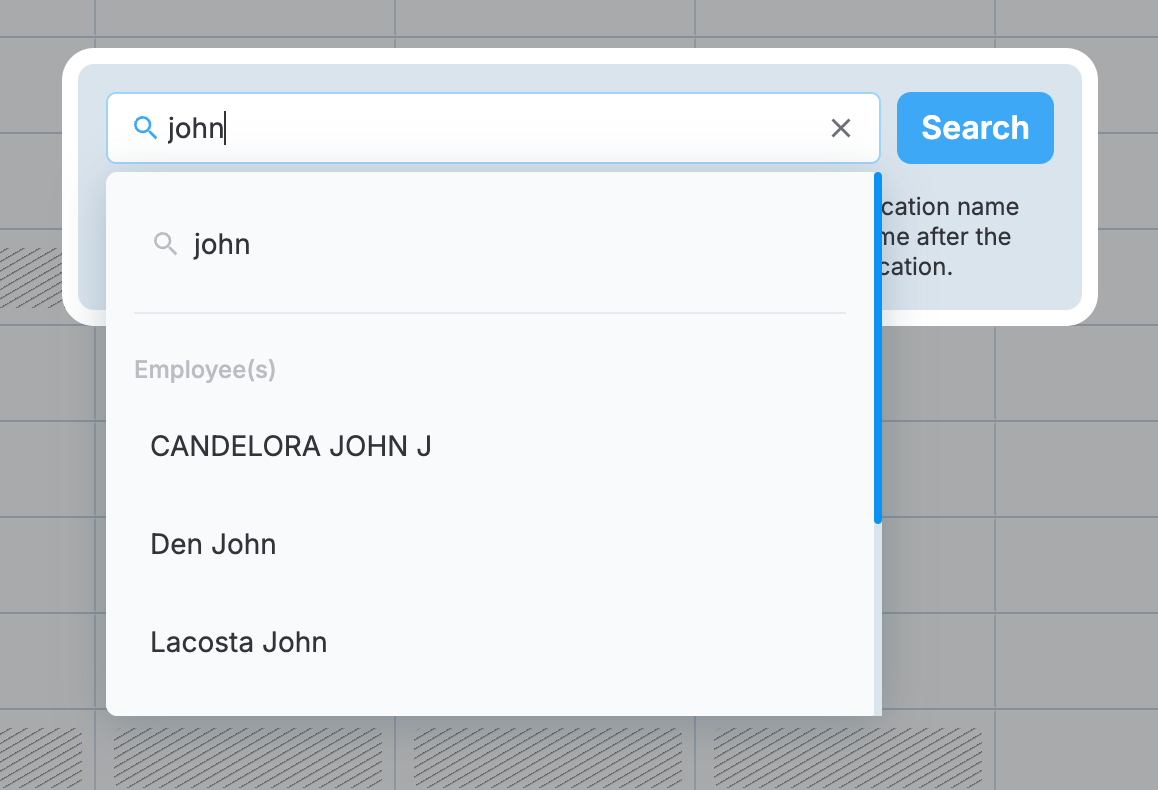
Search autosuggestions
Search results behavior
When you select an employee or classification from the autosuggestions:
- The search window automatically closes.
- The system applies relevant filters.
- The Scheduling page displays only job sites where the selected employees are assigned.
- Only those employees are shown within their scheduled job sites
If you don't select from the autosuggestions and instead press Enter or select Search:
- All matching results (including both classifications and employees) are displayed.
- Pressing Enter or selecting Search again will:
- Close the search window.
- Filter the results.
- Highlight the search term on the page.
Refine your search
You can continue adding characters to refine your search (for example, changing "Em" to "Emp"). After refining, press Enter or select Search to see updated results. Double-clicking the Search button or clicking Enter will apply the filtered view to the Scheduling page.
Search Term Highlighting
Search term highlighting only works when no specific employee or classification has been selected.
When active, all instances of your search term will be highlighted on the page. For example, if you enter carpent and then select Search twice, the Scheduling page is filtered with all the corresponding results (all the employees with a Carpenter classification), and carpent is highlighted on the page, as shown in the following screenshot.
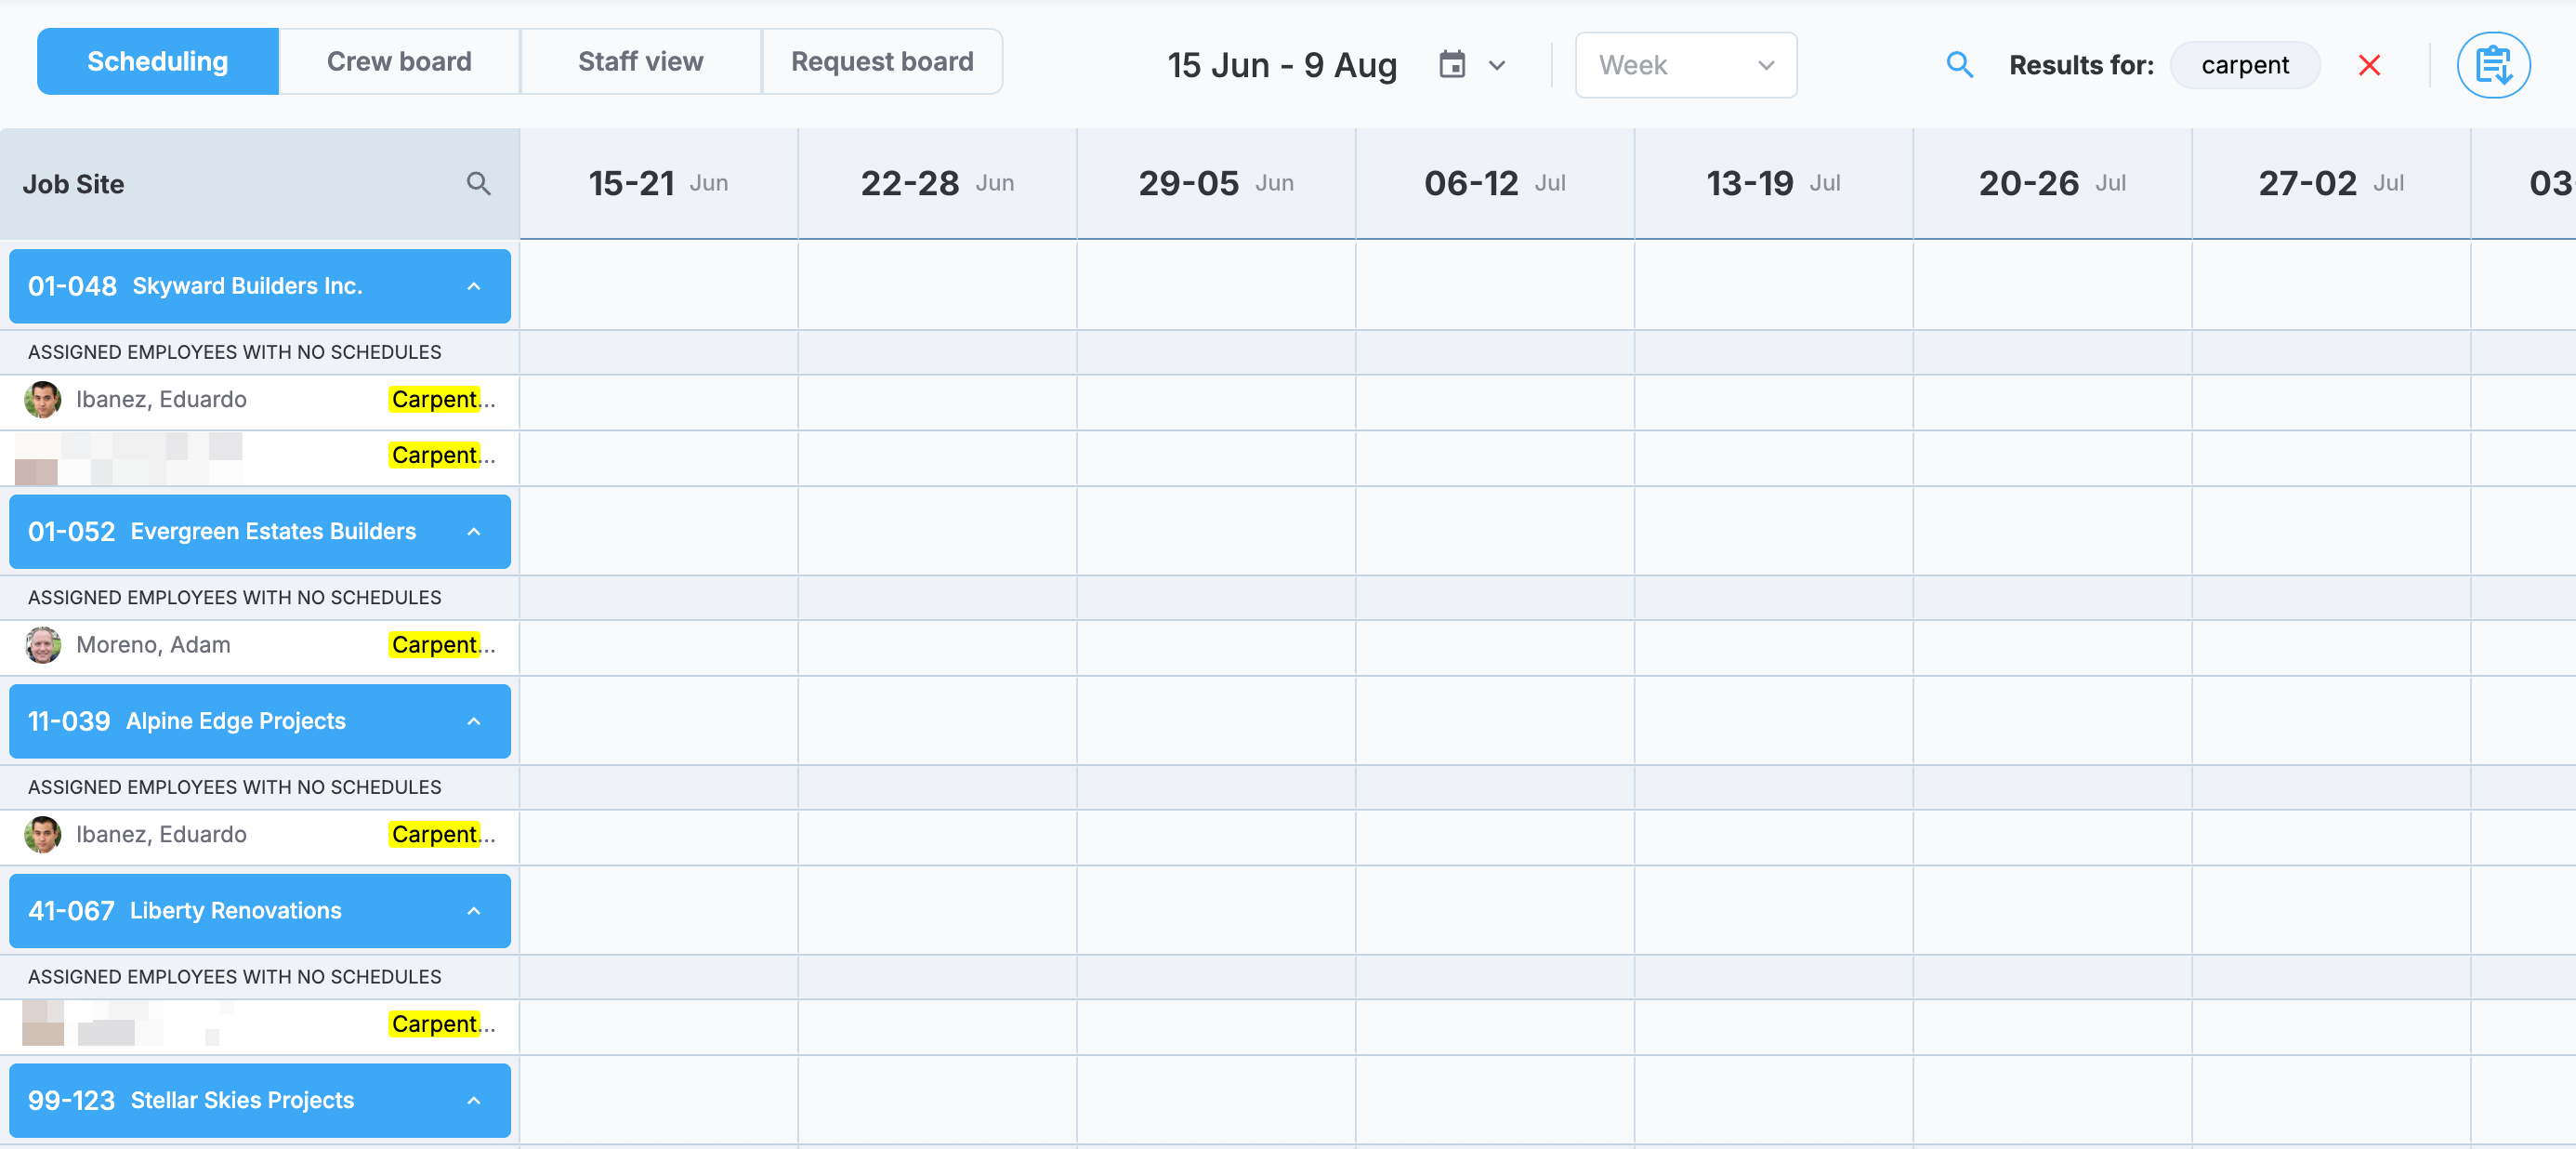
Highlighting a search term on the page
Employee Bench management
Organization unit visibility
If your MobiClocks environment is converted to an enterprise structure, Bench provides global visibility across your organization unit, ensuring consistent workforce management across all job sites and scheduling views. When selecting All or Global filters from the main header, an organization unit filter appears on the Employee bench, allowing you to view and manage employees across different organizational divisions.
Access restrictions:
- Employees can only be added to benches within their organization unit.
- Shared bench categories are only visible to users with access to the relevant organization unit.
- Active crew leaders cannot be added to the bench due to scheduling limitations.
Custom categories
Create unlimited custom bench categories to organize your workforce according to your operational needs. To create a new category, select the plus (+) icon on the bench. This will open a dialog where you must add a category name and select its color, as highlighted in the following screenshot.
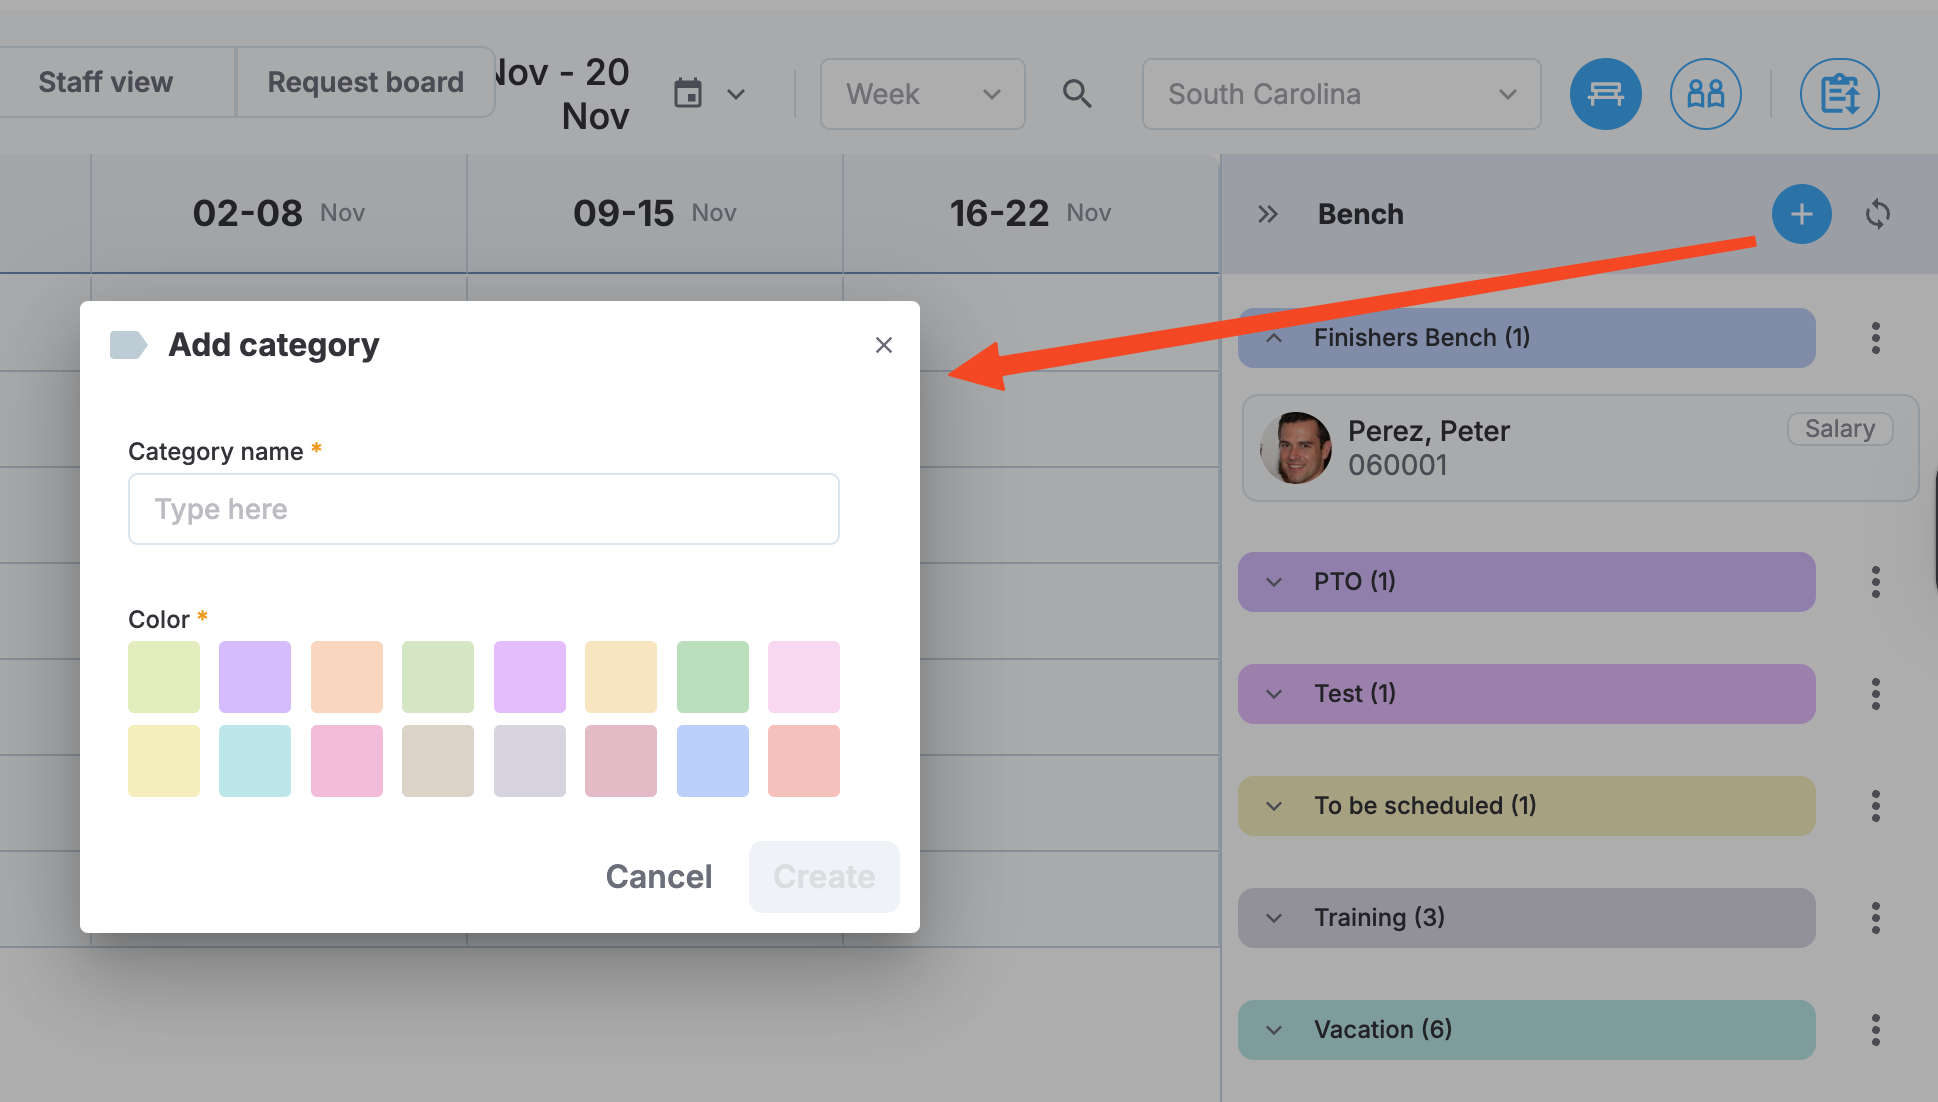
Creating a bench category
There is no predefined category list, and you may create as many custom categories as needed.
In the three-dot () menu of a category, you have options to edit category members and delete the category. The following screenshot highlights these options.
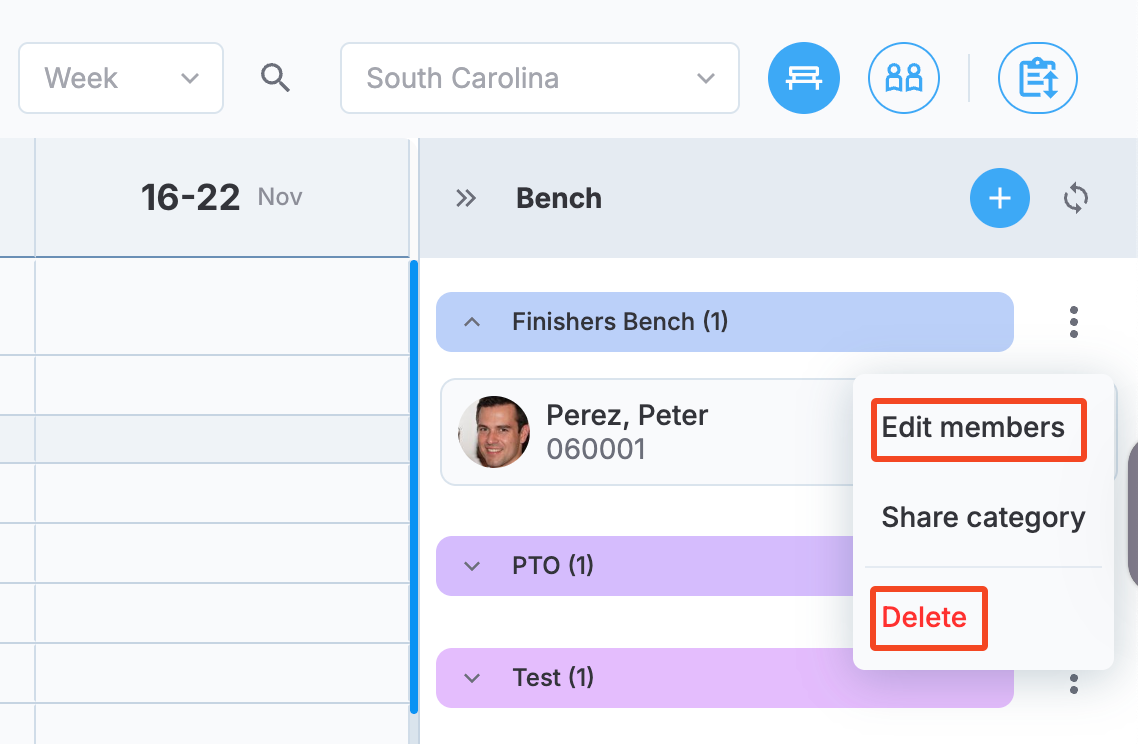
Edit members and Delete
Adding employees to the bench
Employees can be added to the bench from multiple locations in Workforce:
- Staff view
- Scheduling
- Crew board
When an employee is added to the bench, their current schedule automatically ends as of yesterday, making them immediately available for new assignments.
Collaborative sharing
You may share any of the bench categories with other users in your environment to collaborate.
PERMISSIONSYou may share bench categories and configure permissions if you have the Manage employee bench permission enabled for your role in Administration () > Role Permissions > Workforce.
Perform the following steps to share a category:
-
To share a category, select the tree-dot () menu next to the category name and choose Share category.
-
Locate users using the search bar and select them to add to the Share with list.
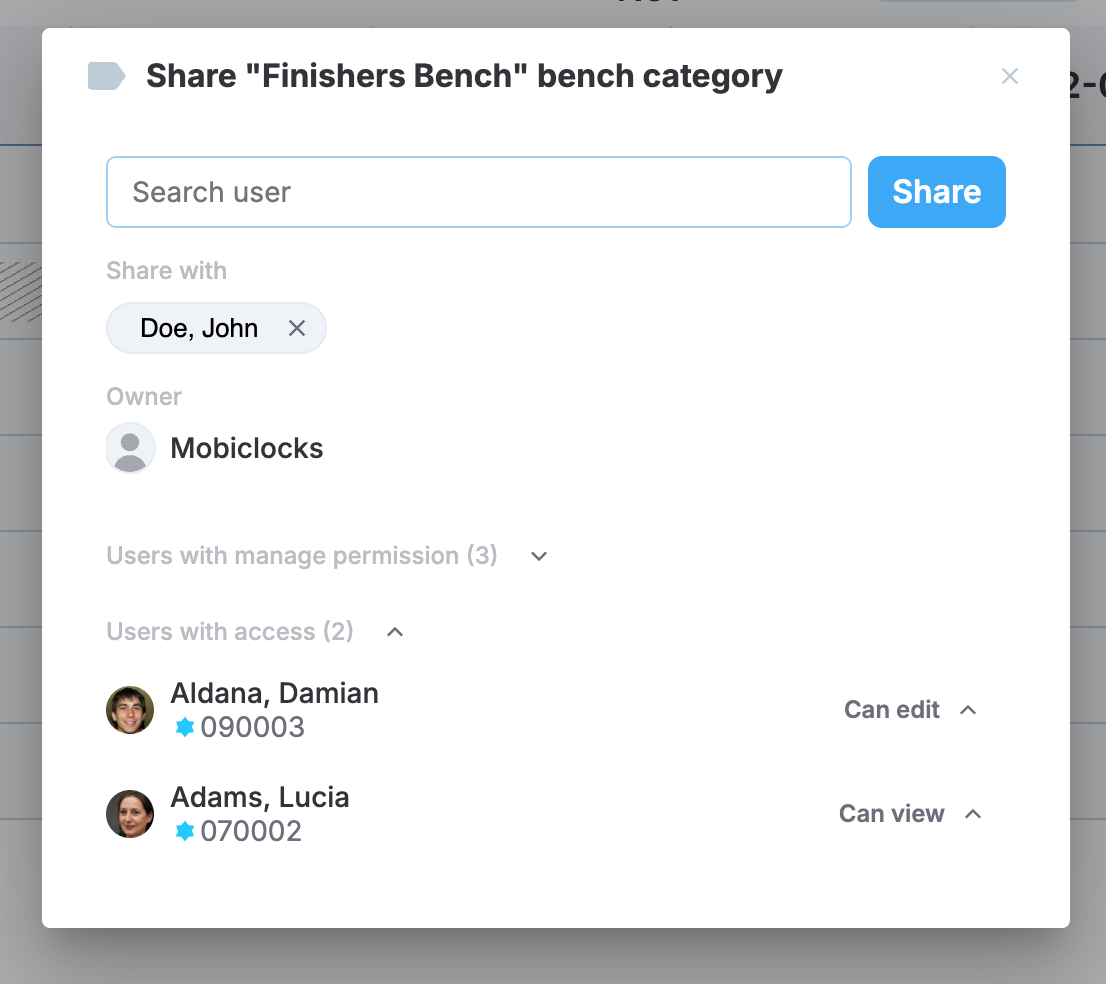
Adding users to Share with
-
Select Share to share the category with the list of the users.
-
Users who have access to the category will appear under the Users with access, where you can configure their permissions:
-
Can view: can only view the category.
-
Can edit: can edit the category.
-
Remove: remove access for the user.
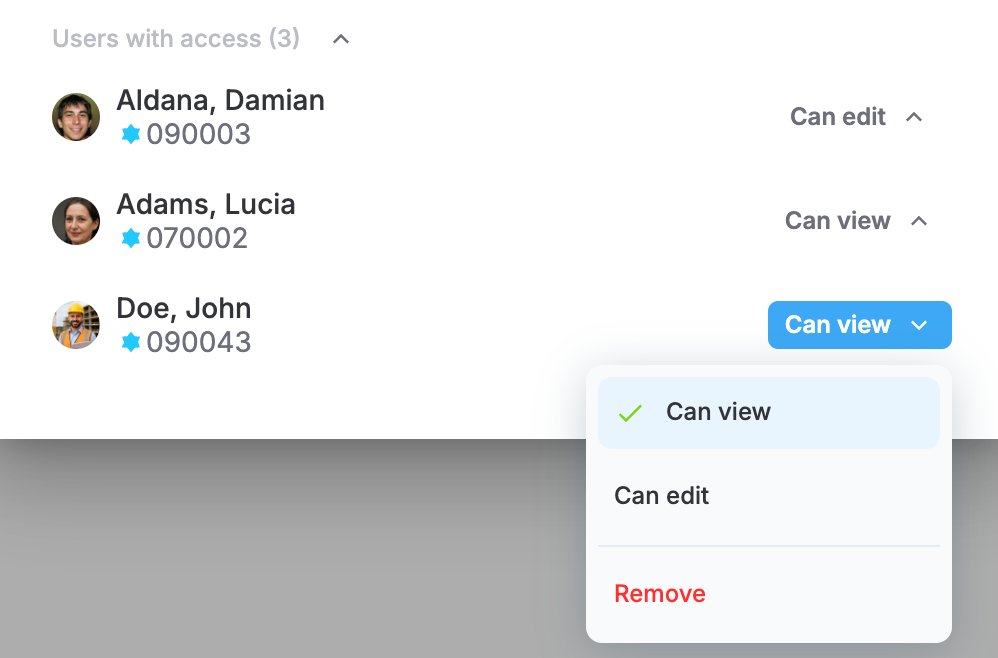
Configuring user access
-
In the category sharing dialog, you also have a Users with manage permission list that includes other users who have the Manage employee bench permission. Lastly, the dialog also indicates the Owner of the category who has created it.
Updated 21 days ago