
Job site settings
Configuring a job site.
Each job site in your MobiClocks environment can be configured to fit your project's needs. This topic provides an overview of all the available settings, explaining what each setting is for and how it's configured.
PERMISSIONSYou may access job site settings if you have the View "Settings" tab permission enabled for your role in Administration > Role Permissions > Job Sites.
To access job site settings, select a job site in the job site list to navigate to the job site details page. Job site settings are located in the Settings tab of the details page.
General settings
PERMISSIONSYou may edit general settings if you have the Edit general settings permission enabled for your role in Administration > Role Permissions > Job Sites.
The following settings are available in this section:
- Organization Unit. The Organization Unit that the job site is part of. This option will be available only if your MobiClocks environment is converted to an enterprise structure.
PERMISSIONSYou may assign a job site to an Organization Unit if you have the Assign to organization unit permission enabled for your role in Administration > Role Permissions > Job Sites.
-
Job site name
-
Job site number. A unique identifier for the job site. The format of the job site number can be specified in Administration > Settings > Job Site Setup.
-
Main address. Specify the job site address. Apart from informational purposes, the address is used in geofence creation. To add an address, fill in the formal address of the job site or specify Latitude and Longitude. The following screenshot shows the dialog for adding the main address.

Job site address
-
Timezone. The timezone of the job site's location. The list starts with the Recent section that contains the timezones recently used in your MobiClocks environment.
-
Status. A newly created job site is automatically assigned an Active status. However, if the job site is no longer needed in your environment (for example, the work has been successfully completed), you can Archive or Disable it. Technically, these two options are similar, and they both remove the job site from the default "Active" list as well as unassign all the employees that were assigned to it.
-
Face recognition. If this setting is deactivated, employees are no longer required to punch in and punch out when attending the job site. When entering the job site using the Personal App, employees only need to press the Punch In button (or the Punch Out button if they are leaving the job site). In the case of the Kiosk App, however, employees also need to enter their employee number. Learn more about how face recognition works in Face recognition.
-
Offline face recognition. If this setting is enabled, employees can punch to the job site using face recognition even if the device is offline. In this case, the face recognition process works the same way as online, and identification takes place instantly without an internet connection.
-
Include in Payroll. Choose whether to include the job site and its associated timelogs in the Payroll flow.
In-geofence punch out only
If this setting is enabled, job site employees can only punch out if they are within the geofence zone of the job site.
Certified payroll
Here, you can activate Certified Payroll for the job site. Certified payroll is a payroll report type required from contractors working on federally funded projects. The main goal is to make sure that employees working on the project are paid the prevailing wage or the average wage for employees in a given occupation. Learn more on certified payroll at https://www.forbes.com/advisor/business/certified-payroll/.
Activating Certified Payroll adds new fields to the Pay Classes tab of the job site. These fields are used to define the employee wage rates required by the certified payroll. See Pay Classes to learn more.
Lastly, when you enable Certified Payroll, a Require pay class cost coding toggle appears below, which, if enabled, requires you to apply pay classes during cost coding to be included in the payroll report.
PERMISSIONSYou may access the Pay Classes tab if you have the View "Payroll Classes" tab permissions enabled for your role in Administration > Role Permissions > Job Sites. Additionally, you may configure pay classes if you have the Add/edit payroll class permission enabled for your role under the same Administration setting.
User-defined fields
In this section, you see all the custom fields set up in Administration > Settings > User Defined Fields > Job Site. Using this option, you can supplement the job site profile with any additional details that are not accounted for by the default settings.
Geofence zones
The geofence zone feature allows specifying the exact area and boundaries of the job site, which can then be used to specify additional rules. For example, you can allow employees to punch out inside the job site's geofence zone only.
PERMISSIONSYou may add or edit a geofence zone if you have the Add/edit geofence permission enabled for your role in Administration > Role Permissions > Job Sites.
The starting point for applying a geofence zone is the map and the job site's address. The following cases are possible:
- If a valid address is added in Job Site Address, the system will automatically pin the address on the map with a pin icon. Clicking on the address entry below the map will take you to the corresponding location on the map.
- If the added address cannot be recognized, it will still be indicated below the map, but the location will not be pinned.
- If the address is missing, you will be suggested to pin the location manually, and the address field will be auto-filled. When tapping on a valid main address, you will be redirected to the respective location on the map.
The following screenshot illustrates the geofence map with job site address defined and located on the map.
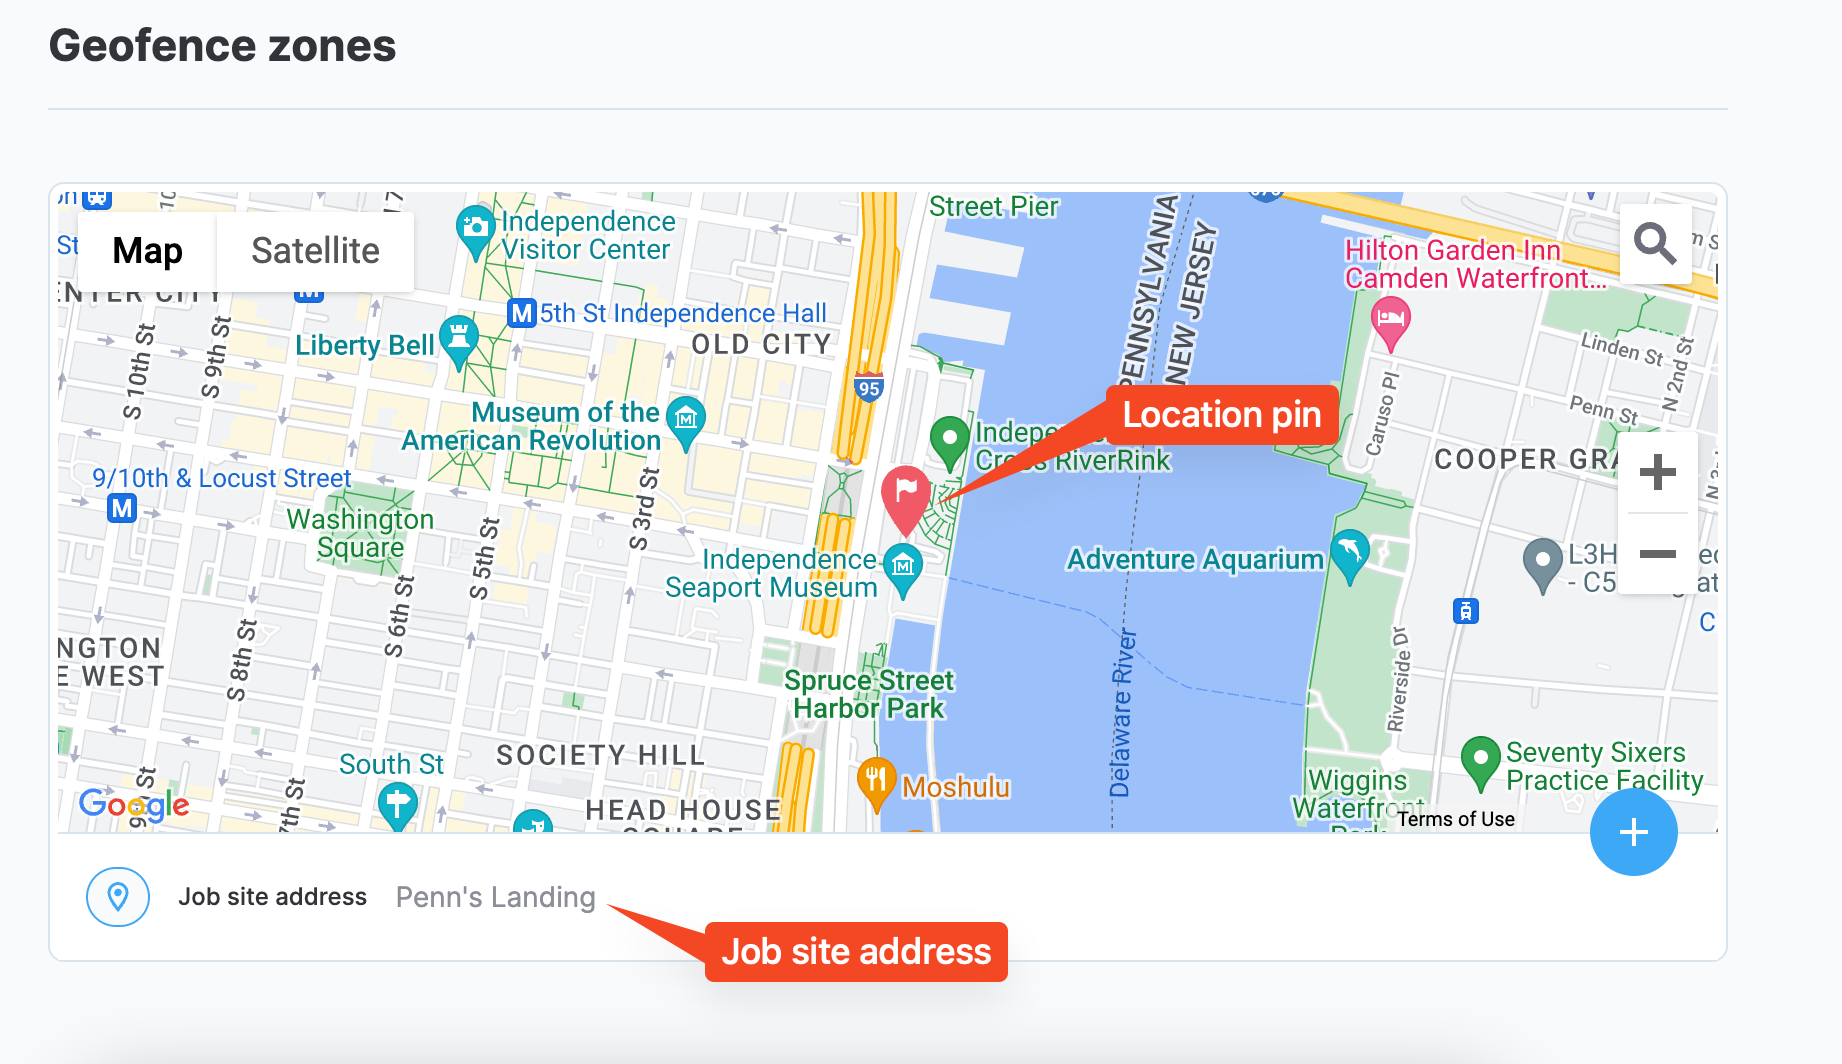
Geofence map with the job site address and location pin icon
After finishing with the job site address, you can start creating the geofence zone. A geofence zone can be created either automatically or manually. To manually create a geofence zone, you need to perform the following steps:
- Select the plus (+) icon in the lower right corner of the map. This switches the map to geofence zone editing mode.
- Add a name for the geofence zone.
- Select the hand icon to navigate to the desired location on the map.
- Choose one of the available shape types, Polygon or Circle, and draw the zone on the map. The zone doesn't have to include the job site address and can be drawn anywhere on the map. After you select Save, the system will calculate the center of the zone and pin it as the zone's address.
- The created zone will be added to the list below the map and can be edited in the future. Note that you can add as many geofence zones as needed.
The following screenshot shows multiple geofence zones added for a job site.
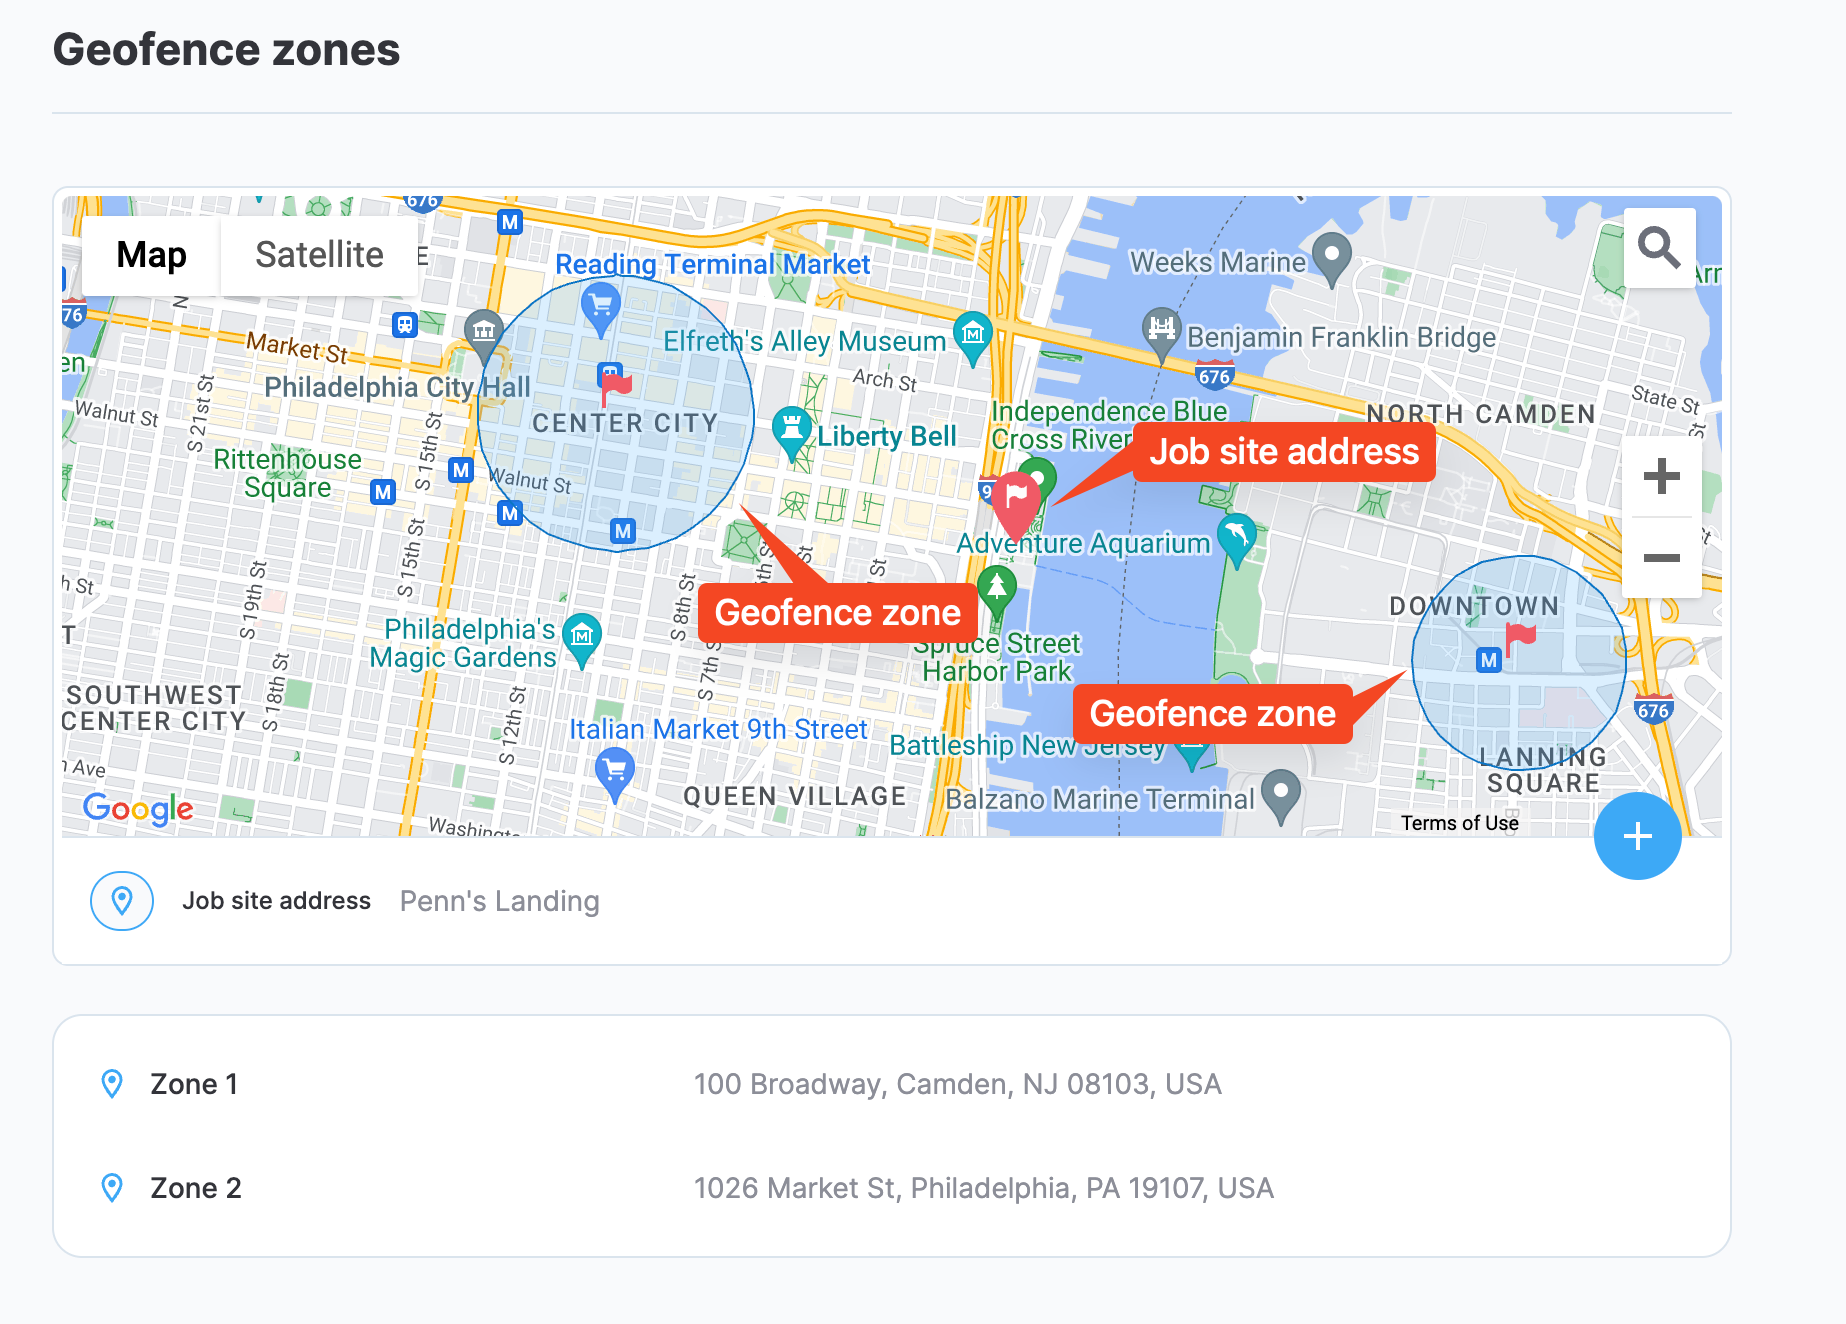
Geofence zones added to the map
To have a geofence zone created automatically, activate the Geofence auto-apply option in Administration () > Settings > General. In this case, a geofence circle with the specified radius will be created automatically around the job site's location pin.
GPS tracking
PERMISSIONSYou may edit GPS settings if you have the Edit GPS settings permission enabled for your role in Administration () > Role Permissions > Job Sites.
VISIBILITYThe job site GPS tracking setting becomes available if GPS tracking is enabled in Administration ().
Here, you can enable or disable GPS tracking for the job site and also override the system-level values for the Alert tolerance settings. See GPS to learn more about GPS tracking in general and the Alert tolerance settings in particular.
Working hours policy
PERMISSIONSYou may configure working hours if you have the Edit "Job Site Hours" policy permission enabled for your role in Administration > Role Permissions > Job Sites.
You can activate this setting to specify working hours and some additional settings for your job site. If the Working hours option is activated, you can configure the following settings:
- For each day of the week, you can indicate job site working hours or mark the job site as Closed. There is an Apply to all button to set the same working hours for the rest of the days as well as an All day option to indicate that the job site is open for 24 hours. The following screenshot illustrates the process of configuring working hours.
Configuring working hours
- Auto-adjust punches to work hours. After setting working hours for the job site, you can have the system auto-adjust punch times according to site working hours. For example, if the job site's working hours are from 10 PM to 7 PM, and the employee has punched in at 9PM and punched out at 6 PM, the employee's punch-in time is adjusted to 10PM to remain within the working hours range, while the punch-out time remains as it is, since it is already within the working hours range.
- Lock hours. If this setting is on, employees are not able to punch in before the job site opens.
- Flag punches off working hours. If employee punch times are beyond job site working hours, the timelog is flagged as Out of working hours.
- Grace period. Here, you can set how much the punch time can deviate from the job site working hours and not be flagged as Out of working hours. If, for example, the grace period is set to 10 minutes and the job site closes at 7 PM, a punch time between 7 PM and 7:10 PM is not flagged.
Meal Break Policy
In this section, you configure meal break policy settings for the job site. The following two tracking methods are available.
VISIBILITYMeal Break Policy settings become available in job site settings if Meal Break Policy is activated from Administration > Settings > Meal & Rest Break.
PERMISSIONSYou may edit Meal Break Policy settings if you have the Edit Meal/Rest Break Policy permission enabled for your role in Administration > Role Permissions > Job Sites.
Fixed Meal Policy
If Fixed Meal Policy is selected, the duration of the break is subtracted from the employee timelog. The following settings are available:
- Auto-apply. Automatically apply the selected break duration to the timelogs of the job site employees. If this setting is deactivated, you can apply a fixed meal break to a timelog from the timelogs list.
NOTE
The auto-apply toggle needs to be on both in job site settings and in the employee's profile for the feature to be applied.
- Duration. The duration of the break. This overrides the value set in Fixed Meal Policy settings in Administration. In turn, if the duration set for an individual employee in employee profile will override the one in job site settings and, thus, has the highest priority.
- Minimum timelog duration. The minimum timelog duration required for the break policy to be applied. This overrides the value set in Fixed Meal Policy settings in Administration.
NOTEWhen an employee works across multiple job sites with a fixed meal break policy in a single day, auto-apply evaluates the Minimum timelog duration against the employee's total daily worked time, and the settings of the first job site where the employee punched in apply. See Auto-apply when working across multiple job sites for details.
Trackable Meal Policy
Trackable Meal Policy lets employees track their meal breaks manually. The following settings are available:
- Provide a break for every X hours
- Allocated break duration
- Prevent ending early
- On break start
- Require identification
- Geofence lock
- On break end
- Require identification
- Geofence lock
Each of these settings overrides the general Trackable Meal Policy settings in Administration. See Trackable Meal Policy to learn more about each setting and meal tracking in general.
NOTEWhen an employee works across multiple job sites with a trackable meal break policy in a single day, the system merges individual settings from all trackable job sites into a single effective policy for the day. See Policy resolution for details.
Rest Break Policy
Rest Break Policy settings work the same way as Fixed Meal Policy settings and are used to account for any additional employee breaks apart from the meal break. See Fixed rest break policy to learn more.
VISIBILITYRest Break Policy settings become available in job site settings if Rest Break Policy is activated from Administration > Settings > Meal & Rest Break.
PERMISSIONSYou may edit Rest Break Policy settings if you have the Edit Meal/Rest Break Policy permission enabled for your role in Administration > Role Permissions > Job Sites.
Payroll Burden
Here, you can set a payroll burden for any of the Companies that are part of the job site. Payroll burden is a part of the employee payroll that accounts for any additional employee costs such as insurance, bonuses, and so on. Depending on your configuration in Payroll settings, you enter the burden value as a percentage of the employee payroll or as a fixed amount.
VISIBILITYThe Payroll Burden setting becomes available for job sites if Payroll Burden is activated in Administration > Payroll > Payroll Settings.
PERMISSIONSYou may modify payroll burden if you have the Edit burden settings permission enabled for your role in Administration > Role Permissions > Job Sites.
It's also possible to set a Job site default burden that applies to all the companies within the job site. Additionally, you can set up a burden value for individual companies, which overrides the default value. The following screenshot shows the dialog box where payroll burden is configured.

Payroll burden dialog box
Per diem
See Set up per diem.
Production Quantity
Here, you can activate Production quantity tracking for the job site. If it is activated, the following settings can be configured.
Method
Choose the tracking method: Weekly or Daily.
Type
Choose the type: By All Employees or By Crew.
The following settings are only available for the By All Employees type.
Warn missing quantities
Show a warning on daily timelog approval if there are timelogs with missing or 0 production quantity in the cost code.
JTD hours column
Show the JTD hours field in the production quantity tracking table. The field indicates the number of hours tracked for a given cost code to this date. See Track production quantity.
Percentage-based production tracking
Activate percentage-based tracking.
Crew tags
Crews are groups of employees who mainly work with one another as a team on a daily basis. Crew tags are applied to employee timelogs to specify within which crew the employee has accomplished the work. Therefore, the same employee can have different crew tags on different timelogs.
However, there is also the concept of a default crew tag. If an employee has a default crew tag specified, it is applied to all their timelogs by default. Default crew tags are set up in the job site's employees section.
In this section of job site settings, you create or edit crew tags for this job site and its employees. To create a new tag, select Create tag and specify a Name and a Color for the tag.
You also have the Copy tags option to copy all the crew tags to another job site.
PERMISSIONSYou may add, edit, or copy crew tags if you have the Add/edit/copy crew tag permission enabled for your role in Administration > Role Permissions > Job Sites.
Updated about 1 month ago