
Schedule a report
Automating the report generation and sharing.
Report scheduling is the process of automating report generation and sharing. Using Report Scheduler, available in Reports > Report Scheduler in your Web App, you can choose a report and set up an automation flow that generates the report and sends it to the selected recipients according to the specified schedule.
Create a schedule from the Report Scheduler page or directly from a report on the Dashboard. See Schedule a report from Reports.
Access and ownership
PERMISSIONSYou may view and manage report schedules if you have both the View "Reports" tab and Manage Report Scheduler permissions enabled for your role in Administration () > Role Permissions > Reports.
The Manage Report Scheduler permission controls access to the whole feature, including the Report Scheduler page, the schedules list and run history, the Schedule a report button, the Schedule action on Dashboard reports, and the edit and delete actions. Without it, Report Scheduler is hidden.
You may schedule only the reports you have permission to run. Each report has its own permission in the Reports section of Role Permissions, and reports you can't run don't appear in the Report list.
Every schedule has an owner, the user who created it. What you can see and manage depends on your role:
- Front-office roles, such as PMs, see and manage only their own schedules.
- Back-office roles see and manage any schedule within their environment or organization unit (if your environment is converted to an enterprise structure), including schedules owned by other users.
In all cases, you see and send reports only for the organization units, companies, and job sites within your access.
NOTEIf a user loses the permission to run a report, their existing schedules for that report aren't deleted, but the user can no longer view, edit, or receive them. Admins keep full access and can edit or delete these schedules if needed.
Schedules list
The Report Scheduler page opens with the list of existing schedules. Each row represents one schedule and includes the following columns:
- Owner: The user who created the schedule, with their full name and employee number. For front-office users, you can select the name to open their profile.
- Schedule name: The name of the schedule. See Report information to learn how names are generated when left blank.
- Report: The name of the scheduled report.
- Format: The output format, such as CSV, XLSX, or PDF.
- Schedule: The recurrence of the schedule, for example,
Every day at 03:00 PM. - Recipients: Select View recipients to see all the recipients of the schedule, including roles and custom email addresses.
- Runs: The status of the three most recent runs, followed by a See all link that opens the full run history. See View run history.
- Actions: Options to edit or delete the schedule. See Edit or delete a schedule.
You can use the time zone selector to choose which time zone the Schedule column uses:
- System timezone: The time zone set for your environment in Administration () > Settings > General.
- Local timezone: The time zone of your device.
- UTC timezone: Coordinated Universal Time (UTC).
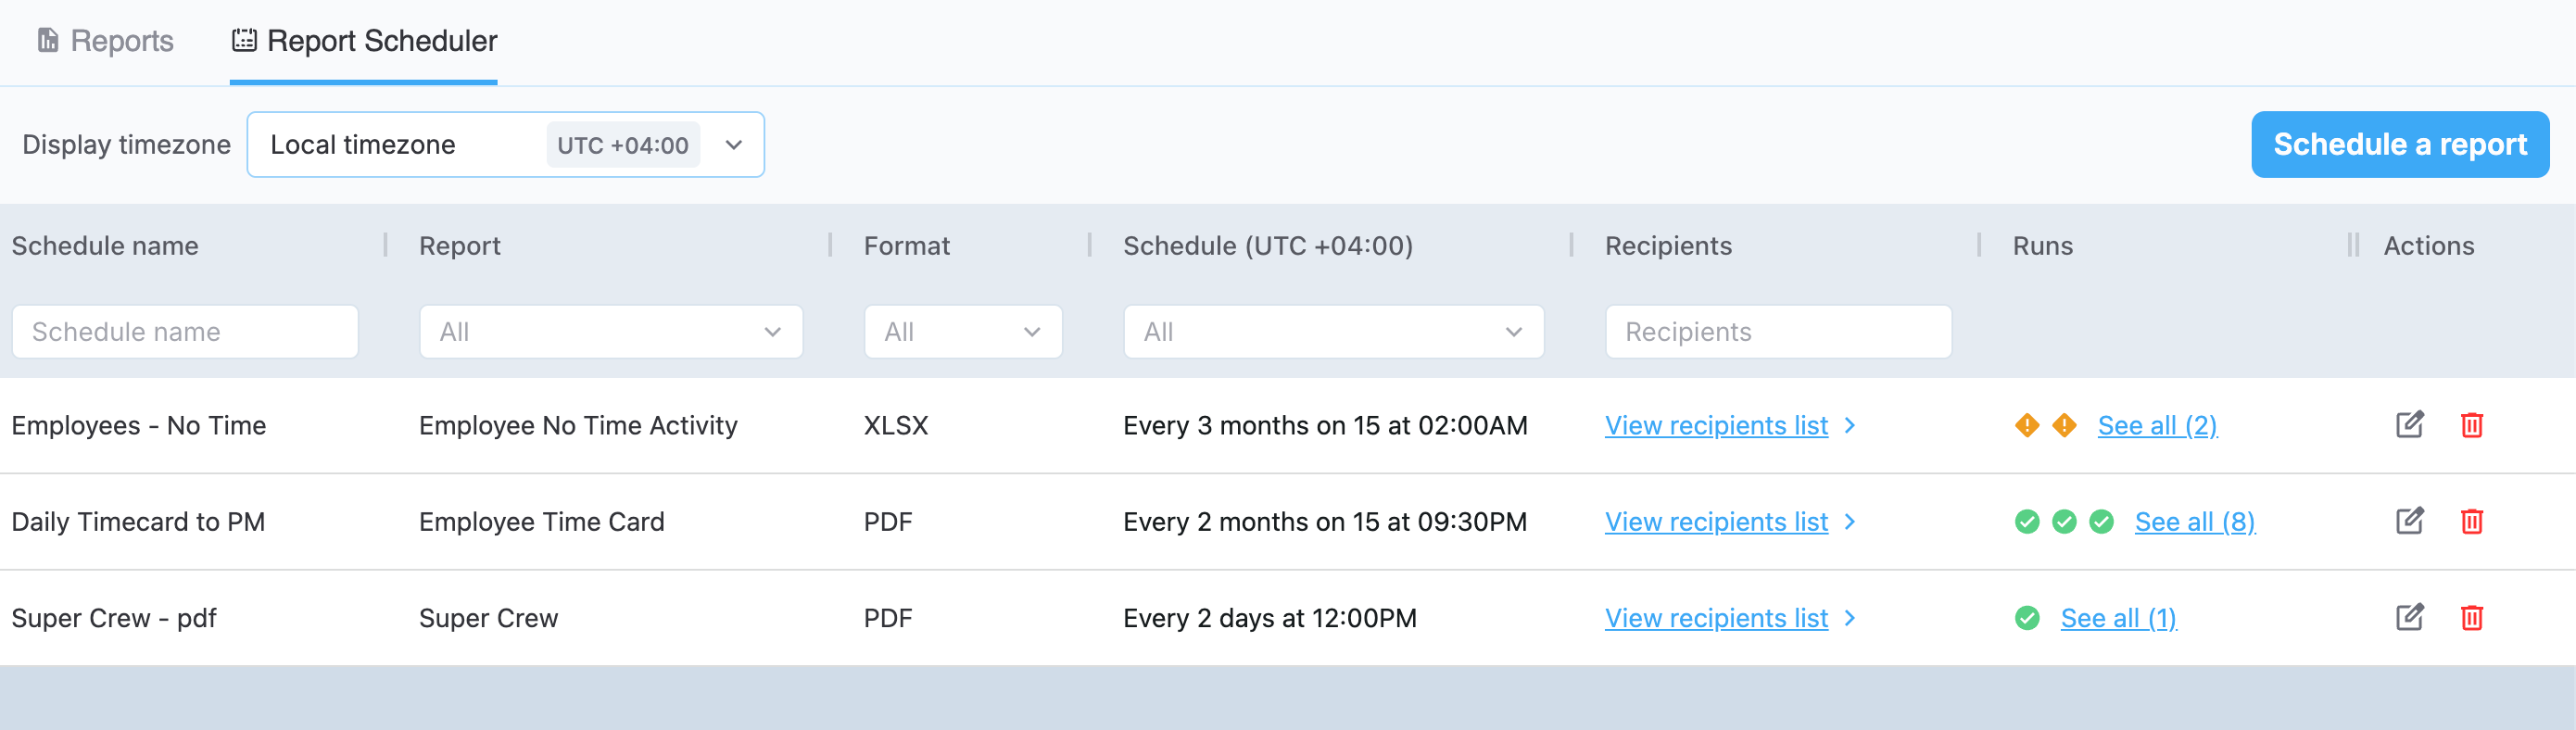
Schedules list
Create a schedule
To create a new schedule, select Schedule a report on the Report Scheduler page. The Schedule a report panel opens, where you configure the report, filters, schedule, and recipients. The following sections describe each part of the panel.
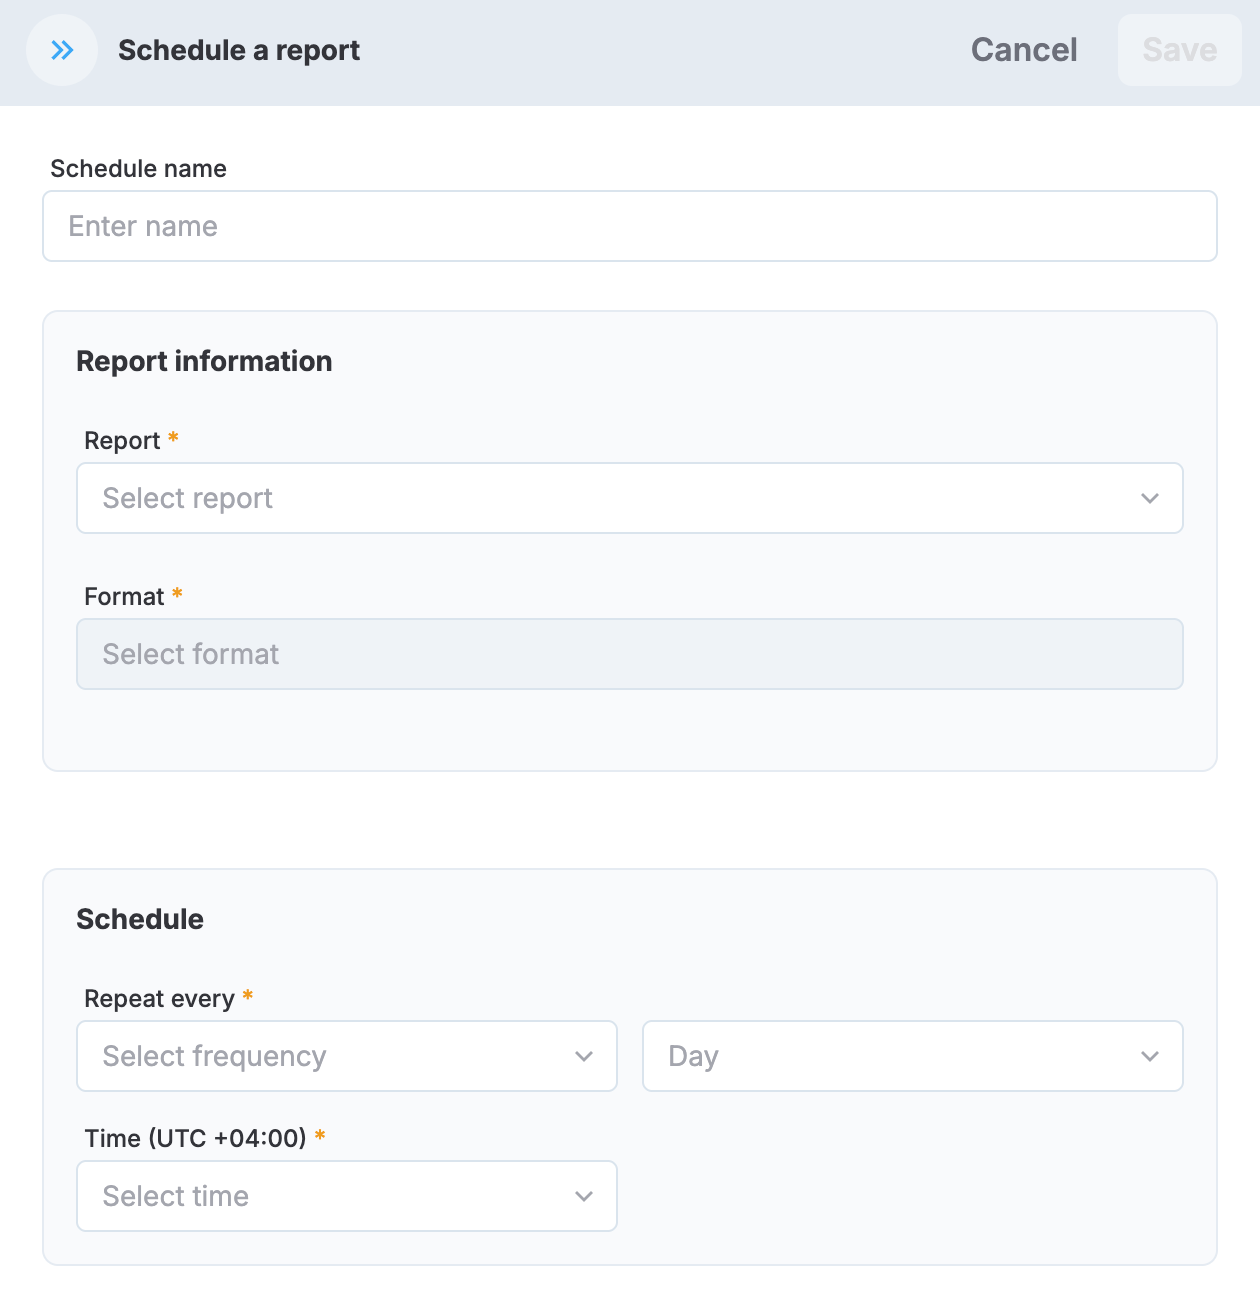
"Schedule a report" panel
Report information
In the Schedule name field, you can enter a name that helps you tell schedules apart. The name doesn't affect the report contents. If you leave the field blank, MobiClocks generates a name from the report name and format when you save the schedule, for example, Employee Timecard - PDF.
In the Report information section, select the following:
- Report: The report to schedule. Select a report from the list, or enter its name in the search field. The list includes all standard and custom reports, as well as data exports, such as Clocks Export, Employees Export, Job sites export, and Production Quantity Export. Reports that belong to a module, such as Scheduling or SMS, appear only when that module is enabled.
- Format: The format that the report is generated in. Different reports support different formats, so the list of options can differ.
- Generation type: How the report is distributed. There are three options:
- Single file: All the data is compiled into a single file.
- Separate file per company: The data is grouped by the Company field, and a separate file is generated for each company.
- Separate file per job site: The data is grouped by the Job Site field, and a separate file is generated for each job site.
Filters
In the Filter section, you specify the timeframe that the report covers and which data to include.
First, select the timeframe. The available options depend on the selected report and can include the following:
- Current day: The report includes data for the day it's generated. The data reflects what's available at the time the report runs, including in-progress punches according to the report's existing behavior. Because the workday may not be complete, results can change if the same report runs again later that day. This option is available for reports that support daily date selection.
- Last day: The report includes data for the day before it's generated.
- Last week: The report includes data for the previous week.
- Last month: The report includes data for the previous month.
- Custom: The report includes data for a custom period before the report is generated. Select the number of periods and the period unit, such as Days. For example, select
3and Days to include data for the previous three days. This option is available only for some reports.
Next, select the data to include:
- Organization unit: If your environment is converted to an enterprise structure, you can filter the companies and job sites by organization unit.
- Company: The companies to include in the report. Select Automatically include new companies to add companies created later to the schedule automatically.
- Job site: The job sites to include in the report. Select Automatically include new job sites to add job sites created later to the schedule automatically.
Set the schedule
In the Schedule section, you choose how frequently the report is sent:
- Under Repeat every, select the frequency and the interval unit: Day, Week, or Month. For example, select
2and Week to send the report every two weeks. - If you selected Week or Month, use the On field to choose the days the report runs:
- Week: Select one or more days of the week, from Mon to Sun.
- Month: Select one or more days of the month, from
1to28.
- Under Time, select the hour and minutes when the report is sent, and then select Apply.
Select recipients
In the Recipients section, choose who receives the report. You must add at least one recipient. You can combine the following recipient types:
- Role: Select one or more roles. Every user with a selected role receives the report at their email address. Each user sees only the data that they have access to based on their permissions. See Role permissions for more information on roles. The Employee role isn't available.
- Custom email: Enter one or more email addresses. Custom email recipients get all the data in the report, without any permission-related restrictions. If an email address isn't valid, an error is shown.
- Company owners: Company owners (the contact person set in Company details) receive a report with data on their company only. This option is available only when Separate file per company is selected.
NOTETo send reports to the PM role, select Separate file per job site as the generation type. With any other generation type, you can't save the schedule.
Set up SFTP
This option lets you receive reports in a secure FTP (SFTP) folder on your device. To learn more about SFTP, see What is SFTP?
To be able to configure SFTP in Report Scheduler, you first need to configure an SFTP server on your device. The configuration process is different for each operating system. The following guides help you set up an SFTP server on Windows or macOS:
If you're using a different operating system, try a search engine query such as "SFTP server setup on [OS name]", where [OS name] is the name of your operating system.
After you set up an SFTP server, select Send to SFTP folder and fill in the following fields to establish the connection:
- Host: Your host name in the following format:
www.example.com. Don't includehttp://orhttps://. - Port: The default port is
22, but you can use any other port depending on the SFTP setup on your device. - Username: The user name for the SFTP server.
- Password: The password for the SFTP server.
- Folder: The folder that receives the reports. The folder name must start with a backslash, as in
\foldername.
After entering all the details, select Test connection to make sure the connection is established. Then, select Save to save your changes.
Schedule a report from Reports
Every report that you can run from the Reports section has a Schedule action next to its download option. Select Schedule to open the Schedule a report panel with the report already selected. The schedule name, recipients, and the remaining fields start empty. Then, complete the schedule as described in Create a schedule.
View run history
When you have one or more schedules that run regularly, you can monitor their run history to make sure the reports are being sent successfully or learn about any issues.
In the schedules list, the Runs column shows the status of the three most recent runs of each schedule. Select See all to open the full run history of the schedule. The run history shows the total number of runs and lists them from newest to oldest, with the following columns:
- Run Time: When the schedule ran, in your time zone.
- Status: The outcome of the run.
- Actions: Download the report files generated during the run.
- Logs: View the delivery details of the run.
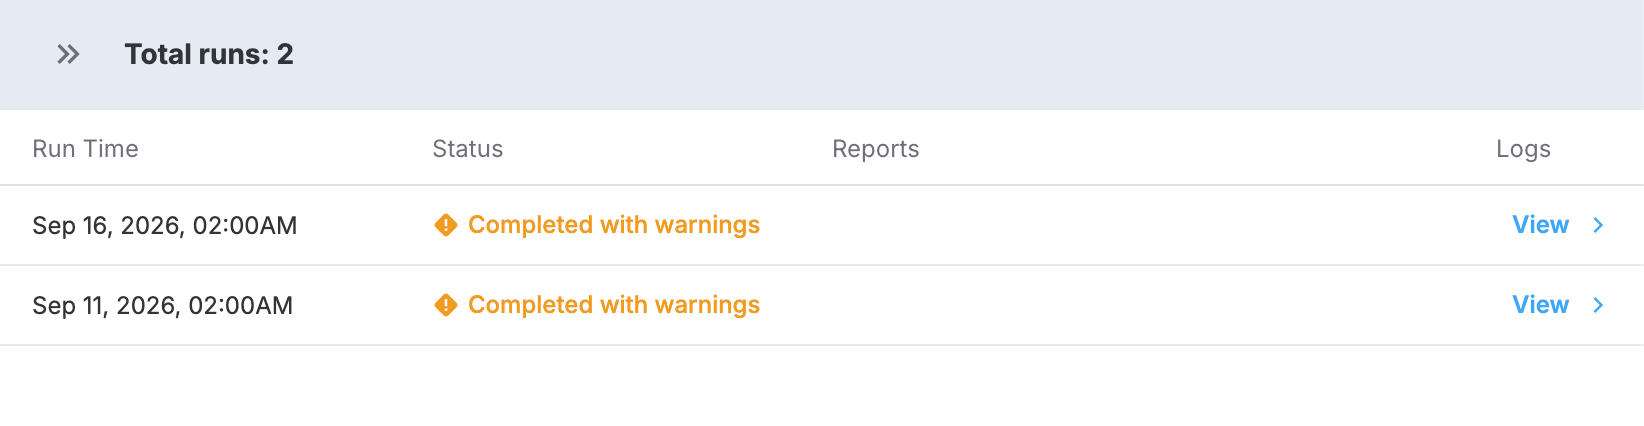
Run details
Run statuses
Each run has one of the following statuses:
- Success: The report was generated and delivered to all recipients.
- Completed with warning: The report was generated but didn't reach every recipient, or there was no data or no recipients available. The logs show which deliveries succeeded and which failed.
- Failed: The report couldn't be generated, and nothing was delivered.
A failed run or a run completed with warning doesn't stop the schedule. The schedule keeps running at its set frequency, and the result is recorded in the run history. No failure notification is sent, so check the Runs column to notice any issues.
Edit or delete a schedule
In the schedules list, each schedule has edit and delete options in the Actions column:
- Edit (): Opens the schedule panel with the current values of the schedule. The selected report can't be changed. To schedule a different report, create a new schedule.
- Delete (): Opens a confirmation dialog. When you confirm, the schedule and its run history are deleted. The report itself isn't affected.
Editing and deleting user permissions are similar to those for creating a schedule. See Access and ownership to learn more.
Updated 16 days ago